Whether you want to expand the storage space of your PC or want to get Windows moving with a fast SSD: Replacing a hard drive has many advantages. But it's not that simple: in order to benefit from the new disk, you first have to transfer the data from the old to the new disk. We'll show you how to do it easily and without reinstalling Windows.
Replacing the hard disk: Preferably with a USB adapter
The most efficient way to swap your hard drive under Windows is if you can connect the new drive to the computer via USB . In this case, you can choose to clone the current system or targeted individual hard disks and partitions to the new hardware without losing your data. To do this, you need an adapter that can be bought for a few euros. If the new hard drive is a 2.5-inch model or an SSD, a simple SATA-to-USB adapter , which you can purchase for around 10 euros , is sufficient .
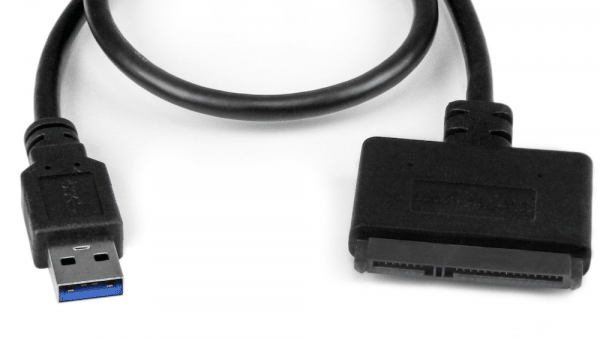 A simple SATA to USB adapter makes it possible to connect a 2.5-inch hard drive to the PC. (Source: Startech / Amazon.com)
 It gets a little more complicated with 3.5-inch hard drives . Since these cannot be supplied with power via the USB connection, you need a suitable housing in order to be able to use them as an external disk. Here, too, there are a number of solutions to be found at electrical retailers. A corresponding hard drive USB adapter with integrated power supply is available from around 20 euros..
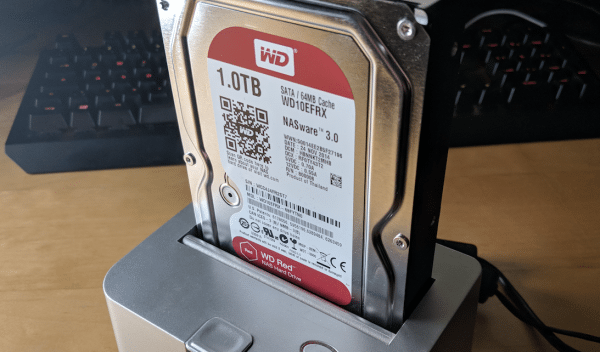 Desktop hard drives require an adapter with an integrated power supply so that you can connect them via USB.
Important : If you connect a new, empty hard disk to your PC via USB, you must initialize the disk before the cloning process . Only then do programs recognize the disk and make data migration possible. To do this, use the Windows disk management .
To open it, press the key combination [Windows] + [R] and enter the command diskmgmt.msc . The data carrier initialization now automatically recognizes a new hard disk and offers you to initialize it. Confirm this with a click on " OK ". You don't have to do anything else here, we do the rest in the actual cloning process.
 In order for cloning via USB to work, you have to initialize the new hard disk once.
 Transfer Windows installation to new hard disk
The most efficient way to move your Windows installation from the old to the new hard drive is to clone the hard drive . All data and partition information is transferred from the old to the new hard drive so that you can continue working with it immediately after the replacement. There are a number of hard drive cloning programs available. In the example we use the test version of Easeus ToDo Backup , which offers an optimized function for Windows migration. In contrast to "normal" cloning (see next section), Easeus ToDo Backup ensures that boot sectors etc. are transferred cleanly during system cloning.
Note: When downloading, make sure that you do not load the free version of Easus ToDo Backup, as it no longer contains the "Clone Operating System" function..
This is how you do it:
1st step:
 Download and install the free version of Easeus ToDo Backup . The program works equally well on Windows 7 , Windows 8 and Windows 10 . Connect the new hard drive to the PC as described above and initialize it. Then start the program and click on " System Clone " in the menu bar on the left .
 2nd step:
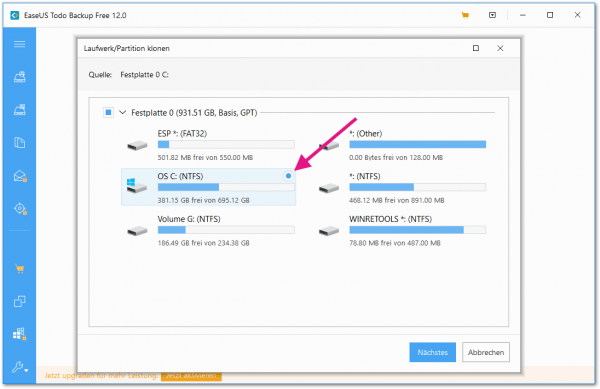 Easeus ToDo Backup selects the Windows hard drive automatically , you just have to specify the destination . Find the initialized hard drive in the list and mark it with a dot . Note: Make sure that you get the correct disk, as all data that may be present will be deleted during cloning!
 3rd step:
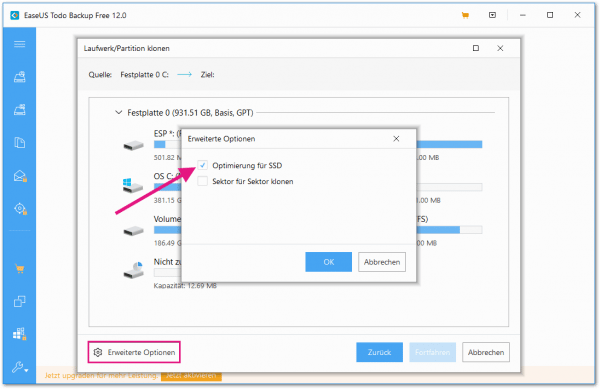 Are you copying Windows from an HDD to a lightning-fast SSD ? Then you should click on “ Advanced Options ” and tick “ Optimization for SSD ”. However, you should only activate the “Clone sector by sector” function if the hard disks are of the same size. The reason: If the option is activated, ToDo Backup sets the same partition size for the new hard disk as on the old one. If everything fits, you can start cloning . Simply click on " Next ".
 4th step:
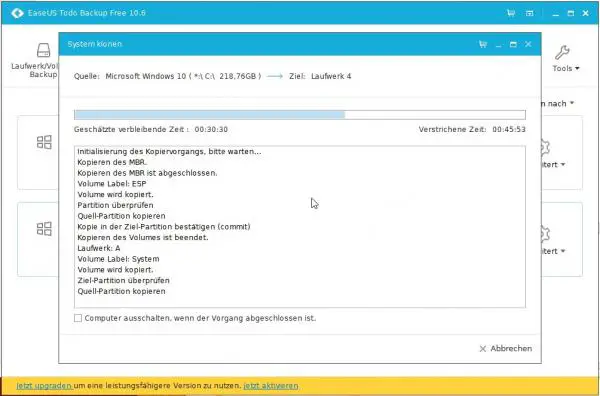 Easeus ToDo Backup now begins directly with the transfer of the data to the new disk. You now have to wait some time until the process is finished. You can then replace the old hard drive with the new one and continue to use Windows without reinstalling.
 Clone non-system disks with ease
In addition to the system disk, there are often other hard disks, especially in desktop PCs. If these are full and you want to replace them with larger hard drives, that's no problem either. We use the free Easeus ToDo Backup again, but the procedure is slightly different.
1st step:
 First connect the new hard drive to your PC using a USB adapter and initialize it as shown above. Now start Easeus ToDo Backup and click on the “ Clone ” button on the start page in the menu on the left .
 2nd step:
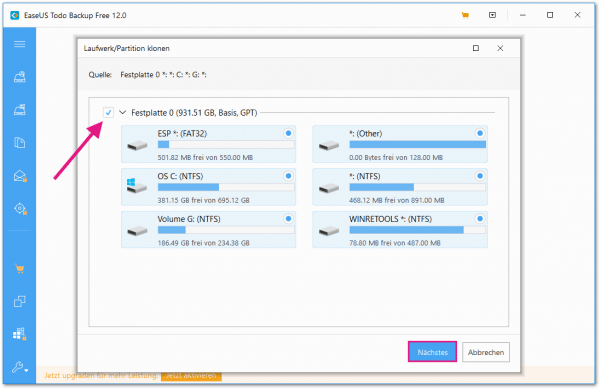 The first step is to select the source hard drive . If you check the entry for the hard disk in the overview , ToDo Backup not only copies the data but also the partitions to the new disk. In this way, you can continue working one-to-one after replacing the plate. If you only want to clone a single partition to the new disk, simply mark it in the overview.
 3rd step:
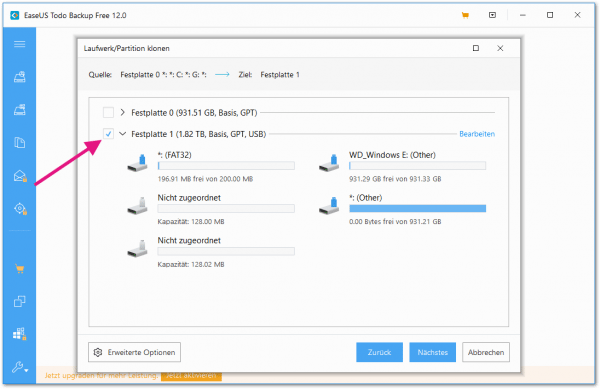 After clicking on “ Next ”, you have to select the target disk . To do this, simply look for the connected, empty hard disk in the overview and mark it.
 4th step:
 Before you start, you should click on " Edit ". ToDo Backup now shows the " Layout after cloning " button . Here you determine how big the partition will be on the cloned hard drive. By default, the program adopts the size of the old disk and leaves the rest unused. To change this, click in the graphic on the right edge of the rectangle that symbolizes the old plate. Now "drag" the box to the right with the mouse button pressed to allocate more space to the cloned partition. In order to utilize the full capacity of the new plate, draw the rectangle over the full length to the right. If everything fits, click “ Confirm ” to start the cloning process. As soon as the copying process is complete, you can replace the old hard drive with the new one and continue working immediately.
 Replace hard disk
The actual replacement of the hard disk requires the use of a screwdriver . How it works depends primarily on your hardware: on a laptop, for example, you have to loosen the screws on the back to access the hard drive. Now you can swap the 2.5-inch hard drive for a larger model or an SSD. For desktop PCs, remove the side panel and screw the new plate into the corresponding suspension. If in doubt, the instructions from the PC or housing manufacturer will help you continue with the exact steps. If everything worked during the cloning, Windows should start from the new hard disk without any problems or recognize the data on the expanded disk directly. It is possible that Windows will ask Microsoft to reactivate it after changing the disk . Experience has shown that this works without any problems because the rest of the PC has not been changed.
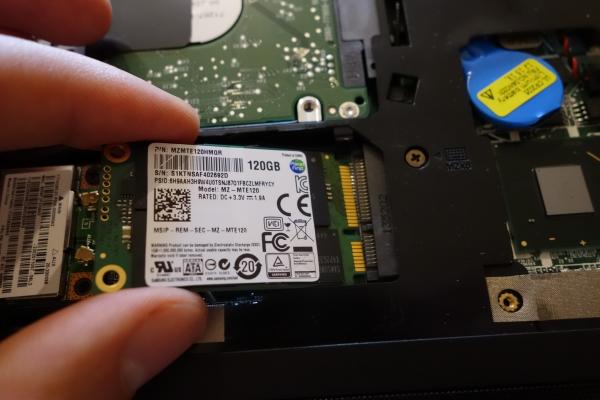 The installation of a new hard drive or SSD is usually not rocket science.