How to create a PowerPoint template 1st step: 2nd step: 3rd step: 4th step 5th step: 6th step: 7th step: 8th step: Overview of other functions Design fonts and colors Create placeholders Quick guide: Create a PowerPoint template
If you want all your slides to appear uniformly with the same fonts and images in the layout, you can make these settings in one place in PowerPoint - the slide master. Any changed setting for the layout is inserted on all slides and you do not have to laboriously edit each slide individually. In the following article, we will explain to you how to use templates correctly with the slide master in PowerPoint.
How to create a PowerPoint template
In our instructions we will show you an example of a slide template in which we can adapt the heading and insert our logo. There are of course no limits to your imagination when creating a presentation. Follow our step-by-step instructions or take a look at the brief instructions .
1st step:
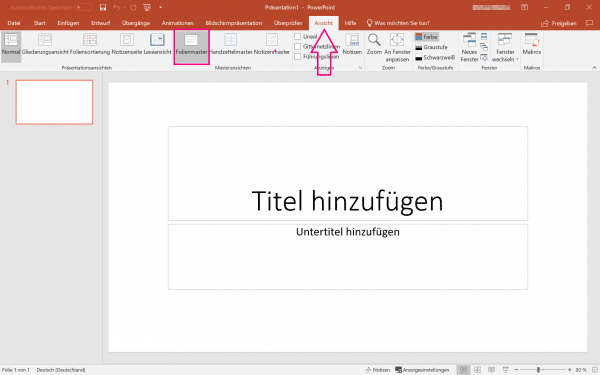 Open PowerPoint and click first on the menu bar, click " View " and then under the ribbon, " Master Views " on " Slide Master ".
2nd step:
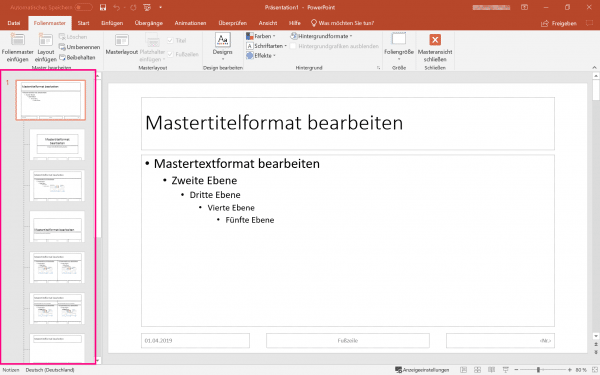 You will see that the left area has changed. Instead of the current slide, you will now see the slide layouts . In the scroll bar, select the top slide layout - the slide master . The subdivided slides are the individual slide layouts for different formats, such as text and image or two-content layouts. Every setting that you make on the slide master is applied directly to the associated slide layout.
3rd step:
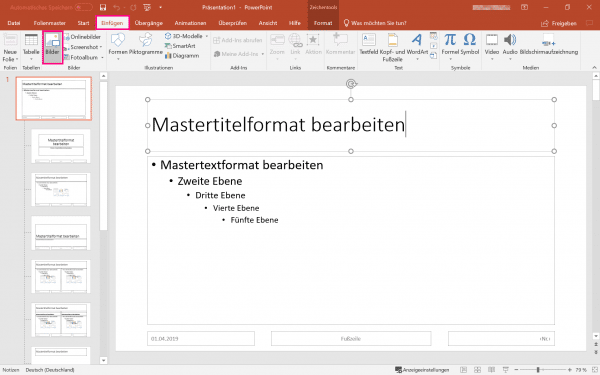 In our example presentation, we are adding our logo to the top right in the master title field. To do this, we go, as usual, via " Insert "> " Pictures " and select the picture. The picture is initially inserted in the middle, but can easily be moved to the desired location with the left mouse button.
4th step
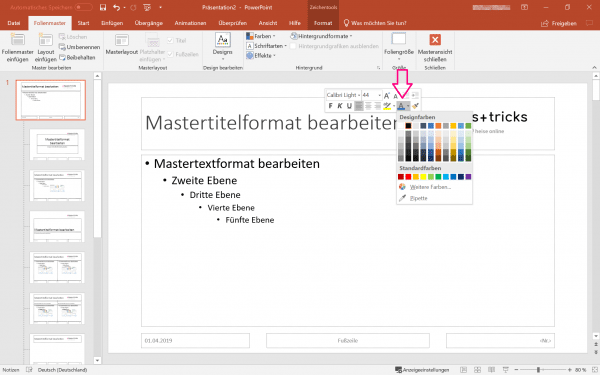 In a further step we adapt the font color of the master title. To do this, select the text and click the right mouse button. Click the Font Color icon and select a font color you want . Here, too, the font color changes on all slides .
5th step:
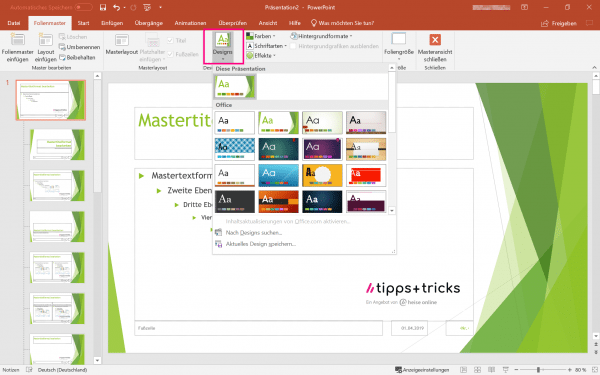 Another way to change the look and feel of your presentation is through designs . To do this, click on " Designs " in the menu ribbon and select any design. Note that the font color is of course updated according to the design.
6th step:
 Feel free to try out a little until you have found a suitable design and layout for your needs. We opt for this self-made design.
7th step:
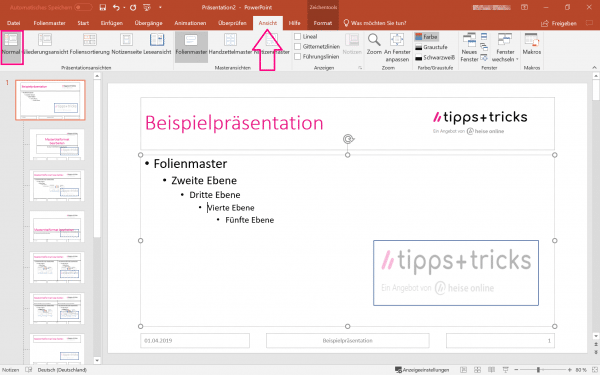 Now switch back to the normal view via " Presentation Views "> " View "> " Normal ".
8th step:
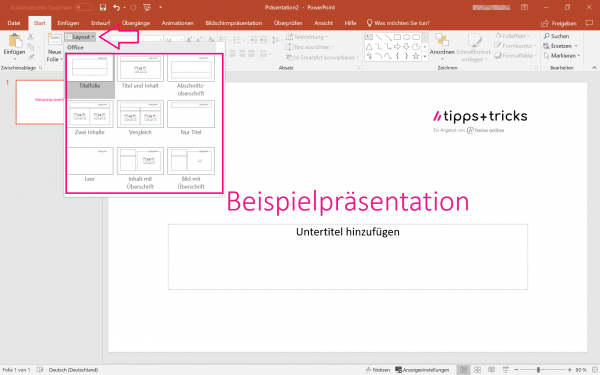 The layout of the slide master is now adopted by default for all newly inserted slides . To insert a new slide with the desired appearance, go to " Layout " and select the slide layout that you have previously updated in the slide master view. You can now adjust all of your slides on top of it and no longer have to change each slide individually.
Tip: You can find out how to insert transparent images into your presentation here..
Overview of other functions
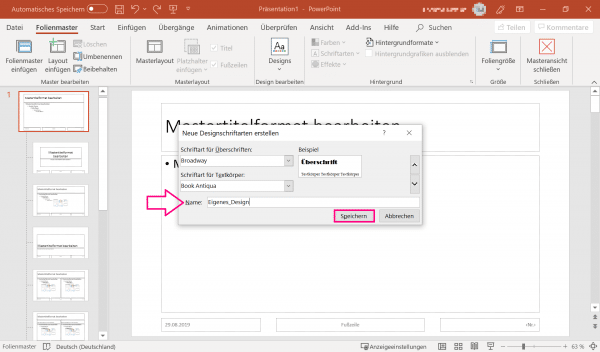
Design fonts and colors
There are automatic functions for changing fonts and colors in the slide master, which make handling easier and save valuable time.
For the indiviuelle customization of fonts click the " Slide Master " to " Fonts " and "then adjust fonts ". In the newly opened dialog window you can then select your desired font for headings and text bodies. Enter the title of your font package in the " Name: " field and then click on " Save "..
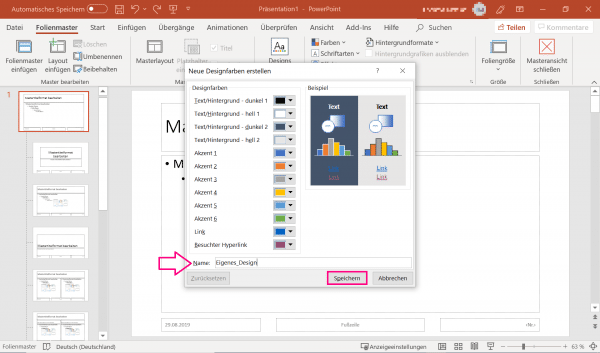
You can do the same for background and accent colors. To do this, go to " Colors " in the " Slide master " tab . Here you can define 12 different colors / nuances for different functions and elements. Enter the title of your design colors in the " Name: " field and then click on " Save ".
Create placeholders
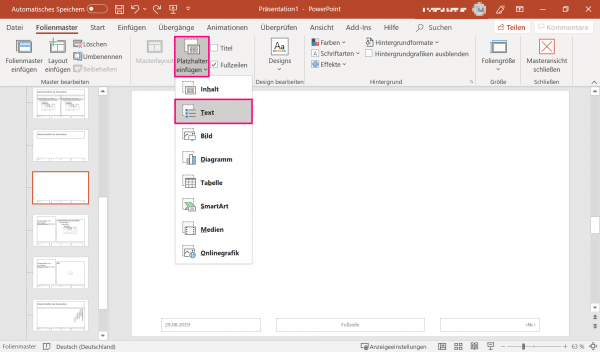
Placeholders determine which elements are in which position on your slides. In this way you can assign a fixed position to running texts, lists, images, sound and video elements . Select the slide that you want to insert a placeholder on. On the top ribbon, click Insert Placeholder . Please note that the slide master must be activated. In the drop-down menu you can now choose the appropriate element type and place it on the slide .
Quick guide: Create a PowerPoint template
- Change the view with " View "> " Slide Master ".
- The left area has now changed. Select the top slide layout - the slide master.
- Insert images / fonts / placeholders ... as desired.
- You can use pre-made designs from Microsoft via " Themes " in the ribbon .
- Change the view back via " View "> " Normal ".
- Insert new slides via " Layout " or adapt your old ones by marking them and changing the layout accordingly via the " Layout " option in the ribbon.