Along with Ubuntu, Linux Mint is one of the most popular desktop Linux distributions, especially among those who have switched to Windows. Unlike Windows, however, a new version comes onto the market about every six months. Here you will find all the necessary steps including data backup.
Back up data and software
As usual with Linux, there are several ways to upgrade. Either you do this via the package manager or via a new installation medium . The package version sounds simpler at first, because basically everything takes place in the terminal - but as soon as something doesn't work, it gets complicated. The safer method runs on a boot medium - with the great advantage that you can try out the new version first before you actually install it. In addition, this is also the officially recommended variant - so we go this way. Before you start: Start the update manager and update the system if necessary .
The first thing you should do is your save personal data as well as your software compilation . Linux Mint provides the excellent " Backup Tool " for this, which you can find in the " Administration " area in the start menu .
- First click on the " Backup files " button to start the data backup. You could select the entire system (root) or specific folders as the source , but your user folder would generally make sense . An external hard drive or a network drive is then suitable as a backup destination . In the " Output " field you should select " .tar.gz file " to create the backup as a compressed archive. All other settings can remain as they are.
- In the next dialog you can add exceptions, i.e. folders and files that should not be backed up. Here, for example, large media files or directories that were only intended for playing around are ideal.
- Now start the file backup and then call the backup tool again .
- This time select the " Backup software selection " function and then set the destination again . In the following window you will see a long list with all installed packages - not just those that you installed manually, but all of them. If something should not be saved, simply remove the check mark .
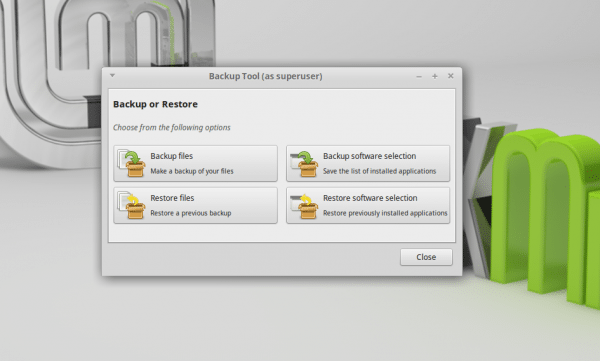 Backing up and restoring is child's play with Mint's own backup tool.
 Create mint start medium
Now you need to create a boot medium from which you can boot the new Linux Mint version. For this you need a USB stick with at least 2 gigabytes of storage space and the Unetbootin program.
- First download the Linux Mint image you want.
- Now you have to install Unetbootin and the required service extlinux (otherwise Unetbootin annoys with an error message): sudo apt-get install external unetbootin
- Now call up Unebootin . In the single window, enter the downloaded ISO file under " Disk Image " and then select the inserted USB stick . Caution: There are no names here, only the system-internal abbreviations. If only a USB data carrier with one partition is inserted, it should appear as " sdb1 ". If in doubt, you can look in the terminal with the command " lsblk ". Then start the writing process .
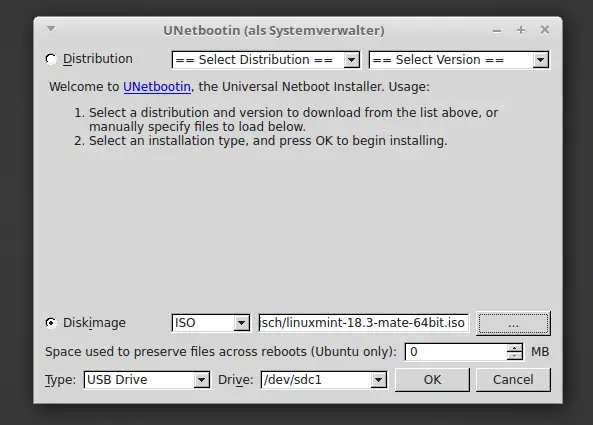 Unetbootin writes images to USB sticks, including its own boot menu.
Alternatively, you can burn the image to a DVD and boot from it..
Test and install Mint
Now you can start the new Linux Mint, try it out and, if you like, install it. Prerequisite: the computer really boots from the stick. And for this, the boot order may have to be changed, which you do in the EFI or, in the case of older computers, in the BIOS. If you have burned a DVD, this step is not necessary.
- First you have to make sure that the computer boots from the stick and, if necessary, set the boot sequence. On almost all computers, the BIOS can be called up with [DEL] when the computer is started - in a very short time frame (here you will find a table with the corresponding shortcuts from the respective manufacturers). UEFIs can also be reached via an abbreviation at the point, usually [F2] . Usually, the mainboard manufacturer also shows the abbreviation, very briefly, in the picture. Look here for the boot options and there for the order and put the USB stick all the way up there . If no stick is plugged in, the computer booted as usual.
- As soon as the computer starts from the stick, an Unebootin-specific start menu appears and you can boot Mint .
- Now take a look around the live Linux - does everything work? Do you even like it? If so, start the installation from the shortcut on the desktop .
- During the installation it is suggested by default to install the new Mint next to the existing Mint - change this to " Erase hard drive and install Linux Mint ". At this point it becomes clear: This official upgrade route is a pure reinstallation with subsequent restoration of data and installed software. Mint considers this route to be more reliable for non-Linux professionals.
- The installation routine, you can largely simply click through and accept the default options - but read carefully and update it you should naturally already! In addition, only the user account has to be set up again. The old username is a good choice here, in case you have used it in any configuration.
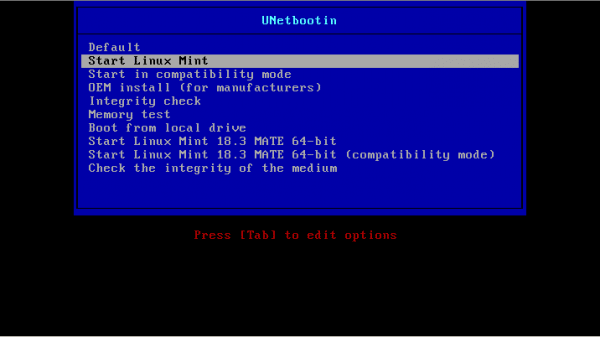 Unetbootin comes with its own boot manager, which makes installation easier.
 Recover data and software
After the reinstallation, the restoration is still missing - otherwise it would not be a real upgrade. The process is very simple: Open the backup tool again and this time use the restore buttons instead of the backup .
This means that Mint is up to date, your software is available again, and so is all your data - provided that you really haven't forgotten anything during the backup..
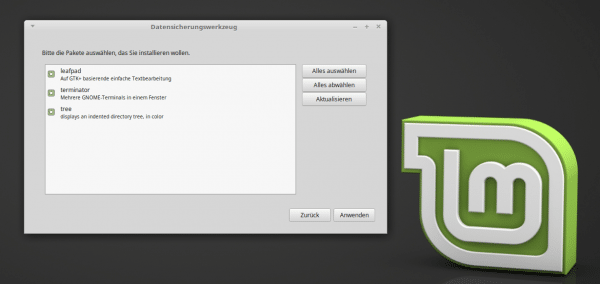 You can completely restore the old system using the backed up software sources.