For example, if you enter "heise.de" in the browser, the IP "193.99.144.80" is actually called. Computers on private lines are often assigned a new IP for new connections. So a detour has to be found in order to be able to access your changing IP address with a fixed name. This detour runs via DDNS. Find out what it is and how to set it up for free here.
What is DDNS?
If DNS and IP addresses don't tell you much, try the following: Enter "heise.de" in the browser and "193.99.144.80" in another tab. In both cases you will see the same page. The Domain Name Service (DNS) is responsible for this. This is a kind of phone book: You look up the name and get the number - only it's not the last name and telephone number, but the web address and IP. Of course, this only works if the IP address always remains the same.
But since you regularly get a new IP address from your provider at home, this is of course not possible - and you will hardly want to write down the IP address every time. A new IP is often given with new connections, for example after restarting the router, or at regular intervals. How often varies from provider to provider - but you shouldn't rely on a permanent IP. The second "D" in DDNS stands for Dynamic and is the simple solution: A small program runs at home that regularly informs the DDNS provider of your current IP address (DDNS client). And the provider then links this to a web address of the type "meinkonto.ddns-dienstleistungen.com".
So you can type "meinkonto.ddns-dienstleistungen.com" into a browser from anywhere in the world and you will be forwarded to your home network. But what then? Then you stand at the gateway to the router - but where you tend not to want to go. So you still have to tell the router what to do with this request from outside. This means that you set up a forwarding: The router receives the request and forwards it, for example, to your NAS or your normal desktop computer. There, of course, services that can be used via the browser must run there, for example a web server, the surface of a NAS or a media center. You can also set up several forwardings on one and the same computer,For example, to remotely access both the surface of the NAS and the media center running on it. This works via so-called ports, more or less house numbers for the various services on one computer. For example, normal websites are delivered via port 80, which you can easily test again: "heise.de:80" shows the normal heise website again - the port specification ": 80" is simply assumed as the standard, unless otherwise specified will. Most media center or NAS interfaces, on the other hand, are accessed via port 8080, i.e. in the home network something like "nas.fritzbox: 8080".For example, normal websites are delivered via port 80, which you can easily test again: "heise.de:80" shows the normal heise website again - the port specification ": 80" is simply assumed as the standard, unless otherwise specified will. Most media center or NAS interfaces, on the other hand, are accessed via port 8080, i.e. in the home network something like "nas.fritzbox: 8080".For example, normal websites are delivered via port 80, which you can easily test again: "heise.de:80" shows the normal heise website again - the port specification ": 80" is simply assumed as the standard, unless otherwise specified will. Most media center or NAS interfaces, on the other hand, are accessed via port 8080, i.e. in the home network something like "nas.fritzbox: 8080".
So again briefly: You need a DDNS provider for the translation of the web address to the respective IP address, a DDNS client for the updates and a port forwarding..
DDNS for free via FreeDNS
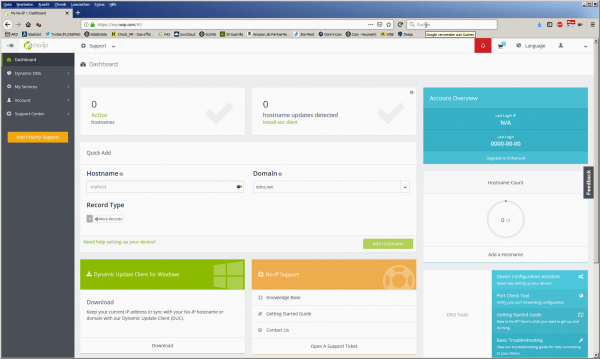
FreeDNS is a very simple DDNS provider and, above all, one of the few that still offer a full-fledged free service. The NoIp.com service is often touted in this context. This is a bit fancier on the website, but the free accounts must be confirmed every 30 days, otherwise they will expire. With FreeDNS, the status of an account only goes into a kind of pause mode if there are no updates or logins for 6 months.
Step 1:
So sign up for a free account at FreeDNS ..
Step 2:
Go to the " Subdomains " area and create a link using the " Add " button.
Step 3:
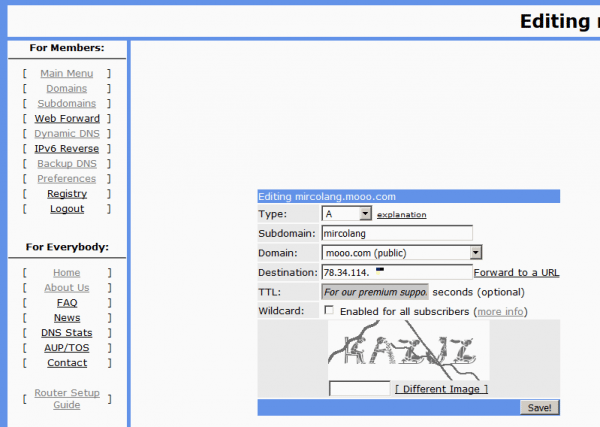
Choose any name as " Subdomain " and any entry from the list for " Domain ". This then results in the web address in the form "Subdomain.Domain". Any combination that you can easily remember - for example "mircolang.mooo.com". Well, you should perhaps adjust the subdomain part ... You can leave the other specifications as they are , although your current IP address should already be entered correctly under " Destination " . If in doubt, you can easily check this on the Ifconfig.me page .

Step 4:
Now download a DDNS client. You can find a choice if you search for Dynamic DNS or Dynamic DNS Clients . For Windows, the first choice FreeDNS Update is the recommended client.
Step 5:
Start FreeDNS Update , log in with the FreeDNS data in the " Settings " tab and call up the subdomains you have created using the " Get Domain List " button .
Step 6:
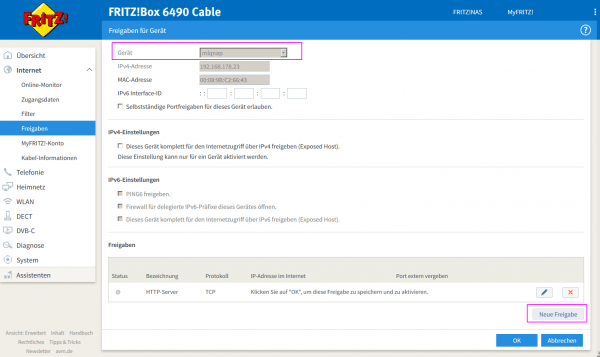
Now call up the interface of your router , navigate to the port shares , for the Fritzbox, for example, under " Internet / Shares " and create a new share for the desired device, e.g. your NAS.
Step 7:
Now set up the actual port forwarding : For a typical NAS or Mediacenter interface, select " HTTP Server " as the type , " TCP " as the protocol, " TCP " as the port / port range for the device. 8080 to 8080 "(so that only this one port is addressed) and as an external port" 8080 ". If you set the external port to 80, you do not have to specify it later in the browser. Save your settings.

Step 8:
Now call up your FreeDNS address and port in your browser , for example "mircolang.mooo.com:8080". Now the surface of NAS, Mediacenter or whatever should appear. In this scenario, the FreeDNS client runs on the Windows computer - this is certainly not suitable for everyone. On the FreeDNS homepage there are clients for all sorts of other systems, but the most plausible should be the operation directly in the router - after all, it is always online. Unfortunately, this is not the same on every device, albeit similar. You need a username , password , the created web address and an update URL
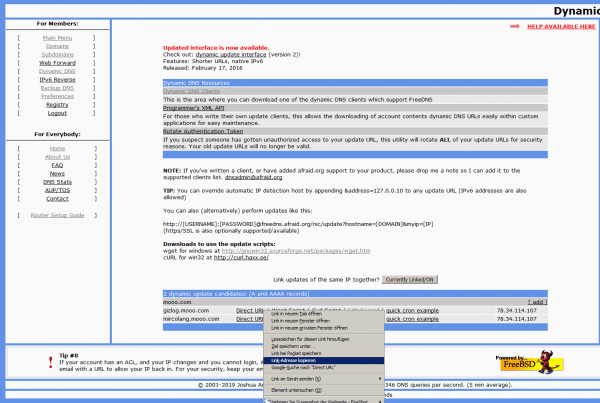
. The update URL can be found on the FreeDNS page under " Dynamic DNS ". There you will see a list of the subdomains you have set up and a link " Direct URL " for each entry . Save this link address with a right click.

With the Fritzbox you can now enter this data under " Internet / Shares / DynDNS ", for example , if you select " User-defined " as the service provider . It looks very similar with other manufacturers.
Other DDNS services
The above route is pretty universal - but there are of course other routes as well. Probably the most popular way is via the Fritzbox itself, because AVM offers DDNS under the name MyFritz. That is reliable, but not everyone necessarily wants to use AVM's own offers for DDNS. Also read our article on FritzBox remote access.
Many better NAS also offer corresponding services, such as QNAP and Synology. How exactly this works depends on the manufacturer app. With QNA, for example, you can alternatively access the NAS interface directly from the QNAP homepage, if you prefer. But basically the same thing always happens in the background: Your changing home IP address is linked to a web address and dynamically kept up to date.
