Hard disks are usually so large that it is worth dividing them into several drives / partitions. With the standard tool GParted, you can use Linux to freshly divide new disks, enlarge existing drives, free up storage space or even rearrange the entire system.
Note : It takes seconds to create new partitions, enlarging / reducing or moving partitions can sometimes take hours if large amounts of data are being shifted on a slow HDD hard drive. So if in doubt, it is better not to plan for the lunch break! Canceling partitioning tasks is not a good idea and is almost guaranteed to cause problems.
The right Linux distribution
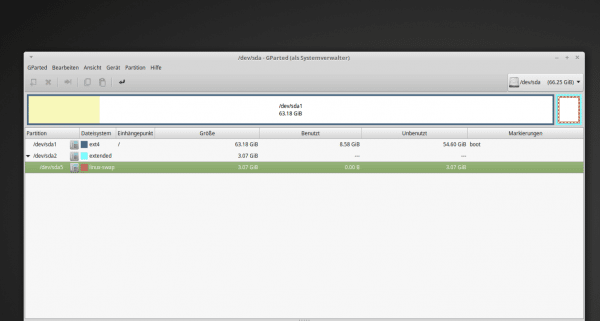
Before we get to the practical part, here is some information about typical Linux partitioning , i.e. the division of the operating system itself. By default, most Linux distributions set up two partitions , let's take the popular Linux Mint as an example : One partition for the operating system and your data and a so-called swap partition as a swap file. Data ends up in the swap partition when there is no memory space for it. (On Windows, the equivalent is the "pagefile.sys" file.)
The first partition is formatted with the " ext4 " file system , the swap partition with " linux-swap ". The partitions are named " sda1 ", " sda2 " and so on (or " hda " if it is HDD hard drives). "Sd" describes a normal connection of an SSD disk via IDE, "a" stands for the first hard disk and the final digits simply number the existing partitions. Numbers 1 to 4 refer to primary partitions. These are bootable and there can only be four of them per disk. If further partitions are required, an " extended partition " can be used,which is not bootable and any number " Logical Partitions ". Therefore Linux Mint looks like this by default: A primary partition sda1 for the system, an extended partition sda2 and below that the logical partition sda5 for the swap.
The last important info : For partitions that you can access directly from your Linux, there is always a " mount point ", or " Mount Point called" next to the name. The system partition "sda1" is mounted as "/", i.e. on the lowest folder level. "/" corresponds in the hierarchy to "C: \" under Windows. In contrast to Windows, partitions and drives under Linux are not attached via letters, but via paths . You can mount additional partitions in the "media" folder, for example, so that they can then be found in the file manager under "/ media / username / My-USB-Stick"..
 Typical partitioning after a standard installation.
 When installing a Linux system, however, you can deviate from the default. You will find an alternative for pretty much every installation routine of a distribution: You can have the "home" directory created as a separate partition . And so should you! The two big advantages: All your personal files and settings are in the home directory. And if the system is set up again at some point, the separate home partition is not touched, your data is retained without having to create backups and restore them. And secondly, the home partition can be easily transferred to other data storage media if space is tight. The only "disadvantage": For laypeople, a third partition may be "complicated" during installationworks...
Partition hard drives
First of all, you need to install a partition manager - and this is where GParted is the default. By the way: Even when installing Mint & Co., the partitioning part is done with GParted. Start GParted and enter the admin password when asked . The first important button can be found at the top right: Here you can select the hard drive that you want to partition. The first disk, ie " sda ", is displayed here by default.
Below you can see the representation of the partitions as a graphic and as a list. To select a partition , click either on a list entry or the element in the graphic. If you want to set up a new, empty hard disk, you will only see a gray area with the label " not allocated " and you will first have to use the "Device" menu to create a partition table . After that, the picture does not change, but only now does the actual partitioning functions work..
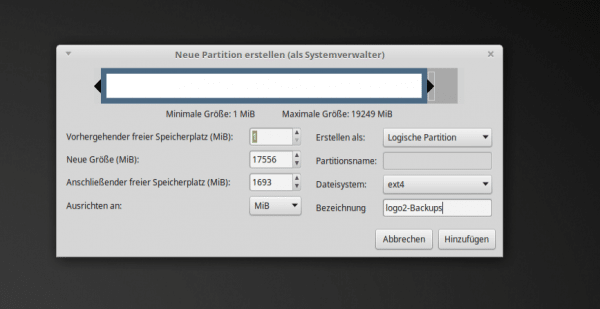
 In the dialog for new partitions you can work with numbers or the mouse.
 To change an area, open the context menu of the desired partition and select the desired function. For a new disk, this would be the " New " action to create a partition. In the following dialog there are all sorts of settings to be made. Firstly set the size determined by selectively adjust the graphic display using drag and drop or specify a final size. As soon as the partition is smaller than the entire disk, you can even move it back and forth, i.e. place it at the beginning or the end of the total storage space. (This might be useful to optimize access, but you can safely ignore the placement.)
In addition to the size, you also specify whether it should be a primary or an extended partition . If it is an extended partition, you must then create additional logical partitions in it. You will remember: Extended are quasi containers for logical partitions. If you get by with four partitions, just leave the default value, Extended .
Last but not least , you assign a (meaningful) name and determine the file system , usually " ext4 ".
If you would like to delete, move, or enlarge / reduce existing partitions at a later date , you can do this using the Context menu - you already know all the settings from the dialog for creating a partition. When you have finished with all operations, you still have to activate them using the button with the small back arrow (like on the Enter key) ! All partition managers do it like this: Everything you set in the way of settings only appears in the program interface. It will only be implemented after confirmation.
Partition the system drive
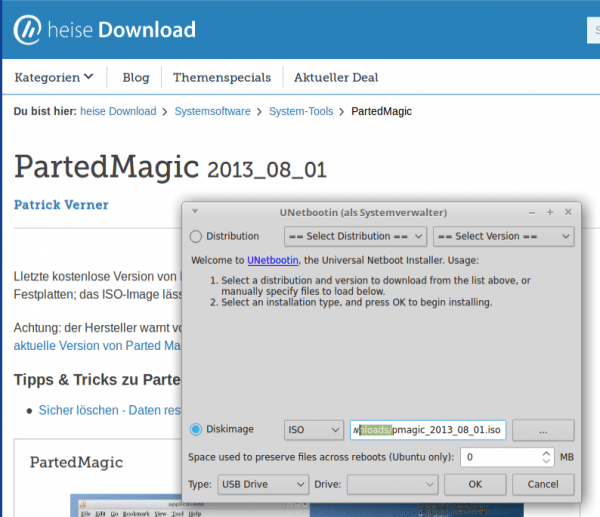
There is one special feature to note : GParted cannot partition the system hard drive on which Linux and GParted run themselves. Fortunately, Parted Magic also has the right live distribution. Attention : The current versions of Parted Magic are chargeable - the last free version can be downloaded here from us: www.heise.de/download/product/partedmagic-92431. And of course it works perfectly.
You can either burn the downloaded ISO image onto a CD or onto a USB stick using Unetbootin. How exactly this works with Unetbootin and how you then boot from the USB stick can be found in our article on the Linux Mint upgrade - but it also applies to Ubuntu and other distributions.
 With Unetbootin, Parted Magic comes onto the USB stick.