“The iPhone / iPad / iPod [device name] could not be registered. An unknown error has occurred (-54) ”.

This alert message may appear when you try to sync your iOS device with iTunes. When the error message appears, you are prevented from continuing the process. In the majority of cases, the process takes place with a click of “ OK ”. However, in some cases it does not work..
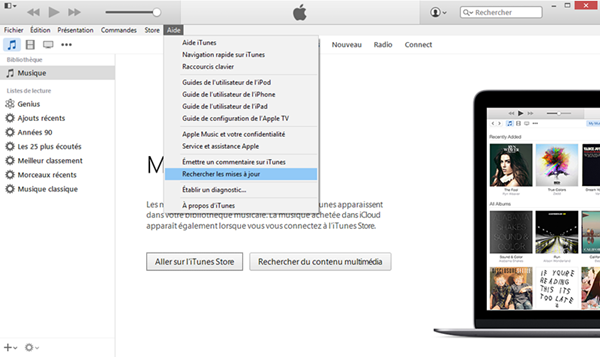
Method 1: Update your iTunes / iOS device to latest version
The start of releasing a new version of iTunes or an iOS operating system is to bring new features and fix previous bugs. Although it is unknown that iTunes error 54 is caused by system bug, you had better upgrade your iTunes to latest version and iPhone / iPad / iPod to latest iOS.
iTunes: Launch “ iTunes ” on PC and go to “ Help ”> “ Check for Updates ”> “ Download iTunes ”..
IOS device: Open “ Settings ”> “ General ”> “ Software update ”> “ Download and install ”.
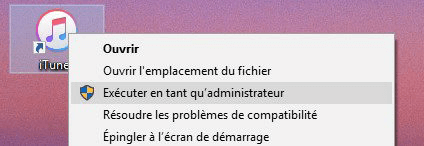
Method 2: Run iTunes as administrator
If you are not using your computer as an administrator, you may not be able to try some functions or access some programs. Hence, it is worth trying to open and run iTunes as administrator..
Step 1. Locate iTunes on your computer or find it with the menu panel.
Step 2. Right click on the “ iTunes ” application .
Step 3. Select “ Run as administrator ”.
Method 3: Remove PDF files from the process
You probably wouldn't know that PDF file is not supported on iOS device if you sync PDF files from computer to iBooks on your iPhone / iPad / iPod.
The current book file supported by iDevices is an ebook file format with the extension .equb. So, you'd better convert PDF files to EPUB files before you start syncing with your device.
Method 4: Sync a small number of files at a time
If you sync a large amount of content at the same time through iTunes, the process might also fail because it is a burden for both the computer and iTunes to run too many files at a time. So, I suggest you cancel the process and sync a small amount of data at once.
Method 5: Check out third-party security software
If third-party security software is running on your computer, it could probably prevent applications from giving instructions on a computer.
It may interfere with the syncing process between your device and your computer. Therefore, you will need to change the configuration of your security software and see if that helps.
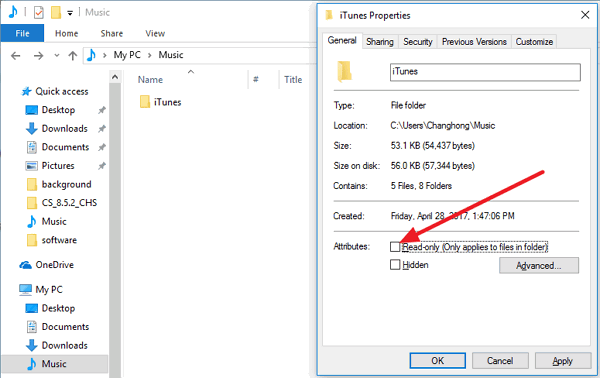
Method 6: Deselect Read-only on iTunes folder
The data you sync with iTunes will be downloaded and stored in the “ iTunes ” folder . If it is configured as " Read only ", new data may not be written to the folder, so you should check if it is a problem with the " iTunes " folder .
Step 1. Follow the steps to find the “ iTunes ” folder .
Windows 7 or later: Open " Disk C "> " Users "> " Username "> " My Music " / " Music "> " iTunes ".
Mac: Make sure you're in Finder. From the menu bar at the top of your computer screen, choose " Go "> " Home "> " Music "> " iTunes ".
Step 2. Select “ Properties ” at the bottom.
Step 3. Apart from the title " Attributes ", uncheck the option " Read only ".
Step 4. Click “ OK ” to save the change.
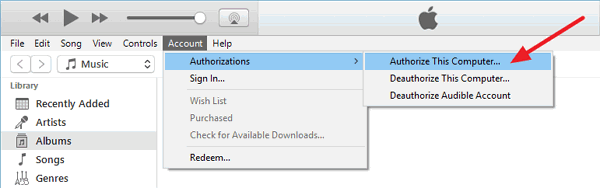
Method 7: Authorize your computer
If you are unable to sync your iDevice with iTunes and the alert messages appear, it could probably be due to your computer's invalid authorization with iTunes.
You should know that as private and personal for data sync, the iPhone and the computer you are using should be authorized by iTunes.
For iOS devices, authorization is performed when you press " Trust " to trust this computer. For a computer, you must follow the instructions to authorize it.
Step 1. When you connect your iDevice to iTunes, click “ Continue ” when prompted to allow this computer to access information about [device name].
Step 2. Click on “ Account ” in the sidebar at the top.
Step 3. Select “ Permissions ” and then choose “ Authorize this computer ”.
Step 4. Re-enter Apple ID and password, then click “ Allow ”.