HTML tables are always useful when you want to present data in a clear form. Be it departure times, game results in sports or the results of a survey. You can use tables to provide a clear structure. If you use HTML for this, you have the advantage that others can admire your work in the browser without any problems.
A simple table
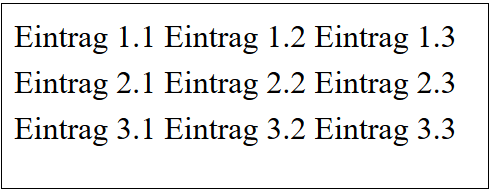
First of all, we would like to explain the structure of an HTML table to you using a small example . A table consists of a header , the table body , i.e. the actual content, and a table footer . The head and foot are optional and do not have to be used. However, the body is what really matters. Therefore we will limit ourselves to the table contents for the time being. The first thing to do is start the table with an element . Of course, this has to be closed again at the end of the table. The lines are located within this element. A table row is enclosed in an element . The actual data of the table are in
<table>
<tr>
<td> Eintrag 1.1 </td>
<td> Eintrag 1.2 </td>
<td> Eintrag 1.3 </td>
</tr>
<tr>
<td> Eintrag 2.1 </td>
<td> Eintrag 2.2 </td>
<td> Eintrag 2.3 </td>
</tr>
<tr>
<td> Eintrag 3.1 </td>
<td> Eintrag 3.2 </td>
<td> Eintrag 3.3 </td>
</tr>
</table>
table tr td Elements embedded. These are the individual cells. The above code would lead to the following result in a browser:
As you will surely see, the table is displayed line by line from top to bottom . Unfortunately, the standard display is not particularly appealing. That is why we will of course show you even more ways to design your table.
Tables with head and foot
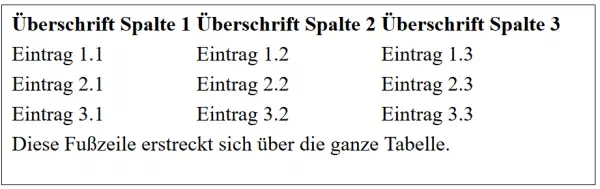
Now we will show you how to give your table a header with column headings and a footer . The head and foot are not that different from the body of the table. Here is our extended example table. The table head and foot each consist of a single line. Instead of the element, an element is used in the header to indicate that it is a header element . The browser often displays the table heading differently, for example in bold font, than the individual entries. The footer, on the other hand, is a single table cell with the attribute
 <table>
 <tr>
 <th> Überschrift Spalte 1 </th>
 <th> Überschrift Spalte 2 </th>
 <th> Überschrift Spalte 3 </th>
 </tr>
 <tr>
 <td> Eintrag 1.1 </td>
 <td> Eintrag 1.2 </td>
 <td> Eintrag 1.3 </td>
 </tr>
 <tr>
 <td> Eintrag 2.1 </td>
 <td> Eintrag 2.2 </td>
 <td> Eintrag 2.3 </td>
 </tr>
 <tr>
 <td> Eintrag 3.1 </td>
 <td> Eintrag 3.2 </td>
 <td> Eintrag 3.3 </td>
 </tr>
 <tr>
 <td colspan="3"> Diese Fußzeile erstreckt sich über die ganze Tabelle. </td>
 </tr>
 </table>
td th colspan="3" . This means that this cell takes up as much space as three horizontal cells - in other words, the cell fills a complete row . In this way, you can put information that is valid for the entire table in a meaningful way. The table looks a bit clearer now, but it is still not really nice.
Make tables appealing
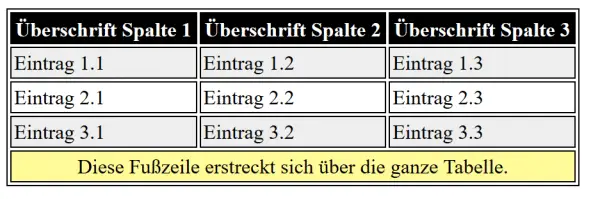
Now we want to use an example to show you how you can give your sample table an attractive appearance. You can of course use CSS for this . Store your styles in a stylesheet and give your table an attribute so that it can be referenced in the stylesheet. To style the table, we use the following CSS code: id
 <link rel="stylesheet" type="text/css" href="styles.css">
 <table>
 <tr>
 <th> Überschrift Spalte 1 </th>
 <th> Überschrift Spalte 2 </th>
 <th> Überschrift Spalte 3 </th>
 </tr>
 <tr>
 <td> Eintrag 1.1 </td>
 <td> Eintrag 1.2 </td>
 <td> Eintrag 1.3 </td>
 </tr>
 <tr>
 <td> Eintrag 2.1 </td>
 <td> Eintrag 2.2 </td>
 <td> Eintrag 2.3 </td>
 </tr>
 <tr>
 <td> Eintrag 3.1 </td>
 <td> Eintrag 3.2 </td>
 <td> Eintrag 3.3 </td>
 </tr>
 <tr>
 <td colspan="3"> Diese Fußzeile erstreckt sich über die ganze Tabelle. </td>
 </tr>
 </table
 table#Tabelle1 {
 border: 1px solid black;
 }

 table#Tabelle1 tr:nth-child(even) {
 background-color: #eee
 }

 table#Tabelle1 tr:nth-child(odd) {
 background-color: #fff;
 }

 table#Tabelle1 th {
 color: white;
 background-color: black;
 padding: 4px 4px 2px 4px;
 }

 table#Tabelle1 td {
 border: 1px solid black;
 padding: 2px;
 }

 table#Tabelle1 tr:last-of-type td {
 background-color: fffb99;
 text-align: center;
 }
In the first block we specify that the entire table should have a frame . In the second and third block, the lines are shown alternately in gray and white in order to be able to distinguish them better. Then we have the headings displayed as a contrast to the actual content with white letters on a black background . In the penultimate step, we give all table cells a frame . Last but not least, the text is centered in the last line, i.e. the footer, and is highlighted with a light shade of yellow . You can of course adapt your design to suit your taste.
Here you can see the finished end result: