If you delete files using the operating system, they are actually still there - Windows only removes the addresses, not the data itself. And with SSDs the rumor persists that you cannot really delete data at all. With our guide you can securely delete data from SSDs, HDDs, SD cards and USB sticks.
Why is data not deleted?
You can easily "delete" a file under Windows: Using the [Del] key or the context menu - however, the files then only end up in the garbage can. Then you have to empty the trash can, just like at home. Alternatively, the file disappears without going through the trash can using the key combination [Shift] + [Del]. But even then the data is still on the hard drive. Windows just removes the file's address..
Think of it as simply "deleting" people from their apartments: If you are looking for a "Peter Schmidt", look in the phone book - if his entry is cut out, Peter will no longer be seen. But of course he's still there! You could still find it by either gluing the cut-out part back together or just going from door to door and seeing if said Peter lives there. And it works the same way when deleting files.
Only when a new tenant moves into Peter's apartment is he really gone - and a file is only really deleted when the space where it was stored is overwritten. You have probably already deleted files from time to time that can be recovered accordingly. There is also another possibility to delete these correctly afterwards: You can simply overwrite the entire free storage space with random data. These are of course then deleted again themselves, so they do not take up any storage space. You can also find a step-by-step explanation of how to erase entire hard drives below..
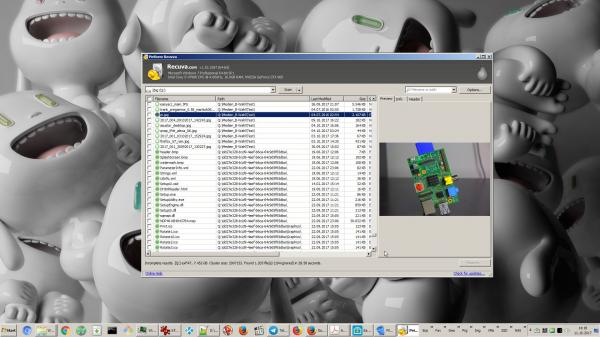 The problem: Assumed deleted files can be recovered using tools like Recuva.
 And then there is the special case of SSD: files cannot be overwritten on solid state drives as easily as on good old magnetic storage devices. Why? Because the operating system simply doesn't know exactly where individual files are. But here, too, there is finally a solution.
A small note in advance: Most tools can overwrite according to different methods / algorithms. Sometimes it is overwritten once with zeros, sometimes seven times with random data - but even simply overwritten data can at best theoretically be restored on modern data media..
Securely delete files under Windows with File Shredder
The free File Shredder tool is a good choice for deleting individual files or directories . The open source program Eraser is better known, but unfortunately it is not compatible with the ExFAT file system, which is increasingly being used on external data storage media. And this is how you delete with File Shredder :
- Download File Shredder e.g. B. at Heise Download.
- Select one or more files and right-click to open the context menu .
- In the dialog you will find the entry " File Shredder " at the bottom . For permanent deletion, click on " Secure delete files ", then confirm again and the files are irrevocably deleted.
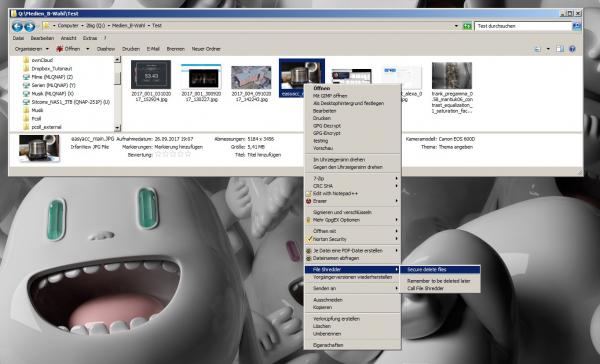 The file shredder is used to delete / overwrite via the context menu.
 Erase files on boot with the Eraser
Sometimes files cannot be shredded, mostly because of some rights issues or because they are being used by other programs. In this case, the already mentioned Eraser may be worthwhile , because it can delete files the next time Windows is started before any programs hog the file:
- Download Eraser , e.g. B. at Heise Download.
- Select the files to be deleted and call up the context menu with a right click .
- Start the deletion process using the " Erase " button below the Eraser entry.
- A confirmation dialog follows - do not confirm , but call up the options .
- Insert here check "Run at restart" to make clear the file during the next boot.
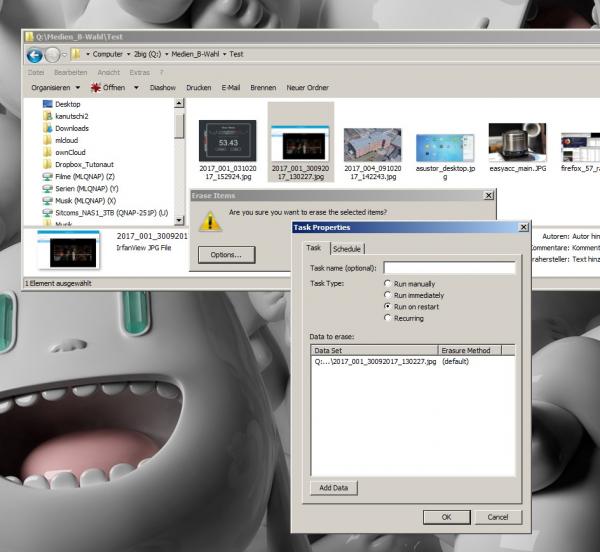 Eraser will delete blocked files the next time the system is started.
 Clean up free space with the CCleaner
If you have previously simply deleted files with Windows yourself, the data is still happily distributed on the free storage space. To clean it up, you have to overwrite it completely, which works, for example, with the popular freeware CCleaner :
- Download the CCleaner , e.g. B. at Heise Download.
- Start the CCleaner and first click on " Tools " and then on the entry " Disk Wiper ".
- Now select the desired hard disk and let the free space overwrite. Instead of the free space, CCleaner can also overwrite entire hard drives - so it is better to look twice to see whether everything is correct.
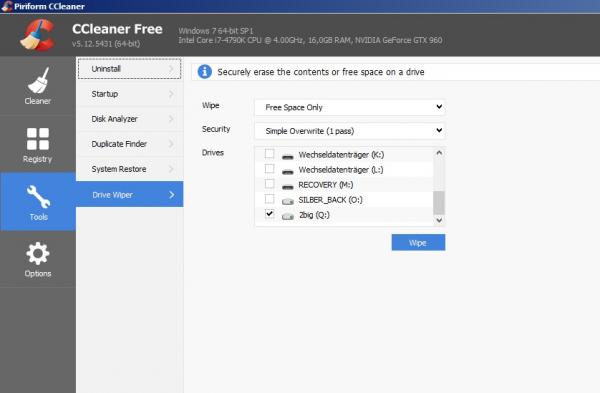 CCleaner can clear recoverable data from free space.
 Tip: If you want to delete the system partition, i.e. the Windows hard drive, you need a tool that does not rely on Windows and boots itself. This works best with the free DBAN, which is simply burned onto a CD / DVD. Using a simple interface, you can select the disk here and have it overwritten. However, this only applies to old HDDs and is therefore more of an exception - with SSDs usually used for the system, things look different again.
Securely erase SSDs
The easiest way to securely erase SSDs: Most SSD management programs include the Secure Erase option and guide you through the process. However, this is solved differently depending on the manufacturer. A common problem with this is the "Disk Frozen" message. The frozen status protects the SSD from accidental deletion by malicious software. When the SSD is in this state, things get a little tricky. Samsung, for example, recommends in its in-house SSD software Magician to unplug the disk during operation and then plug it in again - which works with modest success here. That means: not at all.
The manufacturer-independent alternative is the live Linux system GParted , which has since replaced Parted Magic , which works without tearing cables. You can download the latest free version of GParted from heise Download. First you burn the ISO file to a CD or flash it to a USB storage device and then boot the system.
The following is then deleted:
- Start the " Erase Disk " tool , select the " Internal Secure Erase " method and then the desired hard drive.
- When the tool detects the frozen status, it wants to put the system to sleep - you need to approve that .
- Wake up the system and start the tool again . Now you can repeat step 1 and click your way through a few security questions - then the SSD will be completely, safely and irrevocably erased.
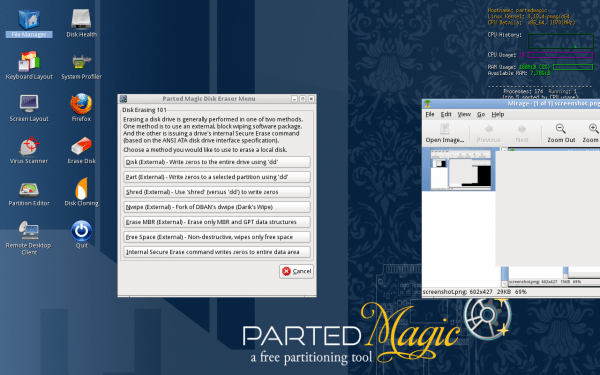 With the Parted Magic live system, stubborn SSDs can also be erased.
 Warning: As unlikely as it may be, there is always a residual risk that an SSD will be destroyed during this process, for example in the event of firmware errors. And sudden power outages in the middle of the process are not exactly ideal either.
Tip: If the effort with SSDs is too much for you or if it just doesn't work, there is also the "Quick & Dirty variant". Simply erase the SSD as usual by overwriting and / or formatting - then theoretically data can still be restored, but in practice you would have to put a lot of work into it to get anything useful. The reason is the same why deleting is so difficult: you just don't know exactly what data is where.