In order to protect documents and copyright, it is advisable to include a watermark. This is very easy to do with Word from Microsoft Office. To do this, follow our step-by-step instructions.
Word: insert watermark
Follow our step-by-step instructions or take a look at the brief instructions .
1st step:
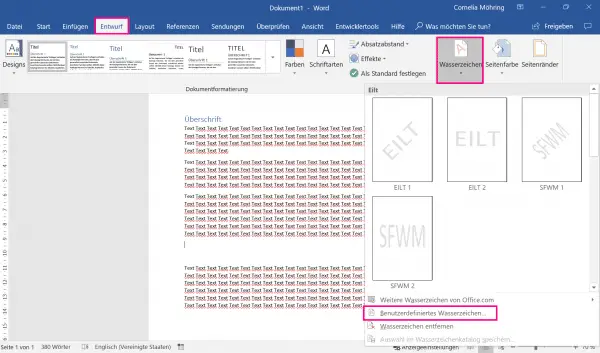
 In Word, click the " Draft " tab . Then select " Watermark " and " Custom Watermark ... ".
 2nd step:
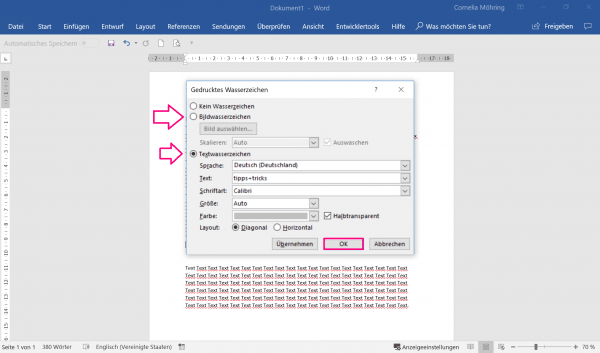
 Now you can define a watermark type: Image watermark: Via " Select image " you can insert your own image as a watermark. Click on the picture in the selection and then select " Open ". Text watermark: Here you can set a watermark in writing. In the field next to " Text: " enter what should ultimately be seen as a watermark in the background. If you have set everything, click on " OK " to insert the watermark.
 3rd step:
 Now you have successfully inserted the watermark.
Tip: If you follow the instructions but the watermark is missing on one page, repeat the instructions for that page. Incidentally, the watermark cannot be placed manually; it is positioned automatically..
Word: remove watermark
Removing a watermark is just as easy as inserting it. The only requirement is that the Word document is not write-protected . If it is write-protected, just save an unprotected copy of it.

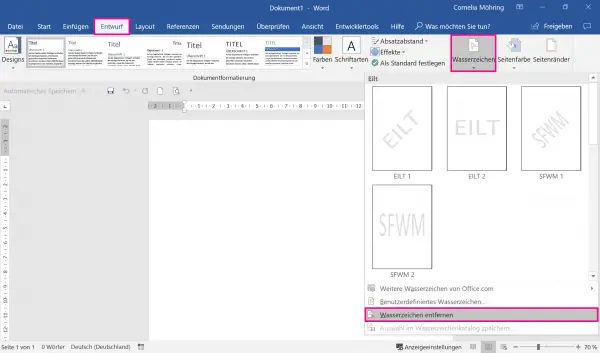
Click on the " Design " tab and select " Watermark ". Now all you have to do is click " Remove Watermark "..
Quick Start Guide: Word: Inserting a Watermark
- Click on the " Draft " tab and select " Watermark " from there.
- Opt for a pre-made watermark or click on " Custom Watermark ... ".
- Make the decision here whether you want a picture watermark or a text watermark. For a picture watermark, you have to click on " Select picture ... " and select an image. There are a few changes you can make to a text watermark. The most important thing is the input next to " Text: ": Here you have to enter the text shown in the watermark.
- When you have finished setting the watermark, click OK . You should now see your watermark.