Hard drives should actually be recognized automatically by PC and Windows and integrated with a drive letter. But it doesn't always work that way. Here are six solutions to common problems.
Root cause research
Hard disks offer a wide range of potential problems, from the missing file system to the wrong cable. "Not recognized" means that a newly connected hard disk does not appear as a drive with a drive letter in My Computer. Below are solutions to common problems. First, there are three solutions to problems on the software side. Conveniently, these three all start at the same point and build on each other: Problem 1 can only occur if Problem 2 does not exist and Problem 2 only if Problem 3 does not exist. In order to address each problem individually, we also list the solutions individually.
The hardware can also be to blame for an unrecognized disk - and surprisingly, that doesn't mean giving up! Incidentally, this applies to both external and internal hard drives, even if different sources of error can creep in.
Problem 1: drive letter
In order for a hard disk to be addressed under Windows, it must be attached to the system (mounted). The hard drive's memory then ends up as a directory with a drive letter such as "D: \" in Windows by default. Now and then it happens again and again that the automatic assignment does not work. Be it because all letters are occupied or reserved, or because Windows thinks that the disk must have a letter that has just been taken. Windows is not exactly mature at this point. This problem tends to occur more with hard drives that have already been used, not with new hardware. If necessary, assign such a drive letter:
- Open the " Disk Management " via the Windows or Cortana search.
- In the lower area of the window, identify the correct drive in the graphic representation: Recognized by the size, the file system and a missing drive letter. In addition, the newly connected plate should appear at the bottom of the graphic display.
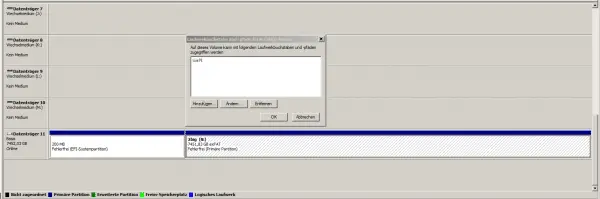
- Open the context menu of the drive, more precisely one of the partitions / volumes by right-clicking on the bar ; by default there will only be one partition. If there are several, you will see split bars with different sizes that add up to the total size. Each partition requires a drive letter. Here select " Choose drive letters and paths ".
- Choose any letter . Tip: If you know that certain external data carriers, such as your standard USB stick, always have the same letters, avoid these.
- Save and then a new drive should be accessible.
 A recognized drive cannot be addressed without a drive letter.
 Problem 2: no filesystem
One level below the letter problem, a missing file system can be the cause of the missing drive. In other words: drives, more precisely partitions, must be formatted with a file system. Under Windows, this is usually "NTFS", which Linux has now also mostly mastered..
- Open the " Disk Management " via the Windows or Cortana search.
- Open the context menu of the desired partition by right-clicking on the bar and selecting " Format ".
- Assign a name and select the file system . Optionally, you can remove the check mark next to " Perform quick format " in order to permanently delete any data on the disk - then the process will take considerably longer.
- Then open the context menu of the now formatted partition again and assign a drive letter .
Problem 3: No partitioning
With a completely new disk, there are not always ready-made partitions, file systems, let alone drive letters - everything has to be new here.
- Open the " Disk Management " via the Windows or Cortana search.
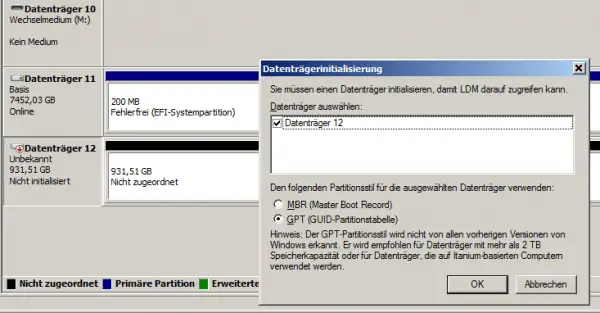
- Identify the drive again: It tends to be at the very bottom of the bar and there is only one hatched box with a black bar above it, with the note " Not assigned ". You may also notice the small red symbol in front of the disk numbering to the left of the bar ("Disk 12" for example).
- Open the context menu again , but this time via the gray box with the data carrier numbering ! The context menu of the bar only contains the items "Help" and "Properties". Select " Disk initialization " here.
- Simply keep the default " GPT " in the following dialog . This initialization determines how exactly the partitions are created in the next step.
- You can then open the context menu of the bar and select " New simple volume " there.
- In the wizard you now define the size of the partition (by default the entire space), then the drive letter and finally the options for formatting, i.e. file system and name. Basically, you can simply accept all of the defaults; you should only change the name in a sensible way.
- When the process is complete, the drive is available.
 New drives must be initialized, partitioned, formatted and given a drive letter.
 Problem 4: Defective USB / SATA port
Now we come to possible hardware problems. Regardless of whether it is an external or internal hard drive, connections can be defective. In particular, USB connections are not uncommon, whether their design and the frequent loads or Windows-internal USB errors (the management of USB devices under Windows is technically rather weak). In both cases, it gets worse with age. So simply try a different USB port on the computer. Unless it is one of the newer USB-C connections (symmetrical plug), you should also make sure that it is a USB-3 connection, recognizable by the blue plastic on the socket (USB-2- Connections are completely black). It actually happens from time to time that USB devices run on one port and not on the other.
This is much less common with internal hard drives and if so, the error is likely to exist from the outset. Because Windows does not configure anything broken over time, nor are there constant mechanical loads. However, it does happen, therefore: Clamp the disk to another free SATA connection and / or a definitely functioning disk to the possibly defective SATA connection. Again, you should pay attention to the connection version: SSDs definitely belong to the faster SATA III connections, slow data storage HDDs can also be content with SATA II if there are too few connections. The labeling can be found directly on the mainboard next to the connections..
Problem 5: Defective / incorrect cable
It's basically exactly the same with the cables; if possible, just replace them. Or test the cables with another drive. With USB cables there is another particularly perfidious source of error: Some cables are only intended for charging! Basically, that's a mess, like a loophole in the USB standard. And who doesn't have a drawer with a dozen USB cables from all kinds of devices from fans to hard drives? This makes data access a game of chance. Hence the tip: If you ever have such a cable in your hands, mark it immediately. And if you really have a dozen cables, better still throw them away.
 Sockets and cables are popular sources of error - if in doubt: replace them.
 Problem 6: Defective hard drive
If the hard drive is defective, of course, all measures will not help. Hardware defects do not necessarily have to be clearly identifiable, sometimes the only indication is that all attempts have not helped. But there are hints: With mechanical HDDs, the noises often give hints. The best known is the "Click of Death": An HDD basically works like a turntable. And when the reading arm slips off the plate, it only makes a loud and audible "click". Congratulations, a classic has carried off your HDD, there is nothing that can be saved economically. Other noises apart from the humming caused by the vibration and slightly "scraping" noises caused by file access also indicate defects.
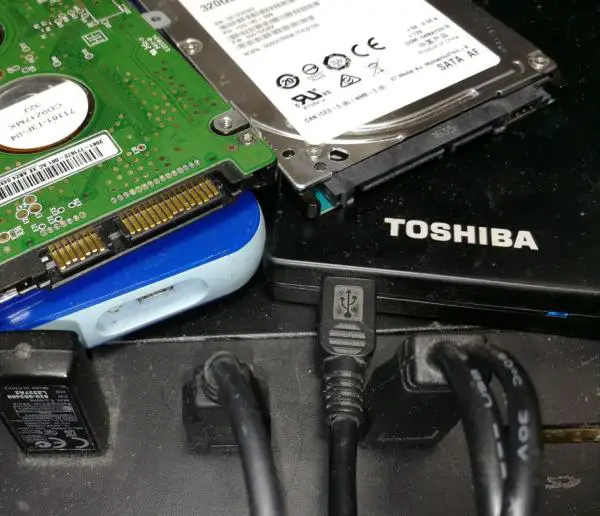
It's a lot more difficult with SSDs. Of course there is great diagnostic software available, but it only works if the disk has been recognized. Basically, all you can do here is test the SSD with other hardware. The best way to do this is to use a USB to SATA cable, with which you can simply clamp SSDs to a computer like an external drive. If that doesn't work either, you must assume that the hardware is defective.