If you regularly work with several program windows in parallel, you will quickly reach the limits of a single monitor. Fortunately, most PCs and notebooks offer the option of connecting one or more additional displays. You can easily increase your productivity on the desktop. But notebook users also benefit from a connected monitor. It is particularly useful to connect an external monitor to a laptop on the desk. Windows 10 supports the connection of one or more additional monitors ex works. Even so, the user experience is not always satisfactory. Moving windows to the second screen in particular is not always unproblematic without the right settings. But don't worry: we'll show youhow to connect a second monitor and configure it optimally under Windows 10.
Setting up a second monitor under Windows 10: The requirements
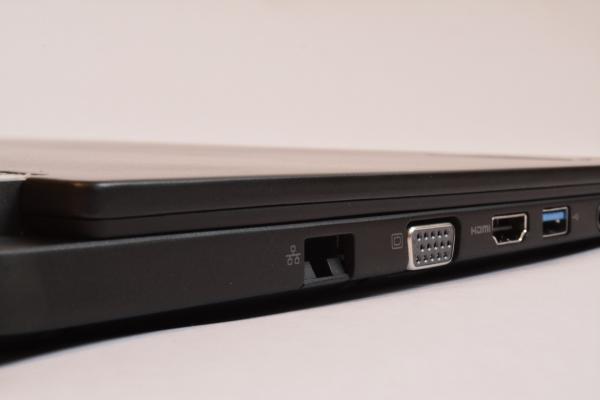
The likelihood that you can connect a second monitor to your PC or laptop is comparatively good. Most desktop graphics cards have more than one screen output. For example, if your graphics card has two HDMI ports or an additional DVI or DisplayPort connection , it will definitely be compatible with an external monitor. Even with laptops, you can see at a glance whether an HDMI or DisplayPort connection is available for connecting an external monitor. Modern devices can also often output the image via USB-C or Thunderbolt 3 connection .
 Many laptops offer the option of connecting an external monitor quickly and easily.
 It is not very easy to determine which screen resolution the respective devices support. The use of a 4K monitor in particular requires powerful hardware and the use of the right cables. If you are not sure, ask the manufacturer or search the Internet for information about the installed graphics card. FullHD or WQHD monitors, on the other hand, can be controlled by practically all reasonably modern graphics cards in PCs or laptops..
Connecting an external monitor: The three operating modes
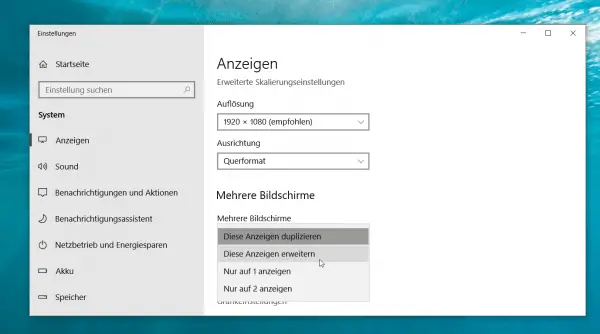
If you connect a second monitor to a PC or notebook with Windows 10, you basically have three different operating modes to choose from. You will find them in the display settings of Windows 10. Call them up by right-clicking on the desktop and selecting the command of the same name in the context menu that appears. Here you now have the following settings to choose from:
- Duplicate this display: With this setting, Windows shows the same content on both monitors. This is worthwhile for a presentation using a projector, for example, since you and the audience will see the same information.
- Expand this display: Windows controls each monitor separately here. You can move programs and windows freely between the monitors. Learn how to configure this mode below.
- Only show on 1/2: As the name suggests, only one of the two displays is in operation. For example, if you want to use a laptop as a desktop, this is the way to go. You can find out which monitor is behind which number by clicking on “Identify”.
 Windows can integrate external monitors in a number of ways.
 Configure the second monitor correctly
Probably the most common way to operate a second monitor under Windows 10 is to use it as an extended display. Both monitors are in use here at the same time and you can arrange Explorer windows and Windows programs as you like. In order for this to work smoothly, however, you have to make a few settings.
1. Connect the second monitor to your Windows 10 PC using an HDMI, DisplayPort or DVI cable . The system should recognize the new display immediately.
2. Open the Windows 10 display settings as shown above. Activate the option “ Extend this display ” under “ Multiple Screens ”. 3. Windows 10 now extends the desktop to the second screen. This will probably be mostly empty. Now try to move a window to the second monitor as a test
. There is a high probability that the edges of the screen do not correspond to the arrangement of the screens on your desk. For example, you may have to slide a window “left” to bring it to a monitor placed on the right..
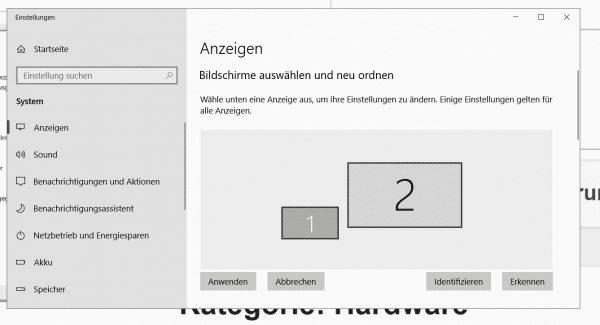
4. Correct this behavior in the display settings . At the top, Windows 10 shows the connected monitors in stylized form. Click on “ Identify ” to find out which number represents which screen. Now you can simply use the mouse to rearrange the drawn screens to match the physical arrangement. For example, if one of the monitors is higher, you can correct this here. Adjust the setting until the mouse pointer and moved windows move correctly between the monitors.
 Adjust the order of the screens so that windows can be moved correctly.
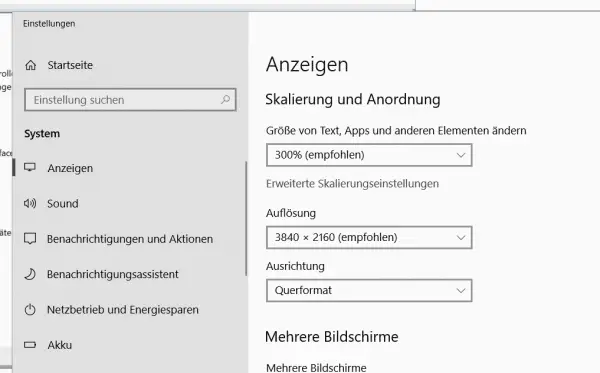
 5. As soon as the arrangement fits, you can make further settings if necessary . To do this, click on the corresponding screen and configure it in the “ Scaling and arrangement ” section. Here you can, for example, adjust the resolution of the external monitor if Windows 10 does not determine this correctly. "About Change size of text, apps and other elements " adjust the scaling of the screen content. This is particularly useful with 4K monitors when fonts and symbols are displayed too small. If necessary, you can also set the orientation of the screen here, for example if you are operating it upright in pivot mode.
 You can set the scaling, alignment and resolution separately for each connected monitor.
 6. If you are satisfied with the settings, apply the changes by clicking on “ Ok ”. You may have to restart your PC for all changes to take effect.
As you can see: with the right settings, operating multiple monitors under Windows 10 is child's play. You can of course adjust and correct the setting for the various monitors at any time.