Advertising on the Internet is important to fund services, but it can create major problems. Not only do advertisements occasionally make websites unusable. In the past there have been repeated cases in which malicious code was distributed via ads and thus infected PCs.
Traditionally, ad blockers such as uBlock Origin or AdGuard help against this. But they have to be set up and configured separately for each browser. It is also often difficult to block advertisements efficiently, especially on smartphones. Under Android, for example, you have to switch to an alternative browser because Google Chrome does not (yet) allow corresponding extensions. Apple allows ad blockers for Safari on the iPhone and iPad, but it does not prevent ads in apps or alternative browsers.
 Pi-Hole is the black hole for online advertising.
 Pi-Hole provides the ability to suppress practically all advertising with just one installation. Pi-Hole is an open source program that turns the Raspberry Pi into a DNS server. The highlight: as soon as an appropriately configured device - i.e. a PC, smartphone or tablet - surfs via a Raspi with a pi-hole, all content is automatically filtered. In this way, Pi-Hole can not only block advertising, but also prevent contaminated websites from being accessed or block adult content. This can be done either for each device individually or for the entire network..
Pi-Hole: Potential Cons
As nice as using Pi-Hole is, it can also have disadvantages in practice. It can happen that certain pages no longer work if they are accessed via Pi-Hole. The “detour” via the Pi while surfing can also lead to a slight delay in the page view. Problems with controlling devices in the network are also possible, depending on the router. Since the solutions for this are often very specific, we recommend visiting the German-speaking forum on the subject of pi-hole problems. You can reach it at https://discourse.pi-hole.net/c/bugs-problems-issues/deutschsprachige-hilfe .
Last but not least, the use of Pi-Hole also ensures that websites and app operators lose a good part of their income. If you would like to continue to support a website operator despite Pi-Hole or to get a possibly faulty page running again, you can put it on a whitelist. We'll show you how to do this below.
Setting up a pi-hole: the prerequisites
Pi-Hole basically requires nothing more than any Raspberry Pi on which a compatible Linux (such as Raspbian or Ubuntu) is already running.
Pi-Hole works quite efficiently and therefore doesn't need a lot of computing power. It also works on older Pi models for this reason. In our experience, especially with newer versions of Raspberry Pi 3 or higher, it is also possible to use Pi-Hole in parallel with other services without any problems. For example, if you have set up Kodi on the Raspberry Pi, the minicomputer can act as an ad blocker in parallel. Alternatively, you can of course also use a minimalist Linux without a desktop environment as the basis for Pi-Hole, such as Raspian Lite.
Setting up SSH access to the Pi is not absolutely necessary, but practical. This way you can easily install Pi-Hole from another PC in the network. In this article, we'll show you how to enable SSH on the Pi..
Install Pi-Hole
At this point we assume that you have already set up an operating system on your Raspberry Pi. The installation of Pi-Hole takes place via the terminal of the respective Raspi-Linux. In our example we are performing a remote installation of the system over an SSH connection. You can of course also install the Pi-Hole directly on the respective Pi. In both cases the terminal command for the installation is:
curl -sSL https://install.pi-hole.net | bash
The Pi will now start downloading and installing Pi-Hole. Depending on the Pi model and internet connection, this can take a few minutes. Let the Raspi do its best during this time.
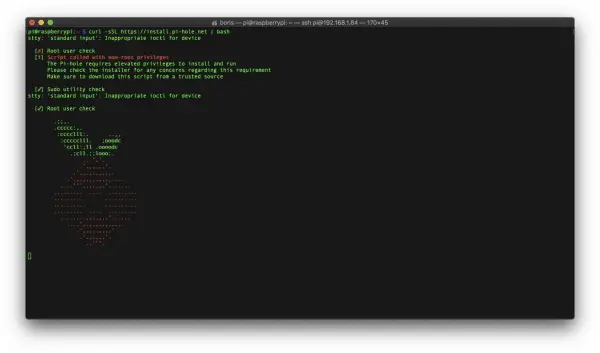 The first installation of Pi-Hole runs via the terminal.
As soon as the download is complete, an automated setup wizard starts. Here you first select the network interface with which the Raspberry Pi goes online. As already described, it is recommended to connect the mini-computer directly to the router via Ethernet.
Then select a DNS provider that Pi-Hole will use to resolve your web requests. If you are not satisfied with the preselection, you can choose your own DNS provider via “Custom”. The Chaos Computer Club, for example, provides a list of DNS providers who protect the privacy of users.
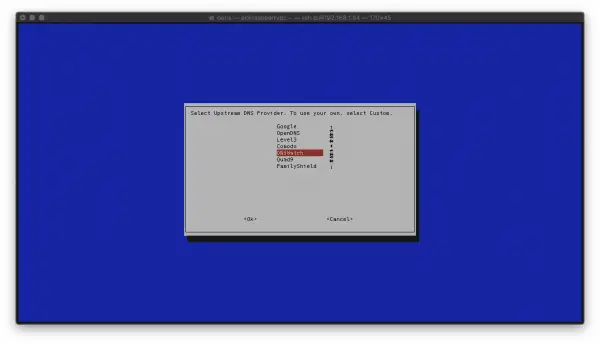 In order for Pi-Hole to be able to forward accessed websites, you must define a public DNS server.
 As with ad blockers for web browsers, Pi-Hole's ad filtering is based on user-managed filter lists. Pi-Hole comes with a number of standard lists that you can usually adopt for good coverage. For consistent ad blocking, you should also activate the filtering for the IPv4 and IPv6 protocol - so use the default setting here as well.
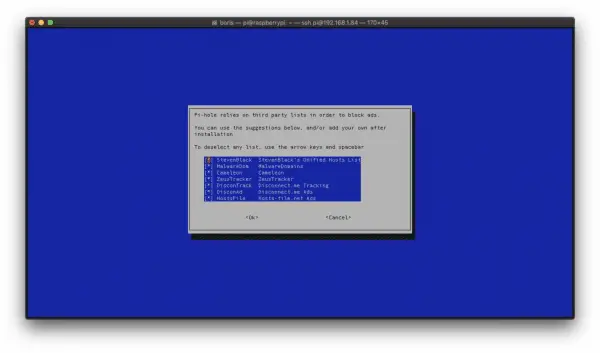 Pi-Hole's pre-built filter lists are usually a good start to an ad-free network.
 In order for Pi-Hole to be reliably available as a DNS server, the Pi must have a fixed IP address. You can either implement this via your router or define it directly when setting up Pi-Hole. Simply accept the current IP address in this step by selecting “Yes” in order to call up Pi-Hole via it later.
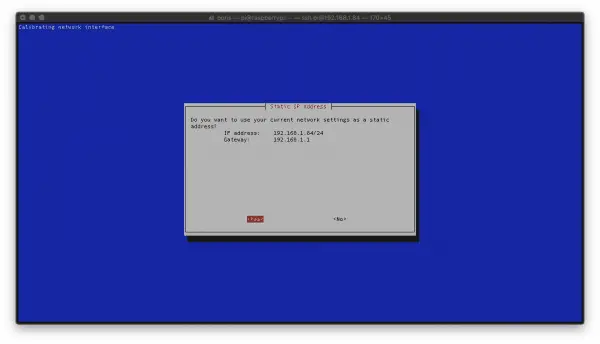 In order for Pi-Hole to work reliably, the service needs a fixed IP address.
 As the next step, Pi-Hole asks you whether you want to install the web interface and the associated web server. You should definitely do this via the standard answer, otherwise you would have to set up Pi-Hole in a laborious manner via the terminal. Confirm the last steps with the standard answers and wait for Pi-Hole to complete the setup. After restarting, Pi-Hole will display summary data. The most important point here is “Your Admin Webpage login password is ...”. You use this password to log into the Pi-Hole control center - so make sure to make a note of the password.
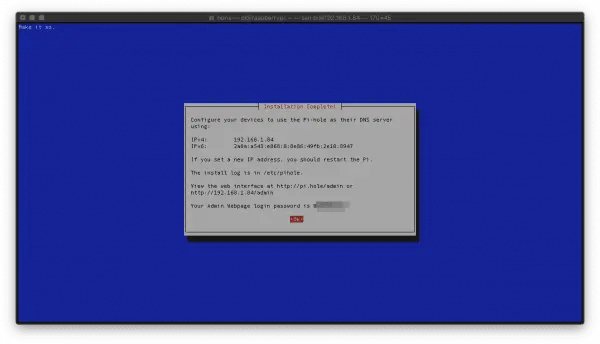 You should definitely remember the login data for Pi-Hole.
 Set up Pi-Hole as a DNS server
After the installation, Pi-Hole runs automatically on the Raspberry Pi. So that advertising can now be filtered, you have to use the Pi-Hole-Pi as a DNS server. Most routers allow you to change the DNS server in the settings. You can find out how this works with the FritzBox, for example, here. Enter the IPv4 and IPv6 address of the Raspberry Pi as the DNS server. All devices connected to the router then surf ad-free.
Alternatively, you can manually set Pi-Hole as a DNS server for the respective devices. The way to get there depends on the respective operating system. In Windows 10, for example, you can find the settings by searching for “Network Status” and selecting “Change adapter options” in the Windows Start menu. Right-click on the network connection you are using, select "Properties" and double-click to change the settings for "Internet Protocol, Version 4" and "Version 6" to the Pi addresses. On an iPhone, the corresponding options can be found in the WiFi settings. Tap on the appropriate connection, select "Configure DNS" and enter the appropriate IP addresses.
Pi-Hole: Adapt configuration
Once the traffic goes through Pi-Hole, you should no longer see any online advertisements. Nevertheless, it can be worthwhile to adjust the configuration of the server. To do this, either enter the Pi-Hole IP followed by "/ admin" in the URL bar (for example 192.168.1.55/admin) or call up the page via "http: // pi-hole / admin". Here you log in with the password you noted down. Via the menu on the left you can now deactivate the pi-hole blocker with "Disable", for example. In the "Settings" area you will find various setting options as well as the IP addresses of Pi-Hole, which you can then easily copy.
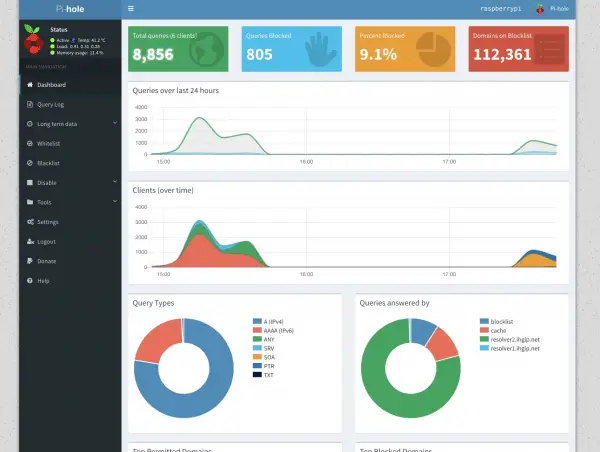 You can make a number of settings and view statistics on the Pi-Hole admin page.
 If you would like to deactivate the filtering for certain pages, for example to support good online content by accepting advertising, you can do this in the "Whitelist" area. Simply enter the domain here, for example "heise.de" and click on "Add". In the "Blocklist" area, you can configure additional block lists if you wish, which you can find in various online forums.