Dropbox, OneDrive, Google Drive or iCloud Drive: Large cloud providers have made it easy for many years to have access to important documents, photos or other files anytime, anywhere. The downside: Anyone who uses commercial providers gives their data unfiltered into the hands of others. The solution offers the establishment of your own cloud via open source services such as Nextcloud. With Nextcloud it is possible to manage files and various functions such as calendar or online notes on a private web space. The data can then be conveniently and securely synchronized on practically any number of systems via the various Nextcloud clients. But not everyone has their own web space available or would like to bear the associated costs and maintenance effort. As is so often the case, the Raspberry Pi provides an alternative!With a little tinkering, it is possible to equip the mini-computer with a Nextcloud instance.
Get there faster with NextCloudPi
The makers of Nextcloud offer their own version that can be installed directly on the Pi. In our test, however, the “official” version turned out to be quite complicated because, among other things, complex database configurations are required. It works much easier with the open source project NextCloudPi . It offers a much easier installation of Nextcloud for the Raspberry Pi. In this guide, we will therefore focus on setting up NextCloudPi. If you prefer to switch to the official version, you will find the necessary information here: https://nextcloud.com/box/
 Installing Nextcloud on the Pi is not without it. But NextCloudPi makes it a bit easier.
 Nextcloud on Raspberry Pi - requirements
The operation of Nextcloud on the Raspberry Pi works from the Raspberry Pi 2, the newer models Raspberry Pi 3, Pi 3+ and especially the Pi 4 deliver a significantly better performance in everyday life. Theoretically, it is also possible to use the smaller Raspberry Pi Zero for Nextcloud, but in practice this is associated with a considerable amount of additional work due to the lack of connections.
For the installation of NextCloudPi you need at least a microSD card with a capacity of 8 gigabytes. Ideally, you should expand the storage space of the Pis using a USB stick or an external hard drive (ideally an external SSD) with additional storage space. The data of your personal cloud and the extensions of Nextcloud will then end up on this later.
That being said, it's a good idea to connect the Pi directly to your router using an Ethernet cable. NextCloudPi also works via WiFi, but a direct connection ensures a much more stable and faster connection.
Install NextCloudPi
The installation of NextcloudPi is possible in two ways: Either you integrate the cloud system into an existing installation of Raspbian or you download a finished Raspbian image from the developer site, in which NextCloudPi is already integrated. If you are already using a finished Raspbian, open a terminal and enter the following command:
curl -sSL https://raw.githubusercontent.com/nextcloud/nextcloudpi/master/install.sh | sudo bash
The installation script then guides you through setting up Nextcloud on the Raspi.
Alternatively, visit the Own Your Bits project download page and download the latest version in the “NextCloudPi_RpI_xyz” folder. You can then use a tool such as BalenaEtcher to transfer the downloaded image to an SD card from which you can boot the Raspberry Pi. This works in the same way as with a “normal” installation of Raspbian. Instructions for setting up a Raspberry Pi can be found here. After the installation it is recommended to create an empty file with the file name “ssh” (without quotation marks and file extension) on the SD card. So you can connect to the Pi via SSH if necessary..
NextCloudPi: First Steps
After installing NextCloudPi, connect the Pi to the router and a power supply. Once the startup is complete, you can reach NextCloudPi via the browser of a PC or Mac on the same network. To do this, enter either the IP address of the Pis (which you can find in the router menu, for example) or the address
https: //nextcloudpi.local: 4443
into the browser of your choice. You can use this address to call up the administration of your Nextcloud installation later, for example to install updates. If your browser displays a security error message, you can safely ignore it - this is simply because Nextcloud does not offer its own TLS certificate ex works. When you start the system for the first time, it now displays the standard user name “ncp” and a complex password that you should absolutely copy.
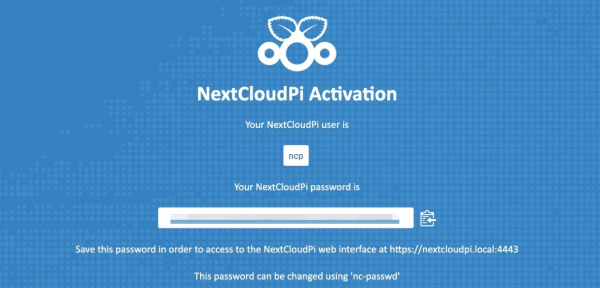 Be sure to write down the password that NextCloudPi displays when you activate it for the first time.
 Once this is done, click on “Activate”. The next time you start NextcloudPi, you will be greeted with a setup wizard. If this does not open by default, call up the address
https: // ipadressedesNextcloudpi: 4443 / wizard /
. Under “USB Configuration” set up a connected USB stick or hard drive for data storage with Nextcloud. Click “Yes”, then “Continue” and finally “Format USB” to start formatting. Logically, all existing data is deleted from the medium. Finally, click the “Move data to USB” button to move the data directory..
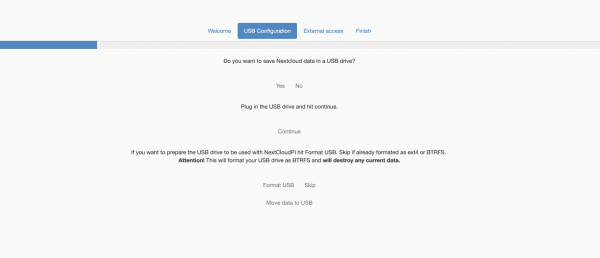 NextCloudPi can automatically format and set up the USB storage device.
In the next step, “External Access”, NextCloudPi tries to set up the Raspi in such a way that it can also be reached via the Internet while on the move. In addition to a DNS service (the makers recommend the free services NoIp or FreeDNS), you also need port sharing in your router. In our tests, the remote access did not work reliably, but this could also be due to local security regulations. Information on setting up remote access to the NextCloudPi can be found here .
You can now call up the Nextcloud user interface via the IP address of the NextCloudPi or the address “https: // nextcloudpi”. To log in, use “ncp” and the password you specified during activation. You can change this later at the top right in the “User” menu. It is now also possible to set up clients that synchronize data with the Raspi cloud. Install the appropriate clients, enter the IP address of the Pis and log in with the user settings.
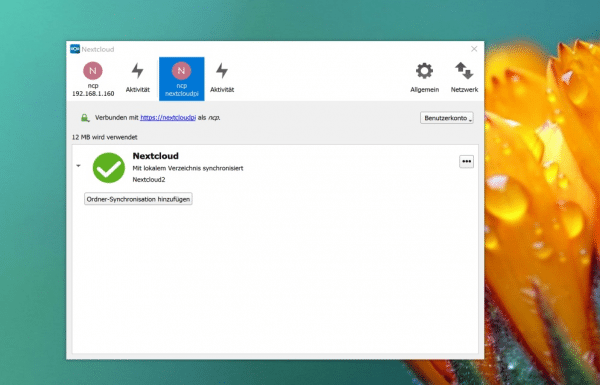 As soon as NextCloudPi is running, you can use the apps to synchronize data with your private cloud.
 The administration of the NextCloudPi installation itself is done by calling
https: // ipadressedesNextcloudpi: 4443 / wizard /
Here you can replace the access passwords to the web interface and the administration console with your own passwords under “nc-admin” or “NCP Password” . The setup of certificates, remote access or the installation of Nextcloud updates is also done via the console. Since the possibilities are extremely extensive, it is advisable to take a look at the documentation for the project. You can find this under this link: http://docs.nextcloudpi.com/en/latest/ .