Accessing a Windows desktop from Ubuntu is easy - you just need to know the right tools. It is also the other way around. In the following, we will explain step by step how it works.
Access to Windows and Ubuntu
Remote access to a desktop means that you can display and use the entire desktop of a remote computer in one window on your local desktop. One speaks generally of " Remote Desktop ". As if you were sitting right in front of the remote computer. To do this, you need server software on the remote computer and client software on the local device. There are many ways to do this. The server is already integrated in Windows: You only need to activate the Remote Desktop Protocol (RDP) to enable remote access. Under Ubuntu you then need a corresponding client.
There are significantly more common variants for the reverse route. To view an Ubuntu desktop on Windows, we recommend X2Go . The server is set up under Ubuntu, the comfortable client under Windows.
Such connections are very easy to implement in the home network, as you will see in a moment. You would have to do a few additional work on the Internet, which we will briefly introduce to you at the end. When it comes to helping the remote desktop user, however, there is still a super easy way through the internet.
Establish an RDP connection to Windows
Under Windows, you must first enable RDP access ..
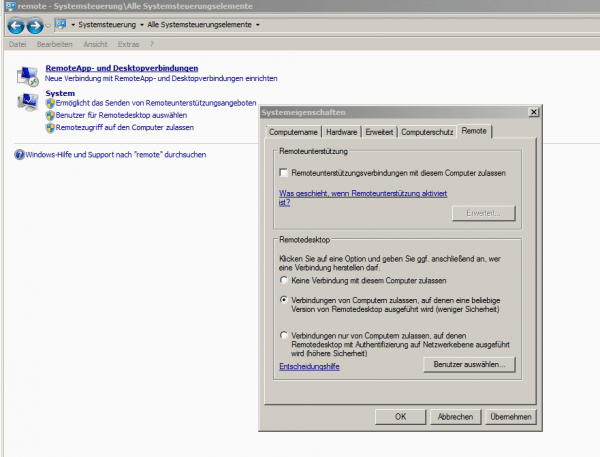
- From the Start menu, find and launch " Allow remote access to this computer ". Alternatively, you can find the setting under " Control Panel / System / Remote Settings ".
- Under " Remote Desktop " select the middle setting " Allow connection from computers running any version of Remote Desktop (less security) ".
- Confirm with " OK " and you are almost done with Windows: You still have to log out , as Windows and RDP only allow one user logged on to the system!
 The RDP settings in the control panel.
Now install one of the many remote desktop clients under Ubuntu, for example Remmina , which you can find in the Ubuntu Software Center.
- Start Remmina and first select " RDP " from the drop-down menu to the left of the input field (Remmina also supports other protocols).
- Then enter the IP address of your Windows computer and click on " Connect ".
- Remmina then responds with two dialogs: First, enter the username and password of the Windows user.
- This is followed by a query as to whether you accept the Windows computer's certificate - which of course you do in your own network.
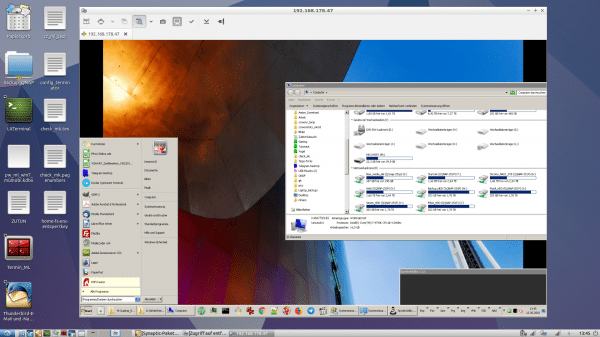
- As soon as you have confirmed, a window will open with the Windows desktop - however, you may only see part of the desktop. In that case, click on the button with the magnifying glass to adjust the zoom setting and, for example, to display the entire desktop in a small window or in full screen.
 The Windows desktop on the Linux desktop.
 Establish X2Go connection to Ubuntu
For the other way around, X2Go is a very good variant, as it runs very stable and fast and it offers many interesting features beyond the pure remote desktop. Here, too, start again with the server, this time under Ubuntu: Start a terminal and install the required X2Go packages with:
sudo add-apt-repository ppa: x2go / stable
sudo apt-get update
sudo apt-get install x2goserver x2goserver-xsession
That's it for Ubuntu - this time you can stay logged in too..
- Now install and start the Windows client: https://www.heise.de/download/product/x2go-46773.
- Create a new connection and assign a meaningful name for this connection (if more are added).
- Enter the IP address of the Ubuntu computer under " Host " and the name of the Ubuntu user under " Login " .
- Under " Session type " you also select " Access to local desktop " to get the entire desktop again. Tip: Some of the other features mentioned are hidden under " Session type ". Using the " Application " session type , you can, for example, open individual Ubuntu programs via X2Go on your Windows desktop. Linux tools can be fully integrated into the Windows desktop.
- Save with " OK ".
- Now start the created session by selecting it from the list on the right, entering your password for the Ubuntu user and clicking " OK " again .
- X2Go also responds with two dialogs: First, a " Desktop selection " window appears , which in this setup only requires you to click on " Full Access ". Alternatively, you could stay in viewer mode via " View only ".
- The second window asks again whether you trust the Ubuntu computer (more precisely the " host key "), which of course you again answer in the affirmative .
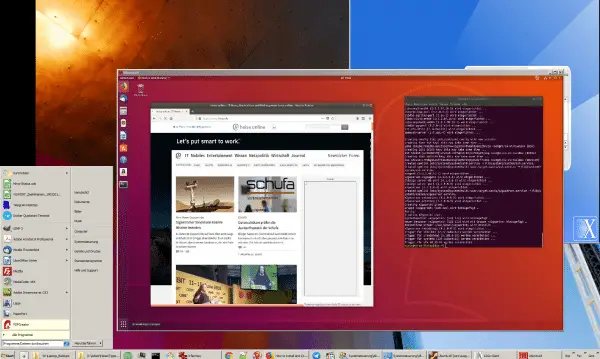
- Now the X2Go window opens with the complete Ubuntu desktop. The desktop is fitted into the window by default, you can easily adjust the size with the mouse as usual.
 The Ubuntu desktop in a window on the Windows desktop.
 Connection through the Internet
In order to be able to use the whole thing via the Internet, you would first have to make sure that you have access to the respective network . To do this, you could set so-called port forwarding in the routers, which forward the incoming traffic to the correct computer. In terms of security, this is not advisable for laypeople. Instead, you could also set up a virtual private network with which you can log into your home network remotely, so to speak. You can work in the same way as if you were sitting at a computer directly in your LAN. That is safe, but also involves a lot of effort.
In both cases you would still have to set up a service that ensures that you can even reach your home network via the Internet - after all, your DSL provider assigns you a different IP address more or less regularly. The solution is Dynamic Domain Name Service : You register an address such as " mynetwork.example.com " with a DDNS provider and this then always points to your current IP.
If you regularly work on a remote computer, you should set up DDNS and VPN . If you want to use your office desktop at home and access a network with a static IP address, you can of course do without DDNS. However, such a setup should only be set up by experts in practice, since sensitive (personal) data then go through the line.
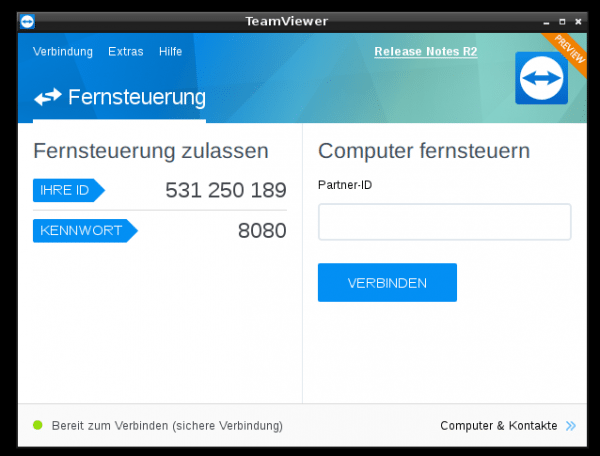
If it's just about helping someone else, it can be much easier. With the free TeamViewer software: Install the tool on Windows and Ubuntu simply by double-clicking. When you start the tool, you can choose: Either give the displayed "ID" to your counterpart so that he can control your desktop. Or you can enter your counterpart's ID in order to use their desktop. Incidentally, both parties see the same picture.
 TeamViewer requires a user on the remote computer, but is then really super easy.