TeamSpeak 3 is a program for group chats and phone calls, which is mainly used by gamers. In order to be able to use the tool, a server is needed on which the users can come together. We'll show you how to create such a server.
1st possibility: Rent a server
The easiest way to run a TeamSpeak 3 server is to rent it. The organizational details will be taken over by your landlord. The entire technical configuration is omitted, so that you only have to design the server according to your ideas. The server can then also run day and night. The only downside: renting a server costs money. Most prices are at least € 5 per month, usually a little more. You can find out more about renting TeamSpeak 3 servers in this post.
2nd possibility: Create TeamSpeak Server yourself
You can also operate a TeamSpeak server yourself. You should make sure that the server is only online while the host computer is switched on and connected to the Internet. So, if you leave your server running around the clock, your computer would have to remain switched on permanently. You also need a stable internet connection of at least 16 megabits per second. In addition, there may be Internet problems if you want to play at the same time yourself via the server computer. Then your online game could use more internet than TeamSpeak actually needs. In addition, the server also needs a certain performance capacity, which is then no longer available for gaming.
Once all questions about the Internet and performance have been clarified, you can start setting up your server. Download the server tool for your operating system from the TeamSpeak website. This is available for Windows, macOS, Linux and via FreeBSD even for Unix-based systems..
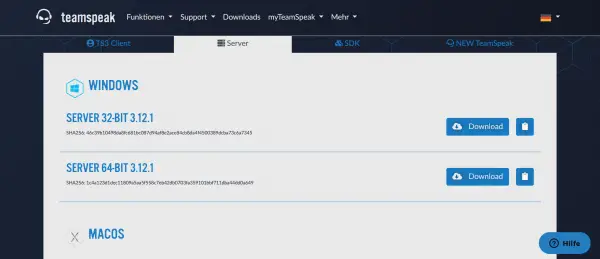 This is what the overview of the various download options for the different operating systems looks like. Simply select the download that matches your operating system.
Download the appropriate file. Since this is a .zip file, you need to unzip it first. There is a " ts3server.exe " file . Run this file and accept the license agreement. You may have to confirm the execution by entering your admin data. These usually correspond to the login data for your computer. You will now be shown four access files, which you can copy using the icon on the right and save in a text file.
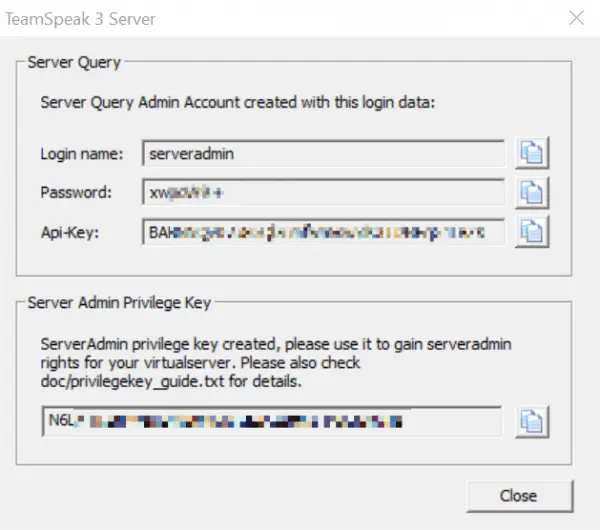 These strings are especially important when you are creating the server. You can use the symbol with the two documents on the right-hand side to copy these short sections of text into a text document and save them securely. You will need it again later.
 Now start the regular TeamSpeak client and select " Continue without login ". Then enter a username. Then click on " links " to " connecting ". Now you need to enter a server IP address. Enter either " 127.0.0.1 " or the IP address of your separately installed server in the local network. The " server password " corresponds to the first access file that you wrote down in the last step. You should specify " serveradmin " as the user name ..
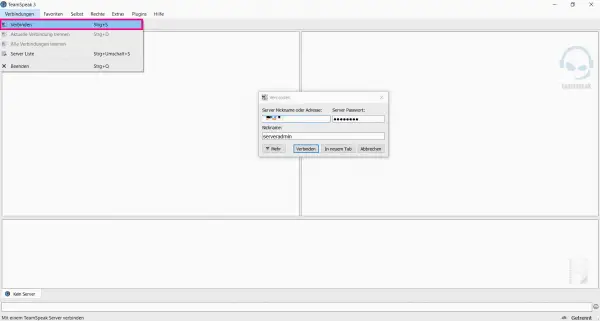 Via "Connection" and then "Connect" you can connect to the server you just created. You now have to insert some of the data just transferred into the text document here in order to define yourself as server admin.
 A message will now appear stating that your server is acting without an administrator. Copy in the character string that you saved during the installation. You have defined yourself as the administrator of your TeamSpeak 3 server.
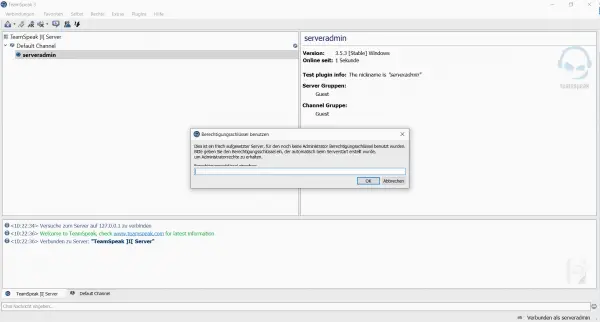 Now enter the previously saved text section that identifies you as the administrator. It is the lowest of the four strings.
Your server is now basically set up. Now you can take care of the details. For example, you can insert channels. To do this, right- click on " TeamSpeak] | [ Server " and select " Create Channel ". Then define a name for the channel and optionally enter a password. You can also specify whether the channel should exist " permanent ", " semi-permanent " or " temporarily ". Normally it is sufficient if you create a channel as " permanent ". Then it will be there until you delete it.
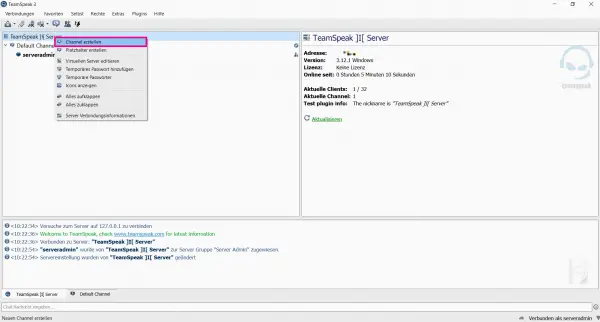 With the help of "Create Channel" you can create new channels on your TeamSpeak server.
 If you want friends to visit your server, you have to give them the address. If the TeamSpeak server is only to run in the local network, your friends need the address in the local network. Otherwise you have to give you the current IP address of your connection. You can do this, for example, via the website "What is my IP address?" find out. Depending on the settings of your router, your IP address can change every 24 hours. So if in doubt you have to give your friends a new IP address every day. If you need to release the port: The standard port for TeamSpeak client connections is 9987 .