By default, Ubuntu has a built-in firewall: UFW, which stands for "Uncomplicated Firewall" - in other words, uncomplicated firewall. It is often difficult for newcomers to the Linux world to use the alternative "IPTables" to block IPs or ports in order to configure the firewall correctly. UFW makes this step easier for you and forms an interface to the IPTables in Ubuntu. You can find out how to use UFW correctly below.
Tip: To find out in advance what a firewall actually is, read our article on it.
How to configure UFW via terminal
UFW is an interface to IPTables, which is supposed to simplify the process of configuring a firewall. If you want to secure the network or want to monitor the incoming and outgoing connections of your server, there is no way around a firewall. UFW is a practical tool that can be controlled and configured via the terminal in Ubuntu:
Step 1: Requirements
To follow our instructions, UFW must be installed on your Linux system. The tool should already be installed by default. If this is not the case, UFW can be installed with the following command:
sudo apt-get install ufw
Step 2: Set up standard policies
Before you create your own rules for the firewall, you should first define how incoming and outgoing data traffic is to be handled. By default, all incoming connections are denied and all outgoing connections are allowed. If every incoming connection were allowed, anyone outside could reach your server. To make sure that the standard settings are set correctly, enter the following commands one after the other: These settings would be sufficient for a PC. But if you have a server and need to enable various services for incoming connections, you have to create rules for it:
sudo ufw default deny incoming
sudo ufw default allow outgoing
Step 3: Set rules and allow connections
If you enable UFW at this point, all incoming connections would be denied by default. However, if you want to allow certain connections, you have to allow them using a rule that has been created. An example of this are SSH connections (Secure Shell). You can access and manage your server from outside via SSH. If you want to allow the service, enter the following command: The process for ftp or http works in the same way. You can also enter its port number instead of specifying the service. To do this, enter port 22 for SSH, for example: You can refuse a connection using the " " command . The rule can be completely deleted via:
sudo ufw allow ssh
sudo ufw allow 22
sudo ufw deny ssh
sudo ufw delete allow ssh or If you made a mistake when creating the rules, you can reset the rules to the factory settings. This works via: Tip: You can find all services under etc / . To do this, enter " less / etc / services " in the terminal to have them listed. sudo ufw delete deny ssh
sudo ufw reset
Step 4: Activate UFW and check the status
Once you have created all the firewall rules that you need for incoming and outgoing connections, it is time to activate UFW. To do this, use the command. You can also deactivate the service again if necessary using the " " command . Now that the firewall is active, it is advisable to check the status of the firewall to see the rules that have been created. For a detailed listing, enter the following command:
sudo ufw enable
sudo ufw disable
sudo ufw status verbose
Step 5: Allow special port ranges and IPs
UFW enables access to port ranges instead of individual ports. Here you have to specify the protocol - i.e. UDP or TCP - for which the rules should apply. If the range of ports you want to allow extends from 6000 to 6010, then you have to execute the following commands for UDP and TCP in the terminal: It is also possible to specify allowed IP addresses with UFW. For example, if you want to allow connections from the private IP address 192.168.253.49, execute the following command: You can also allow certain ports for an IP address. To do this, you need to enable port 22 if you want to establish a connection via SSH to the above IP address. This works with the following command:
sudo ufw allow 6000:6010/udp
sudo ufw allow 6000:6010/tcp
sudo ufw allow from 192.168.253.49
sudo ufw allow from 192.168.253.49 to any port 22
Your firewall is now configured. If you've followed our guide, SSH connections will be allowed. If you want to allow other connections as well, create appropriate rules for them..
How to use the graphical user interface for UFW
With the graphical user interface "GUFW" (Graphical Uncomplicated Firewall) the Ubuntu firewall can be operated much more easily. The tool provides an interface with which you can comfortably create rules for incoming and outgoing connections. Follow our step-by-step guide and have a look at the quick start guide .
1st step:
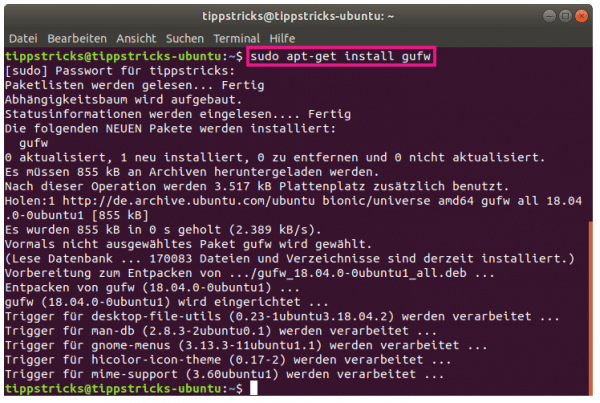 First, install GUFW either via Ubuntu software by searching for it, or via sudo apt install gufw in the terminal.
 2nd step:
 Open GUFW. The firewall automatically sets incoming connections to " Deny " and outgoing connections to " Allow ". You should not change these settings, especially if you are operating a server. Set the status to " ON " by clicking the slider. Then click the " + " below to create a rule.
 3rd step:
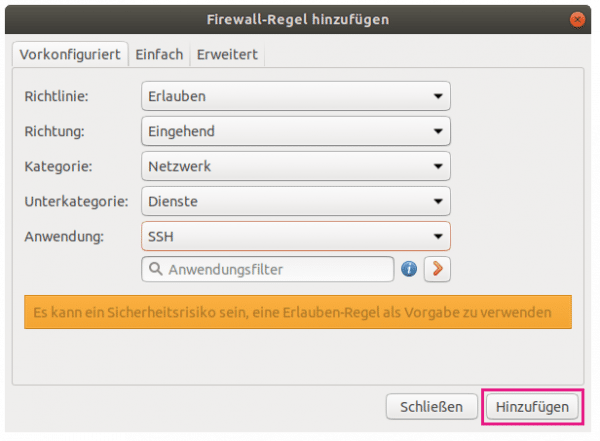 The graphical user interface is intuitive and self-explanatory. As an example, we choose that the incoming connection of the service allows SSH. To do this, adjust the options accordingly and search for the service that you either want to allow or deny. Finally click on " Add ".
 4th step:
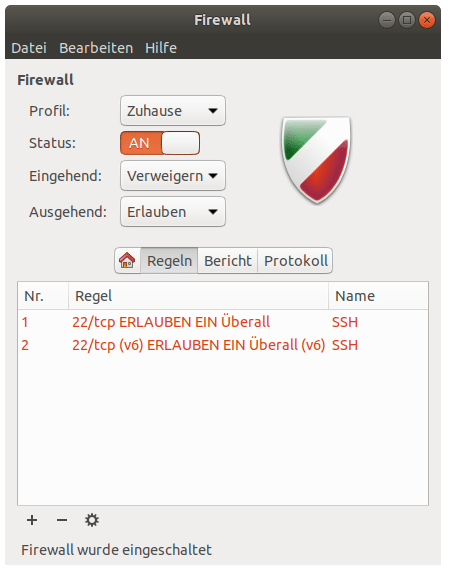 In the overview you can see the rules that you have created. You can now create your own rules or use the " Report " and " Protocol " tabs to check the status of the firewall or the Internet traffic.
 quick start Guide
- First install GUFW using the "
sudo apt install gufw " command in the terminal. - Open the software and set the status to " ON ".
- Then click the " + " below to create a rule.
- Select a service or program for which connections should be allowed or denied. Once the rule has been created, click on " Add ".
- Check the status of the firewall in the overview. Here you also have the tabs " Report " and " Protocol " to choose from.