With Microsoft Excel, you can easily share tables with other people. They can then not only view the table, but also edit it. In this article we will explain exactly how this works.
How to share tables in Excel
To be able to work together on a table, you need a Microsoft account and the ability to save files in OneDrive. This is possible, for example, with a Microsoft Office 365 subscription.
Follow the step-by-step instructions or take a look at the quick start guide ..
1st step
 Open the workbook in Excel and click " Share " in the upper right corner.
 2nd step
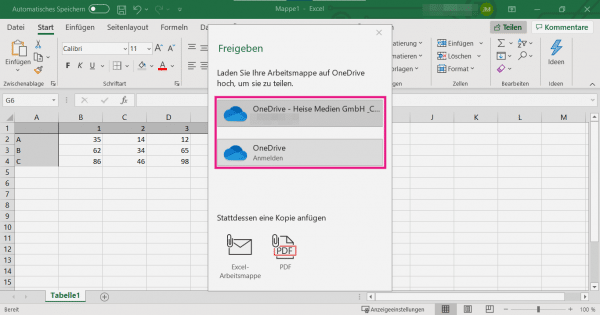 Now you need to upload the file to OneDrive. To do this, select a OneDrive account and, if necessary, log in with your Microsoft credentials . If necessary, give your workbook a name and wait until the file has been uploaded.
 3rd step
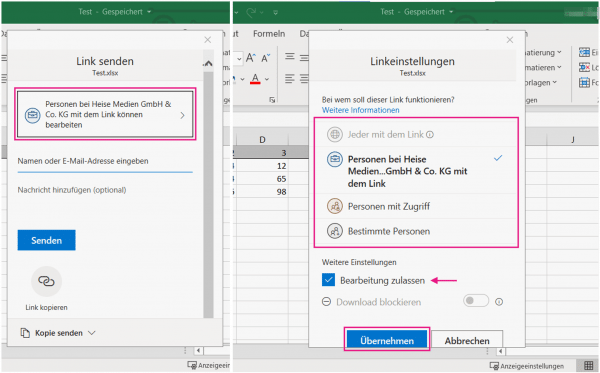 Now click on the big button above to choose who basically has access to the file. Select Anyone With The Link to be able to forward the link to new users without having to manually add them. If you work in an organization or a company, this option is often not available, but you can specify that everyone with the link can access the file. With “ Specific People ” you can manually choose who can access the file. At the bottom you can tick “ Allow editing "Also select that other users are allowed to change the file. Then click on " Apply ".
 4th step
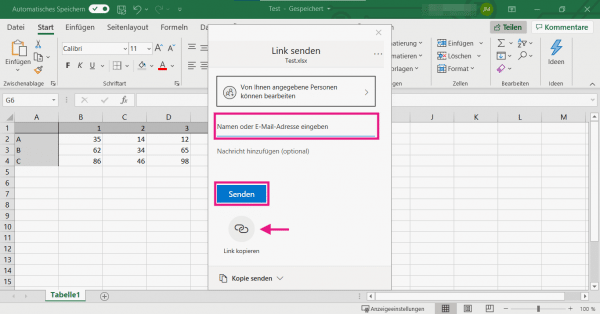 Now add specific people who should have access to the workbook. To do this in the text box the name or email address of the user. Then click " Send " to send the selected people an email with a link to the Excel file, or click " Copy link " to share the link yourself. Other users can now access the shared workbook by clicking the link in the email or message.
 Tip : If you selected "Specific people" in step 3, but would like to add further users later, simply follow steps 1, 2 and 4 again.
quick start Guide
- Open Excel and click Share .
- Select a one-drive account , log in, if necessary, and assign a name to the workbook.
- Click the big button above and choose who basically has access to the workbook. Select below whether people can also edit . Then click on " Apply ".
- Now add the exact users who will be allowed to work on the document by pasting the names or email addresses of the people in the text field. Click " Send " to send an email to users with the link to the document, or click " Copy Link " to send the link themselves.