You can use the Google Analytics tool to evaluate how users interact with your website. You will find out how often your page is visited, how users get there, how long they stay there and what they are looking at. With this information you can continuously improve your website. This article shows you how to set up Google Analytics.
This is google analytics
Google Analytics is a service from Google that you can use to analyze how your app or website is being used. You can find out, for example, how often your website is accessed, how users get there and what they are looking at. You can also link other applications such as Google Ads with Google Analytics. Google Analytics used to be called "Universal Analytics".
With Google Analytics, you focus on how users interact with your site. You can use the Google Search Console to analyze how your website is found by the search engine. Find out exactly what Search Engine Optimization (SEO) is here.
To use Google Analytics, you need to set up an Analytics account and add a Google Analytics tracking code to your website. You can also use Google's Tag Manager for this. In the following you will now find out how to set up a Google Analytics account, how to start data collection and how to anonymize the IP addresses of your users.
Set up a Google Analytics account
Follow our step-by-step instructions or take a look at the brief instructions ..
2nd step:
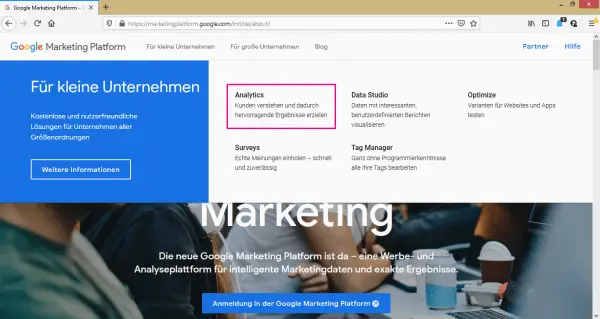 In the menu that opens, click on " Analytics ".
 3rd step:
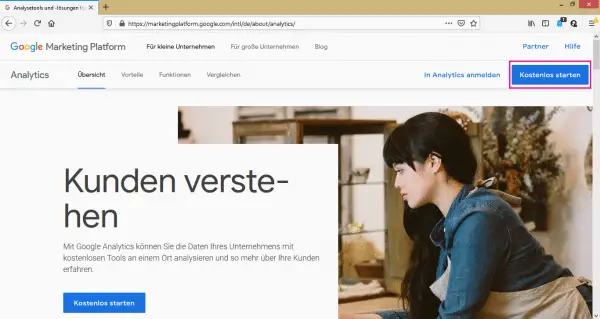 On the Google Analytics website, click on " Start for free " in the top right corner and log in with your Google account .
 4th step:
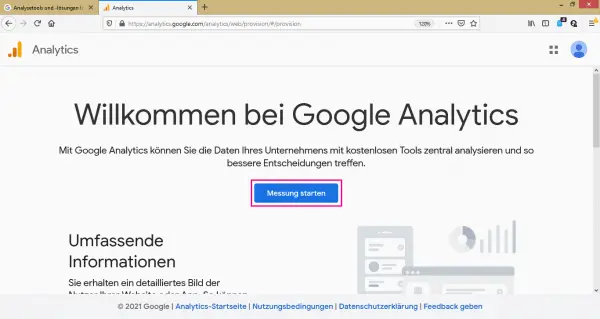 Now you need to create a Google Analytics account . To do this, click in the middle on " Start measurement ".
 5th step:
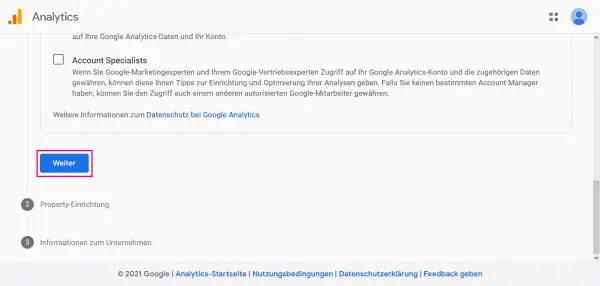 You will now be guided through the account setup . First of all, you have to give your account a name and make some settings as to which data may be released under certain circumstances. When you are done, click " Next " below .
 6th step:
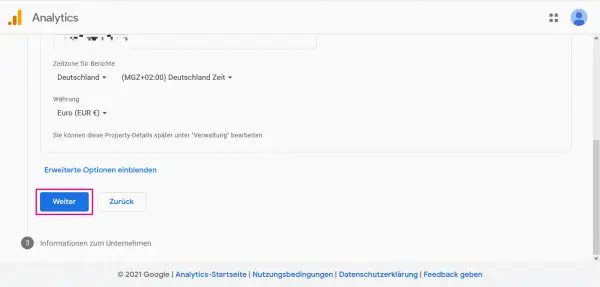 Next, set up your so-called property . This is a specific project that you want to monitor with Google Analytics, for example your website. Give your property a name , set the time zone and, if necessary, the currency. You can also edit these settings later. Then click " Next " below .
 7th step:
 Now you can enter some information about your company (industry, size and your goal with Google Analytics). If you don't want to do this, you can skip the step as well . Click on " Create " below .
 8th step:
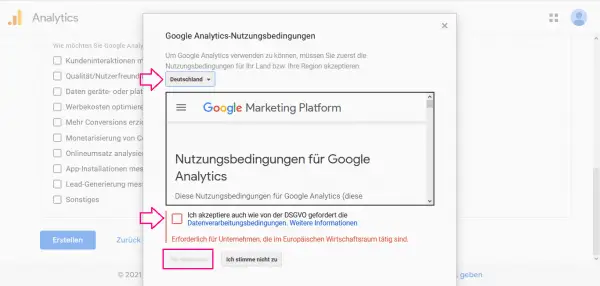 To continue, you must read and accept the Google Analytics Terms of Service. Select your country from, read the rules, set possibly the hook and then click " I agree ".
 9th step:
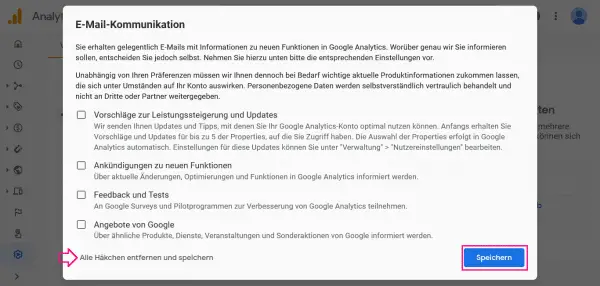 Your Google Analytics account will now be set up. Before you can start using it, you still have to decide which emails you would like to receive on the subject of Google Analytics. If you click "Uncheck All and Save ", you will only receive necessary information. Otherwise select the desired points and click on " Save " at the end .
 10th step:
 Google Analytics is now ready for your use. To create a new property or to edit an existing one, click on " Administration ".
 11th step:
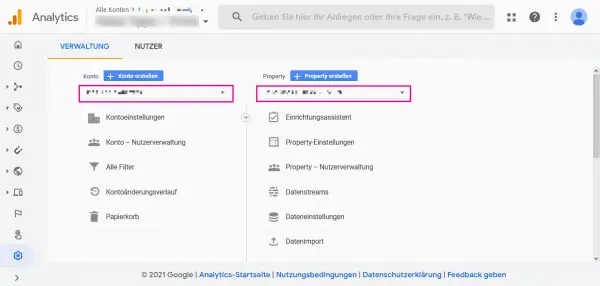 If you have several Google Analytics accounts, you can select one of them from the drop-down menu under " Account ". You can also select a property assigned to the account under " Property ".
 Start data collection with Google Analytics
Follow these step-by-step instructions or take a look at the quick start guide .
1st step:
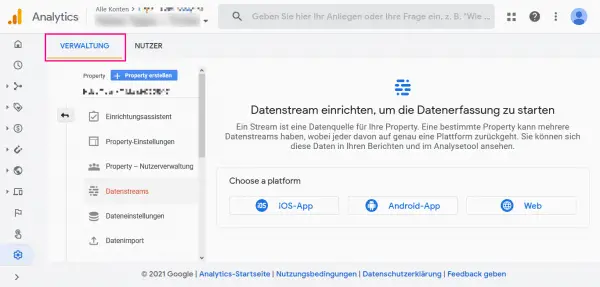
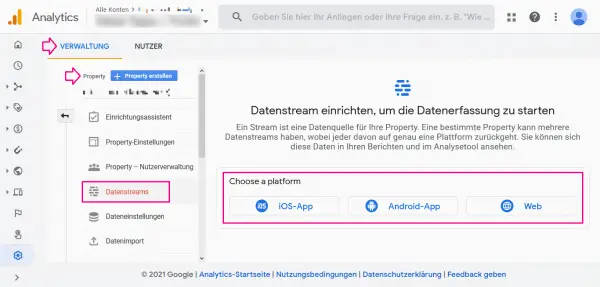 To start collecting data for your website, you need to set up what is known as a data stream. To do this, click in " Administration " under " Property " on " Data Streams " and then select whether your project is an Android or iOS app or a website. In our example we choose a website.
 2nd step:
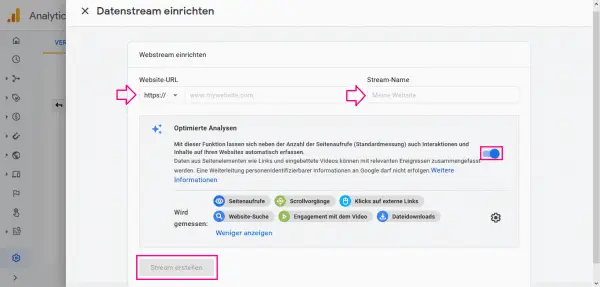 Now enter the necessary information about your project. For a website, you enter its URL and a name for the data stream . You can also activate " Optimized analyzes " in order to receive further information on the use of your website in addition to the page impressions. Finally, click on " Create Stream " below .
 3rd step:
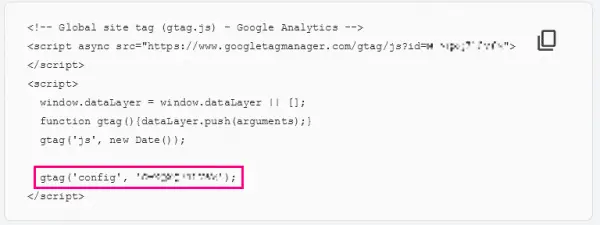
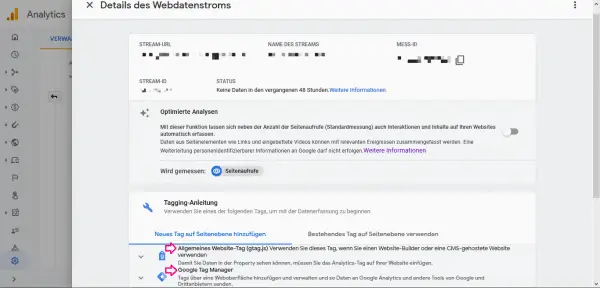 Your stream has now been created. In order to get data about your website, one last step is missing: you have to add a short program code , a " tag " , to your website . There are two ways to do this: You can insert the " General Website Tag " into the HTML of your website yourself. To do this, click the corresponding button and copy the program code. You now have to insert this in the <head> part of your HTML code. Alternatively, you can use the Google Tag Manager to manage your tags. In doing so, however, data is sent to Google and third-party providers. If the analysis tag is integrated into the code of your website, it collects data on user activity. In order to protect the data of your users, you are obliged to anonymize their IP address ! The code contains your tracking ID (also known as tracking code), which is linked to your Analytics account. This will give you the tracking information that is collected on your website.
 Data protection: anonymize the IP of the user
In order to protect users' data, it is imperative that you anonymize their IP addresses before tracking. A small addition to the tag that you added to the <head> section of your HTML code is sufficient for this. To do this, write the following in the last line of code after your tracking ID: ", {'anonymize_ip': true}". The entire last line then reads "gtag ('config', ' [Your tracking ID is here] ', {'anonymize_ip': true})"..
 In order to anonymize the IP address of your users, you need to add a small piece of program code.
 Quick guide: Create a Google Analytics account
- Open the Google Marketing Platform and hover your mouse over " For Small Businesses " at the top . Then select " Analytics " in the menu that opens .
- Now click on " Start for free " in the upper right corner . Sign in with your Google account .
- Then click in the middle on " Start measurement ". You will now be guided through the account setup.
- First give your account a name and make settings for data sharing . Then click on " Next " below .
- Now set up your property . Give it a name, set the time zone and, if necessary, the currency. Then click on " Next " below .
- Optionally, you can now enter information about your company. Then click on " Create " below .
- Read and accept the Google Analytics Terms of Use .
- Then decide which emails you would like to receive about Google Analytics.
- Google Analytics is now ready for your use.
Quick guide: start collecting data with Google Analytics
- Under " Administration " click on " Data Streams " and select the type of your project (here a website as an example).
- Provide the required information about your project, then click " Create Stream " below .
- The last thing you need to do is add a tracking tag to your website. To do this, either copy the " General Website Tag " and paste it yourself in the HTML <head> of your website. Or you can manage your tags with the Google Tag Manager .
- The analysis tag now collects data about user activity on your website. As the operator of the site, you are obliged to protect your users' data by anonymizing their IP address !