The administration of large databases remains a delicate subject for many people because many data come from a numerical type, others from text, others from text, and so on..
It is true that when working with data of different types we can face errors or more calculations, today we can see how we have special software to make this administration as simple as possible.
Google , the IT giant, has developed a free proposal for this type of data management with its Sheets or Spreadsheets program, which has the peculiarity of being a web-based program so there is no need for local installation and To access it, just have a Gmail account. This makes Sheets a really simple tool, free and with various features that have nothing to envy to special spreadsheet software..
One of the daily tasks that we can perform with Sheets is the management of the rows and columns, the soul of any spreadsheet , and for this reason we will see how to exchange and move these types of elements for better control of the data.
1. Move the columns in the spreadsheet by dragging them in Google Sheets
As users of Google spreadsheets it will be necessary to exchange the columns of the table in the spreadsheets. That doesn't mean swapping the actual spreadsheet columns, but only the table cells included in them. For example, if we have cell ranges in columns A and B, swapping them would move the first table column range to B and the second to A.
Swapping columns in a table is a simple process in Google Sheets because it can be done by simply dragging one column over another. Drag and drop is probably the best way to swap table columns in Spreadsheets for its simplicity and ease of use..
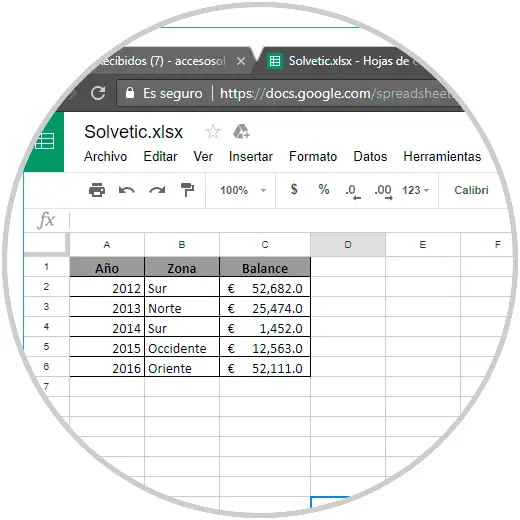
Step 1
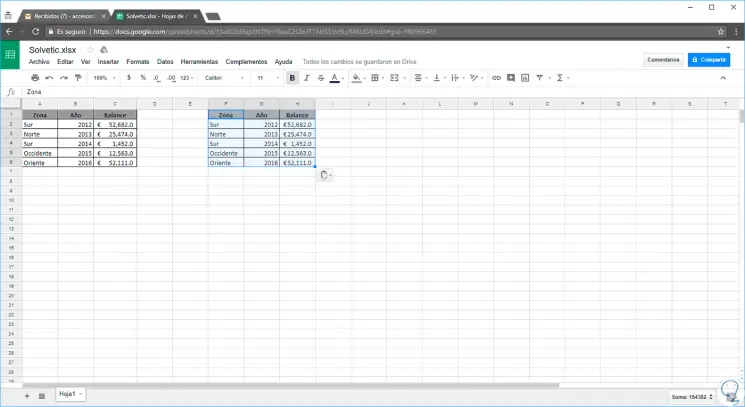
We have the following data:
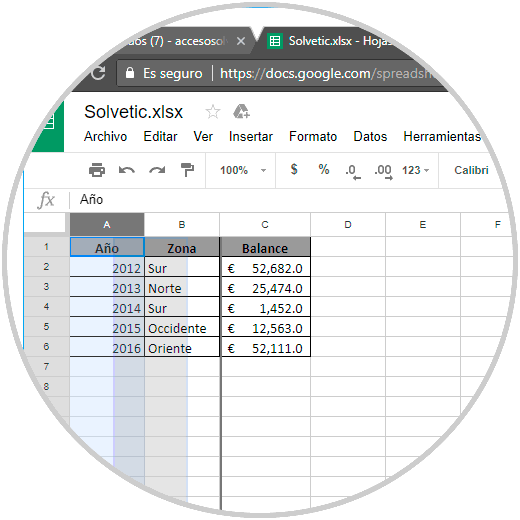
Step 2
We will click on the column heading A to select it. The cursor must become a hand. Then again we will click on the heading of column A and hold the left mouse button down. We drag the first column of the table onto column B:
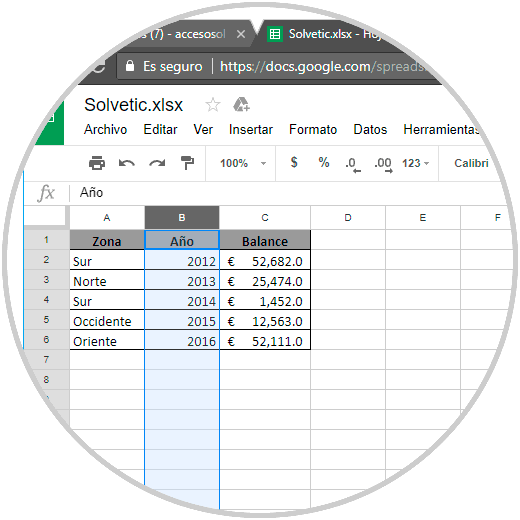
Step 3
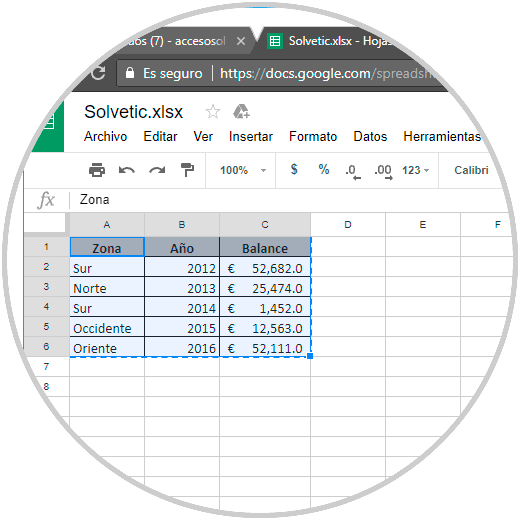
This will change the columns in the table. As we see, commune A has been moved to the place where column B was, this process can be carried out with the number of columns we want.
2. Move the columns of the spreadsheet using copy and paste in Google Sheets
You don't need to use the Ctrl + C (Copy) and Ctrl + V (Paste) key combination to swap table columns in Google Sheets. However, Sheets users have the ability to swap columns by copying and pasting them despite restrictions on the Windows clipboard. It is only allowed to copy a range of cells at a time to the clipboard, but it will still be possible to swap columns in the table by pasting a second copy of this data into a blank area of the spreadsheet.
Step 1
To validate this in Google's spreadsheet we will select cell range A1: C6 and use the following key combination to copy the selected range:
Ctrl + C
Step 2
Next, we will select cell range F1: H6, which includes exactly the same number of rows and columns as the copied table, and use the following combination, this pastes a second table into the spreadsheet:
Ctrl + V
We can see how simple it is to swap or move a column in Google spreadsheets to get a better order and visualization of the managed data.