Flutter tutorial: learn to develop applications with the Google SDK
If you want to program your own application, you will not be short of options. Ready-to-use component kits are very popular for their ease of use, but frameworks are a great alternative and are making the development process easier and easier. One of the most modern options is the software development kit or SDK, for its acronym of English? Software development kit ?, Flutter, developed by Google. This open source framework enables the development of high-performance mobile applications for iOS and Android, as well as web and desktop applications in the Google Dart language..
In this Flutter tutorial in Spanish, we show you the most important steps to start using the Google SDK.
Index
- Learn Flutter: what are the requirements?
- Step 1: create your first app with Flutter
- Step 2: integrate an external package
- Step 3: add a status widget
- Step 4: create an endless scrolling list
- Flutter tutorial: summary
Learn Flutter: what are the requirements?
If you want to learn to code with Flutter, you don't need any prior knowledge of application development or the web. It is not even essential that you are familiar with Dart, the language of Google. If you know object-oriented programming and basic programming concepts like variables, loops, and conditions, you already have a good foundation to work with this framework..
In this Flutter tutorial in Spanish, we will introduce you to programming with this software development kit. To do this, we will write a simple application that randomly combines words and presents these combinations to the user. You will need the basic tools for programming with Flutter: the Flutter SDK and an editor . The former is available for Windows, macOS, and Linux, and you can download it from the official Flutter website.
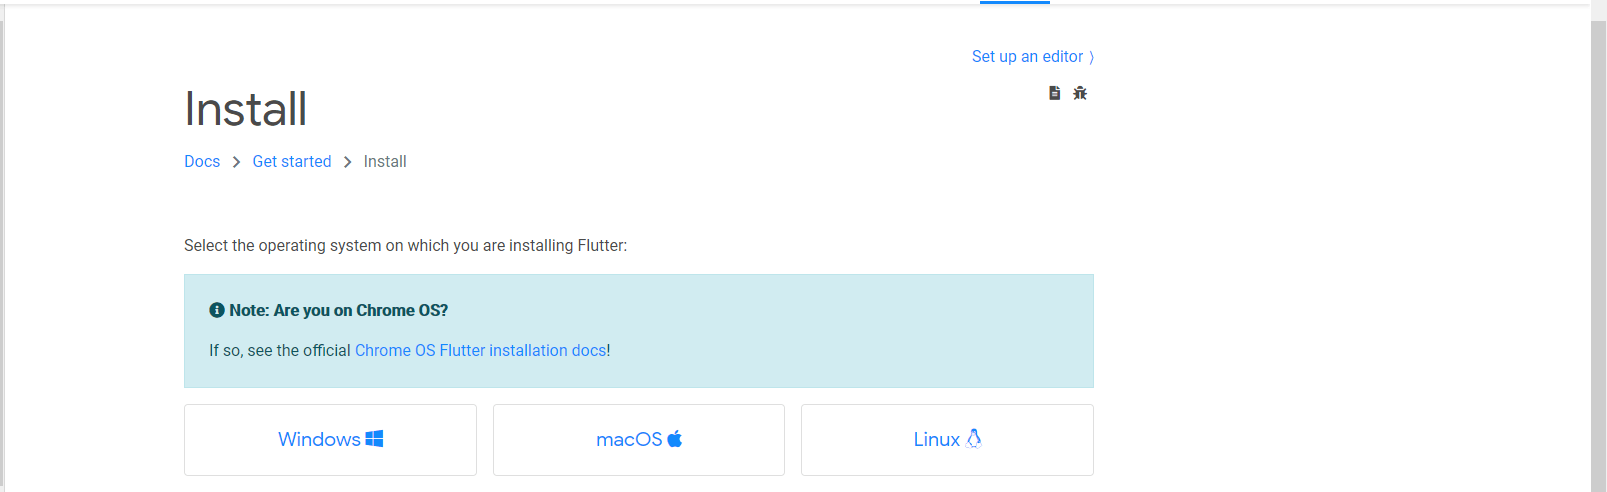 Select the Flutter package for your operating system and follow the instructions to install and configure the SDK.
As for the editor, you can choose the one you want. However, for an optimal user experience with automatic code completion , syntax highlighting, and support for debugging and editing widgets , Google recommends using the Android Studio code editor, for which the company also offers an official plugin of Flutter. This is why in our Flutter tutorial we used Android Studio. After installing this development environment optimized for Android application development, configure the Flutter plugin :
- In the menu bar, go to? File ?.
- Click? Settings ? and then select? Plugins ?.
- Writes ? Dart ? in the search line and click? Install ? in the suggested output to install the extension for the Dart programming language.
- Confirm the use of the extension to third parties with? Accept ?
- Repeat the procedure with the term? Flutter? and press? Restart IDE ? after installation to apply the changes.
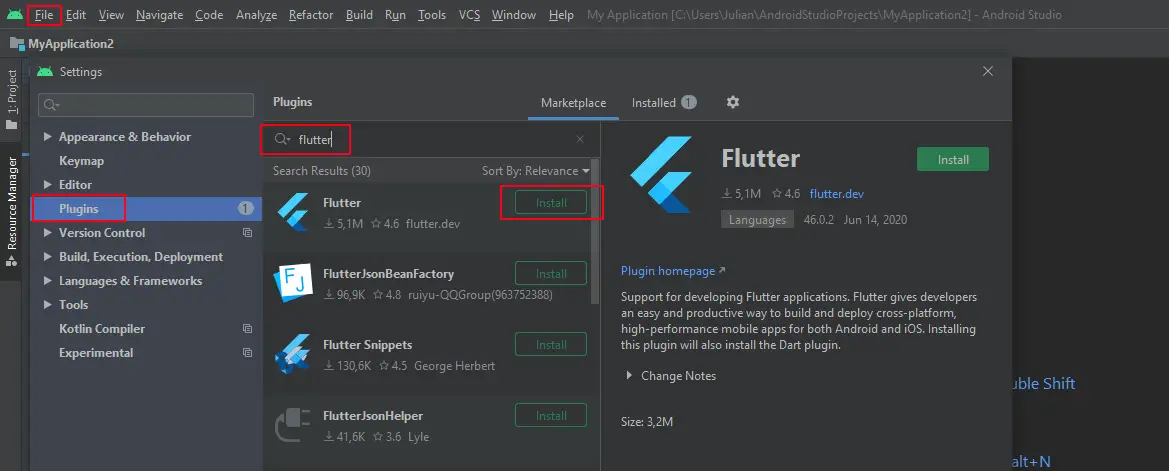 Installing the Flutter plugin in Android Studio only works if the extension for the Dart programming language has been previously installed.
 Note
As an alternative to Android Studio, Google recommends the GNU Emacs, Visual Studio Code and IntelliJ IDEA applications, for which there is also an official Flutter plugin.
Step 1: create your first app with Flutter
After installing Flutter and the desired development environment (or editor), you can create your first application in Flutter. As we already mentioned, in this Flutter tutorial we use Android Studio, so now we will launch the IDE for this purpose. Open the? File? Tab, select? New? and later, ? New Flutter Project ? to start a new project based on the framework..
 Create a new Flutter project with Android Studio.
Choose ? Flutter Application ? as the desired project type and press? Next ?. In the settings menu, now define a job title and the local location where the application will be saved. You can also add a description of the project. On the line ? Flutter SDK path ?, indicates the path to the installed Flutter framework.
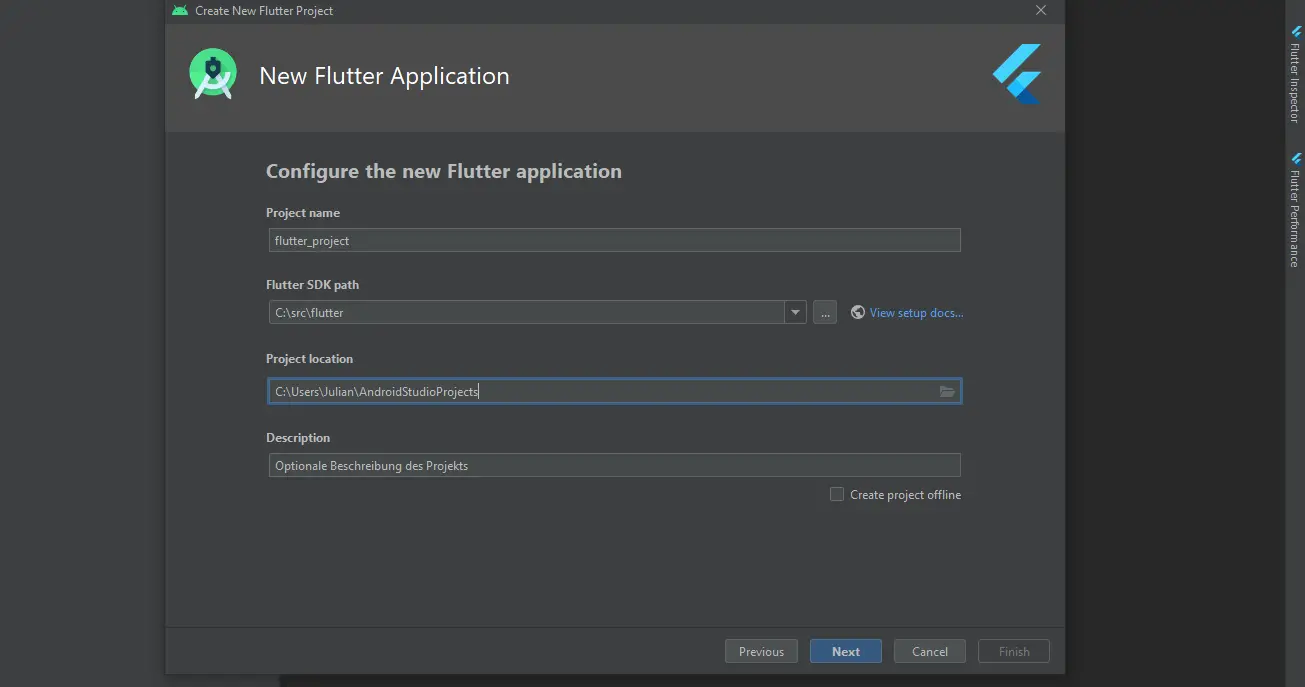 The path to the Flutter SDK is customizable and depends on where you have saved the kit on your system (in this Flutter tutorial, C: \ src \ Flutter).
 When you're done, click ? Finish ? to create the new app in Flutter. In the main.dart file , the basic project work file, which we also use in this Flutter tutorial, write the following code for the application to present a simple? Hello World? Message. (you can delete the existing code in the main.dart file):
// Copyright 2018 The Flutter team. All rights reserved. // Use of this source code is governed by a BSD-style license that can be // found in the LICENSE file. import 'package:Flutter/material.dart'; void main() => runApp(MyApp()); class MyApp extends StatelessWidget { @override Widget build(BuildContext context) { return MaterialApp( title: 'Welcome to Flutter', home: Scaffold( appBar: AppBar( title: Text('Welcome to Flutter'), ), body: Center( child: Text('Hello World'), ), ), ); } }
Once you have inserted the snippet, you can run this first version of your own application. In Android Studio, select the corresponding virtual machine (in? Flutter Device Selection?) And then press the launch button (? Run main.dart?):
 After clicking the play button, the main.dart file runs on the selected test device. You can also use the [Shift] + [F10] key combination.
 Note
To preview an application in Android Studio, an instance of the desired target platform must be installed . Otherwise, you will not be able to select a virtual test device to test the application in? Flutter Device Selection ?. To add an application, select the menu items? Tools ? Y ? AVD Manager ?. Finally, select? Create virtual device? and install the virtual device of your choice. You can find detailed instructions for creating and managing virtual devices in Android Studio on the Android developer forum.
The first startup or debugging of the application will take some time, so be patient, before seeing the welcome message on the test environment screen.
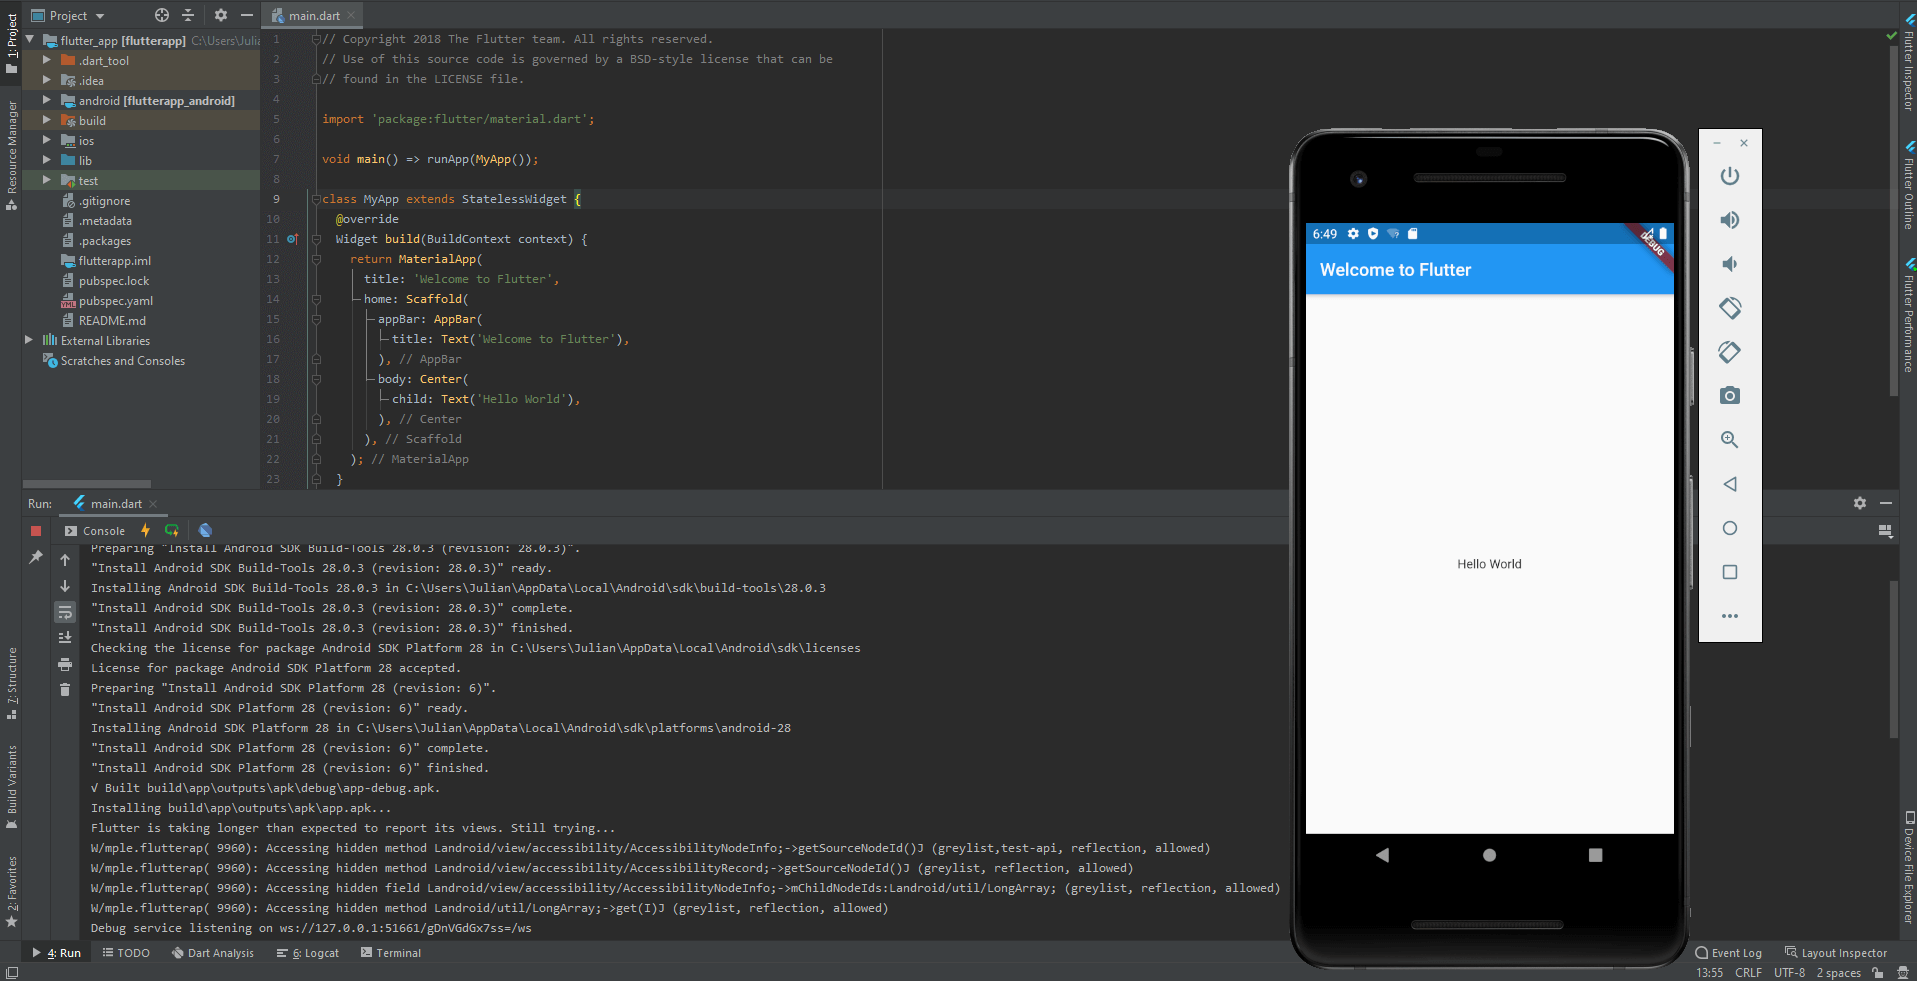 Flutter on Google tutorial: testing your own first application.
 Step 2: integrate an external package
After creating a simple app in the first step of the Flutter tutorial, we will now extend it with an external package. To be more precise, we will include a package of words in our project, with the aim of designing an application that combines words randomly. As an example, we use the open source package? English_words? (licensed by MIT), which you can find, like many other open source packages, on the pub.dev platform. This pack contains over 5000 of the most common words in English, making it ideal for the purposes of this Flutter tutorial.
Flutter applications use the pubspec.yaml file to manage packages and dependencies. Access this file and add an entry for the language pack to the list of dependencies (make sure you have the most up-to-date, in this case 3.1.5):
dependencies: Flutter: sdk: Flutter cupertino_icons: ^0.1.2 english_words: ^3.1.5
Then run the command? Flutter pub get ?. Android Studio even has a button called? Pub get ? for it.
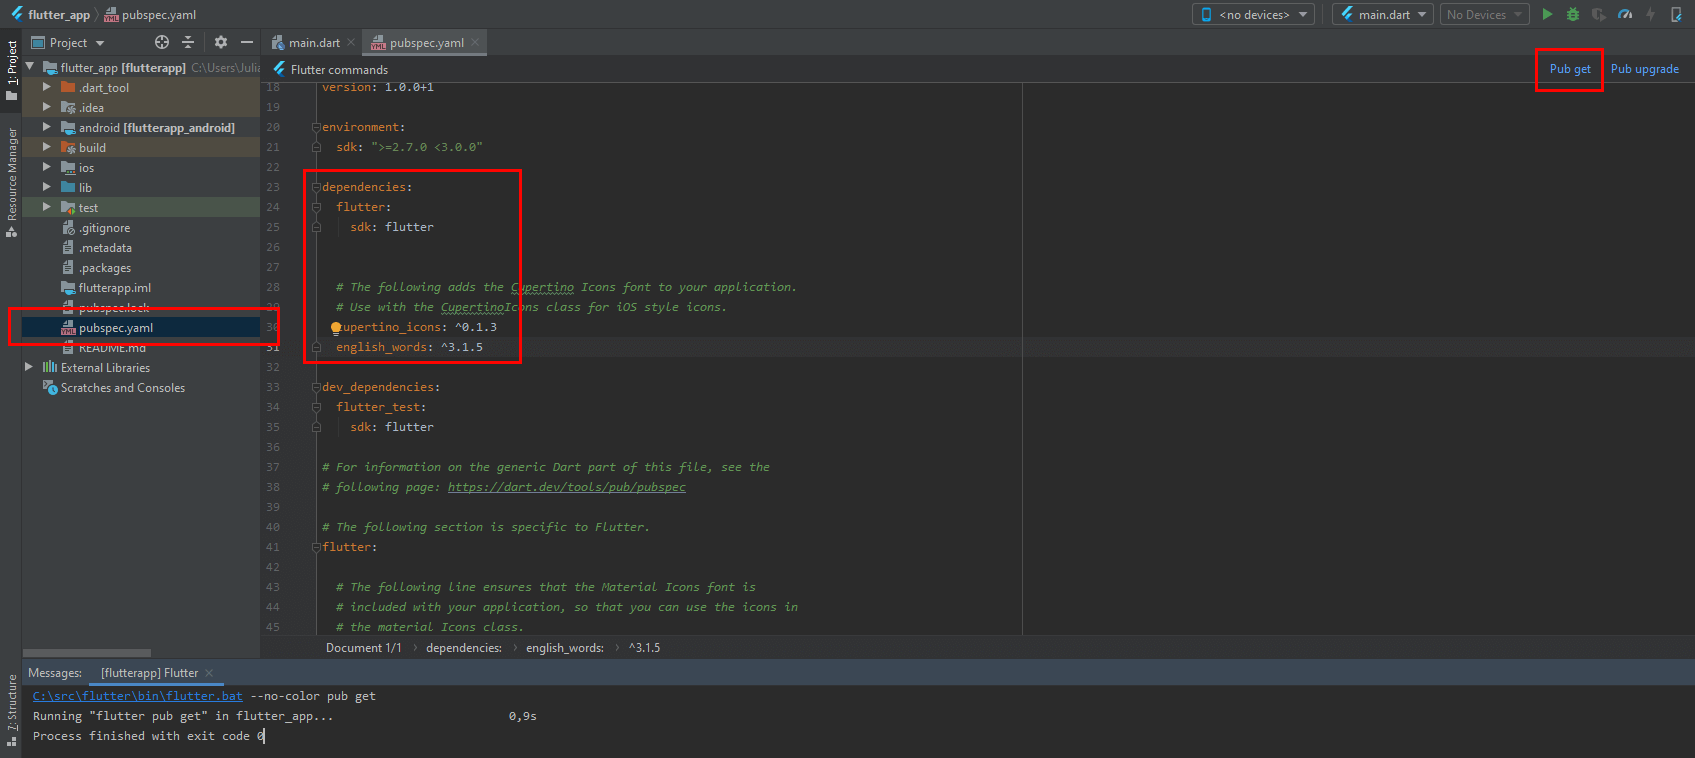 In the console, you can check if the command? Pub get? has been successfully executed. If so, you will see the output? Process finished with exit code 0 ?.
 Go back to the main working file main.dart and import the language pack :
import 'package:Flutter/material.dart'; import 'package:english_words/english_words.dart';
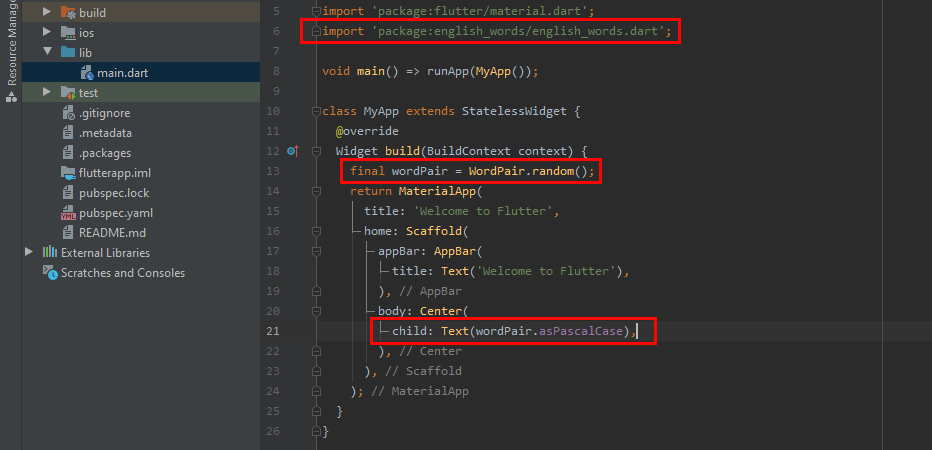
Also write the following line in the application code:
final wordPair = WordPair.random();
Finally, replace the input child , which is responsible for the output of the text? Hello World ?, with the following input:
child: Text(wordPair.asPascalCase),
 With the new child entry, randomly created word pairs (? WordPair.random?) Must respectively start with a capital letter (? AsPascalCase?)? For example,? UpperCase ?.
With each execution of the new application code, you will get a couple of randomly generated English words .
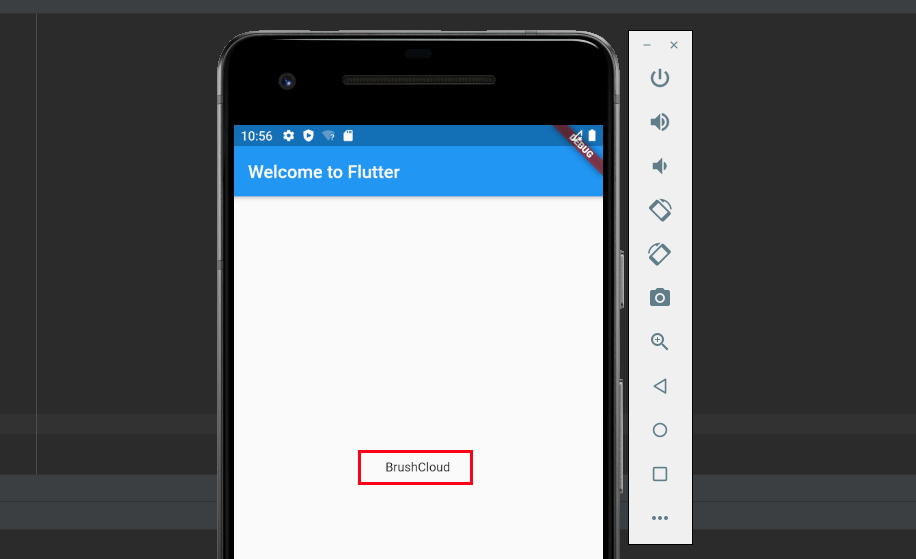 In the example, our Flutter tutorial application has combined the two English words brush and cloud.
 Step 3: add a status widget
Widgets stateless ( stateless widgets ), as have been used so far in this tutorial of Flutter of Google, you can not be changed. This type of widget cannot be changed state while the application is running, so it is not possible to rewrite it if the application is running. Instead, widgets state ( stateful widgets) Yes you can change the state even while the application is running , so it is not necessary to have determined the run the application. If you want to add interactivity to your app elements in Flutter, you will need status widgets.
Note
Flutter widgets are always stateless or stateless. Typical examples for stateless components are icons , buttons, or text modules . Typical examples of simple state widgets include check boxes , forms, or sliders .
Now we are going to integrate an interactive widget in our application. At least two classes are required to implement it: on the one hand, a StatefulWidget class , which in turn generates an instance of the State class .
First, we create a minimalist state class called? RandomWordsState? adding the following code to the end of main.dart :
class RandomWordsState extends State<randomwords> {</randomwords> // TODO Add build() method }
In this case, the generic state class is expressly assigned for use with the? RandomWords? Widget. The status widget itself is written to the main.dart file in the next step using the following entry (in your code, before the? RandomWordsState? Class):
class RandomWords extends StatefulWidget { @override RandomWordsState createState() => RandomWordsState(); }
When you run this new application code, Flutter will tell you that there is currently no build () function defined for? RandomWordsState ?.
 Android Studio: Dart bug analysis for our Flutter tutorial app.
 In the inline fragment of the State class, the placeholder comment ? // TODO Add build () method ?, which is now replaced by the code in the build () function , still covers a critical position :
class RandomWordsState extends State<randomwords> {</randomwords> @override Widget build(BuildContext context) { final wordPair = WordPair.random(); return Text(wordPair.asPascalCase); } }
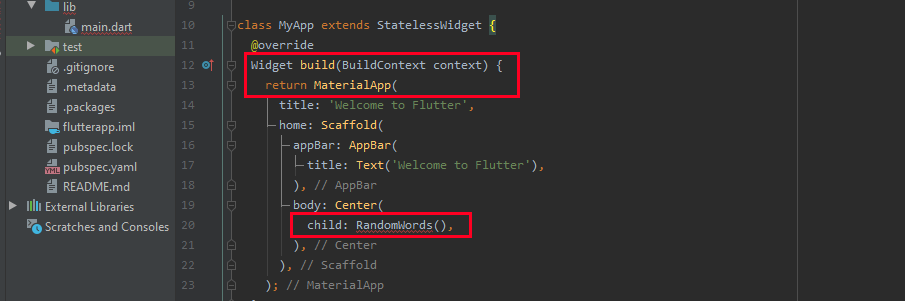
Finally, delete the line ? Final wordPair = WordPair.random () ;? of the MyApp class and replace the entry child ? child: Text (wordPair.asPascalCase) ,? by? child: RandomWords (),?.
 Flutter tutorial in Spanish: code tuning in the sample application.
 When running this new code, the virtual tester should reproduce a couple of words as before, but now it relies on a status widget that allows user interaction.
Step 4: create an endless scrolling list
To provide a first example of an interactive Flutter widget , we will expand our application a bit in the last part of this Google Flutter tutorial: specifically, will the class be adapted ? RandomWordsState ? so that it represents not just individual word pairs, but an endless list of word pairs that the user can refer to. In addition, the pairs of words already suggested should be saved (to avoid duplicate entries) and the font size of the results will be increased.
Start with the last two points (save the displayed results and customize the font) by including a list of _suggestions and a _biggerFont variable :
class RandomWordsState extends State<randomwords> {</randomwords> final _suggestions = <wordpair>[];</wordpair> final _biggerFont = const TextStyle(fontSize: 18.0); }
Then, in the same "RandomWordsState" class, add the corresponding _buildSuggestions () function :
Widget _buildSuggestions() { return ListView.builder( padding: const EdgeInsets.all(16.0), itemBuilder: (context, i) { if (i.isOdd) return Divider(); final index = i ~/ 2; if (index >= _suggestions.length) { _suggestions.addAll(generateWordPairs().take(10)); } return _buildRow(_suggestions[index]); }); }
The function shown adds several features to the application: among other things, the list of word pairs (List.View) is integrated, which is also made clearer by a one-pixel dividing line . Additionally, ten more suggestions (line: _suggestions.addAll) are required to be displayed when the user reaches the end of the list.
A basic component of the extended widget is also the _buildRow () function , which is called once for every pair of words and presents the pairs as ListTitle . Therefore, we will implement this function in the next step:
Widget _buildRow(WordPair pair) { return ListTile( title: Text( pair.asPascalCase, style: _biggerFont, ), ); }
The build () method , which we implement when we generate the status widget (step 3), must be told to use the buildSuggestions () function . Therefore, the previous content of the method must be replaced by the following code:
@override Widget build(BuildContext context) { return Scaffold( appBar: AppBar( title: Text('Word Generator'), ), body: _buildSuggestions(), ); }
Lastly, update the build () method as well in the MyApp class by changing the title and defining in the start input that it is a RandomWords widget:
title: 'Word Generator', home: RandomWords(),
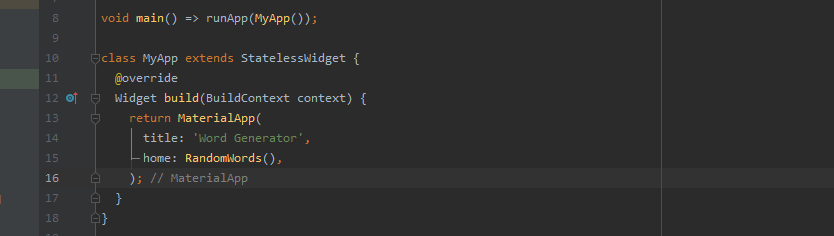 MyApp class from Flutter tutorial test app after tweaks.
When you run the code again, the application will run under the new name ? Word Generator ?. In addition, a whole list of word combinations will be presented and you can scroll down to see more results.
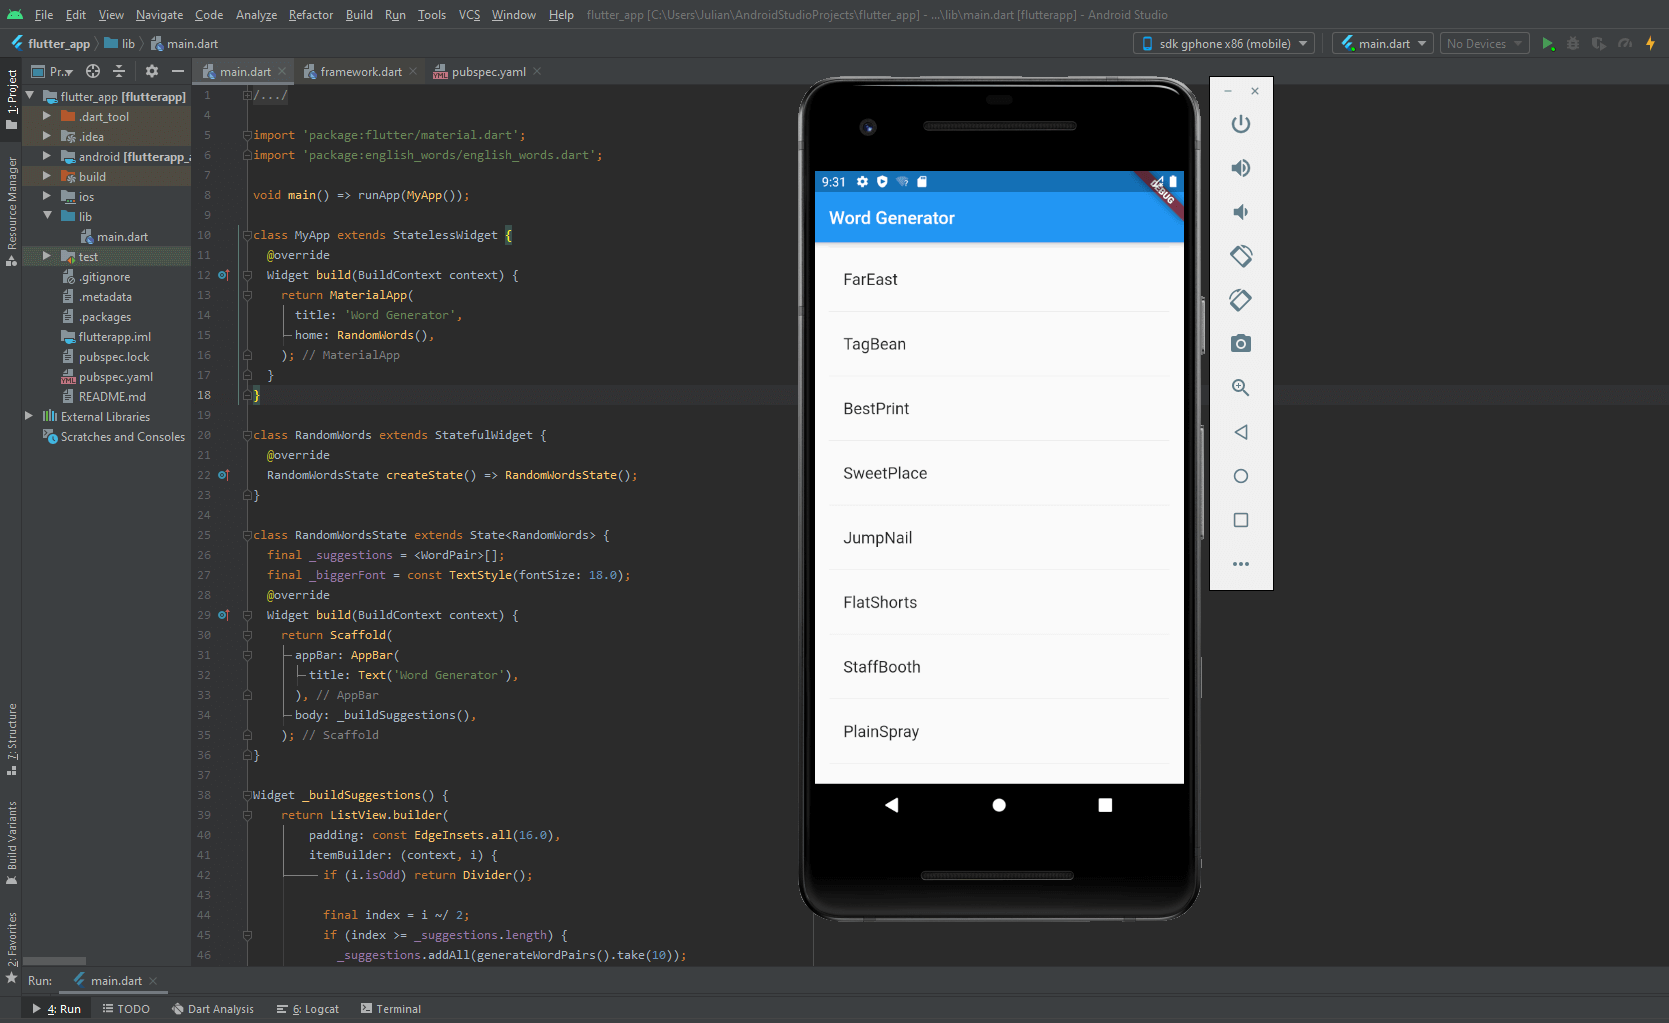 Android Studio and Android virtual machine (pixel 2) with the sample application in Flutter finished.
 Flutter tutorial: summary
In this Flutter tutorial from Google, you have learned the most important basics for working with Flutter and have been able to apply them in a simple example application. Of course, you can develop much more detailed and complex applications in Flutter, as well as you can customize the design once you are familiar with the framework.
Finally, we present the complete code of the example application developed for Android in the main.dart file:
import 'package:english_words/english_words.dart'; void main() => runApp(MyApp()); class MyApp extends StatelessWidget { @override Widget build(BuildContext context) { return MaterialApp( title: 'Word Generator', home: RandomWords(), ); } } class RandomWords extends StatefulWidget { @override RandomWordsState createState() => RandomWordsState(); } class RandomWordsState extends State<randomwords> {</randomwords> final _suggestions = <wordpair>[];</wordpair> final _biggerFont = const TextStyle(fontSize: 18.0); @override Widget build(BuildContext context) { return Scaffold( appBar: AppBar( title: Text('Word Generator'), ), body: _buildSuggestions(), ); } Widget _buildSuggestions() { return ListView.builder( padding: const EdgeInsets.all(16.0), itemBuilder: (context, i) { if (i.isOdd) return Divider(); final index = i ~/ 2; if (index >= _suggestions.length) { _suggestions.addAll(generateWordPairs().take(10)); } return _buildRow(_suggestions[index]); }); } Widget _buildRow(WordPair pair) { return ListTile( title: Text( pair.asPascalCase, style: _biggerFont, ), ); } }