Skype is one of the most widely used communication platforms in the world, not only for making calls and video calls since its majority use is for sending and receiving text messages. The program is available on many platforms such as Windows, which is certainly where I personally use it the most. Skype for Windows has, as on other platforms, a notification service that depending on the moment or the user can be somewhat annoying.

You may also be interested: How to disable or remove Skypehost.exe from Skype in Windows 10. (Windows Skype)
At work I usually have Skype open all the time, so in this way I have direct contact not with my boss, my colleagues, but also with my girlfriend and friends. Although I have nothing to hide, it is true that uncomfortable situations can occur when you and your coworker are looking at something on your computer screen and a Skype notification appears with part of the text right in the taskbar..
These are not the only Skype notifications, since for example it will also show you a window in the lower right corner of your computer screen indicating the users who connect during the period of your connection. The problem is that these notifications, at least to me, are quite annoying and unfortunately they are all activated by default.
The truth is that I started to investigate and it is not complicated, however you have to navigate through the settings of the Skype program installed on your Windows computer. That is why below I want to show you the specific steps to be able to deactivate the annoying Skype message notifications without getting lost in the attempt:
How to disable Skype notifications so that annoying windows are not shown in the Windows taskbar.
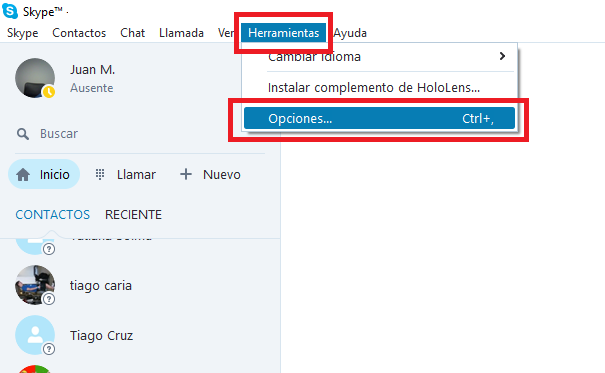
The first of all will be to access Skype using your username and password. Once inside the Skype for Windows interface you will have to click on the Tools option located at the top. This will bring up a menu where you will have to click on: Options ..

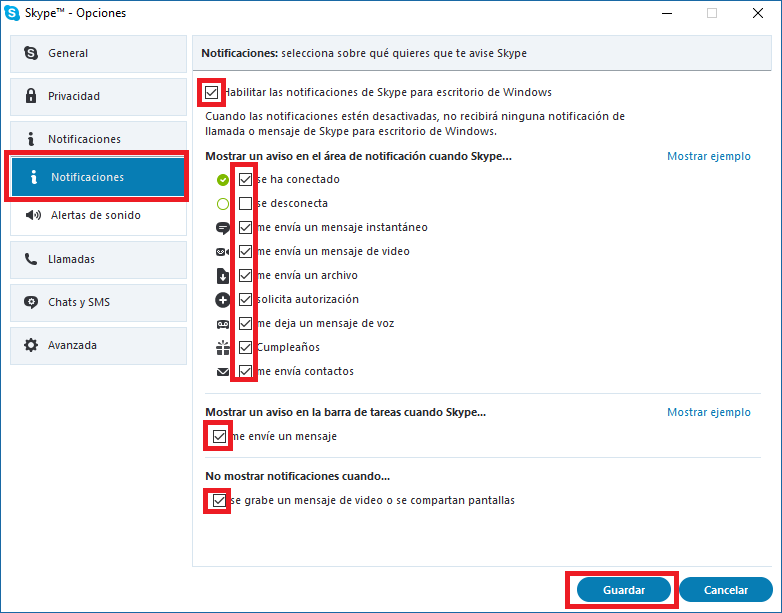
This will open a small one with a menu on the left side of it. Among all the options displayed in the menu you will have to click on the Notifications option. This will cause all notification related settings to be displayed in the center of the window. These Settings are really accurate since it allows you to configure all the notifications in detail.
For example, if, like me, you do not want any notification to be displayed on your Windows desktop, simply uncheck the first of the displayed boxes that counts as a description: Enable Skype notifications for Windows desktop..

On the contrary, if what bothers you is a specific type of notification such as the message so that nobody can read the messages received from the notification, you just have to uncheck the box: Show a warning in the taskbar when Skype… send me a message.
Whatever your configuration preference, once everything is according to your taste, don't forget to click on the Save button. This will make the new Skype notification settings take effect and therefore stop showing the notifications that bother you the most.