If there is something that differentiates Android devices from iOS devices with their great ability to be customized and modified at the software level (operating system). However, these modifications and customizations can lead to certain problems, such as the instability of the Android system. This instability may be due to the installation of unofficial ROMs, the installation of Advanced Recovery Modes or the rooting among many other reasons.
You may also be interested in: How to Root any Android phone or Tablet with Vroot. (iRoot)
One of the most common changes in Android devices is the replacement of the factory ROM which incorporates numerous applications from the manufacturer, for an unofficial ROM which is much lighter, making your device work in a much more fluid way. However, this process can cause your device to malfunction or simply stop working. Something similar occurs with the installation of an Advanced Recovery..
In my case, after trying to root my Android Smartphone, my device did not start. It literally stayed on the manufacturer's logo without being able to start. After much research, I understood that my device's firmware probably contained errors or was corrupted. In this case I had no choice but to reinstall the factory firmware of my Android device. This process is what is known as flashing a ROM.
Before continuing with the steps in the tutorial, you should know that each Android device has a different specific ROM that varies depending on the model and manufacturer of the phone or tablet..
Having said this, we show you step by step how to flash a factory ROM on your Android device, in order to recover your brick or brickened Android device:
Learn how to install the Factory ROM on your Android phone.
The first of all will be to start our Windows 10 operating system in the way in which the developer signature is not necessary in the drivers that we want to install. For this we will have to access the advanced boot options which you can do from: Configuration> Update and security> Recovery> Advanced Start> Restart now .
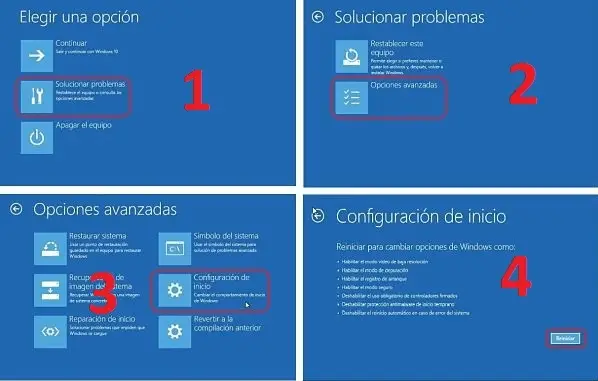
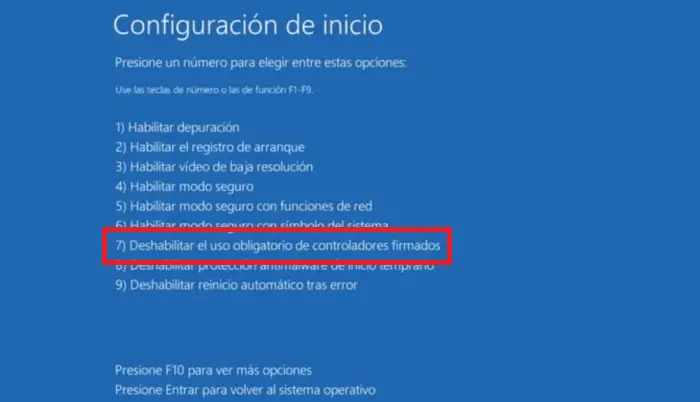
Once on the Windows 10 advanced start blue screen, you should go to: Troubleshoot> Advanced Options> Start Settings> Restart. This will open a new window in which you will have to press the F7 key, which corresponds to the option: Disable the mandatory use of faked drivers. Windows 10 will now boot normally..
The next step will be to download the official ROM of our Android device. You can do this by logging into the following website and selecting the exact manufacturer and model of your device: Android ROM download site . To download the official ROM you will only have to select the link that says: Flash File .
Once you have downloaded the ROM of your device, you must unzip it from the ZIP file. When it is unzipped, it will be time to download the Windows drivers that will make the process succeed. You will have to download this driver from the following link: Download MT65xx USB VCOM DRIVERS
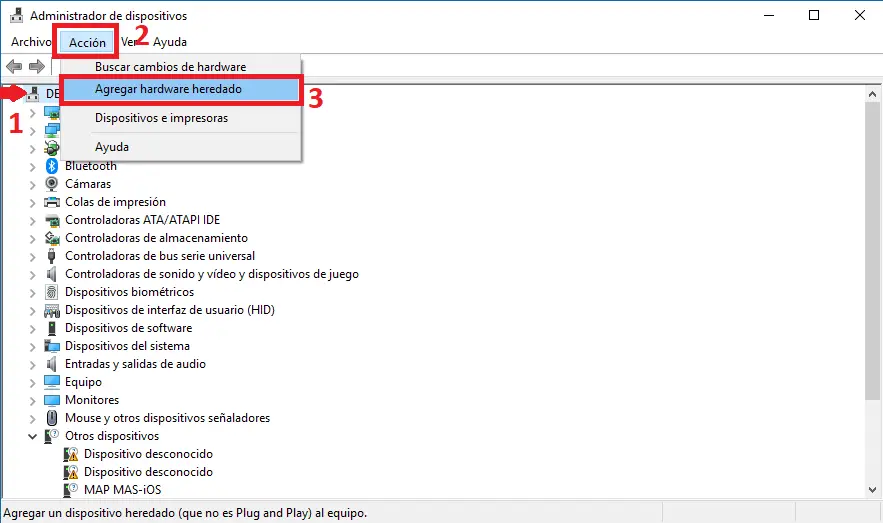
Once downloaded you will have to unzip the Zip file to proceed with its installation. Now you will have to open the Device Manager which you can do from the Windows search. When the device manager is open, you must check the option with the name of your computer or computer for englons, then click: Action> Add added hardware.
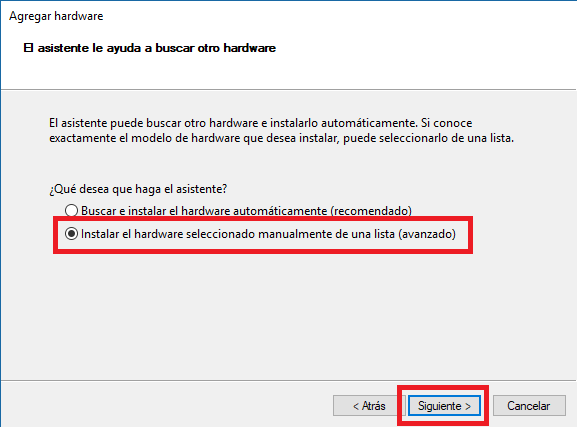
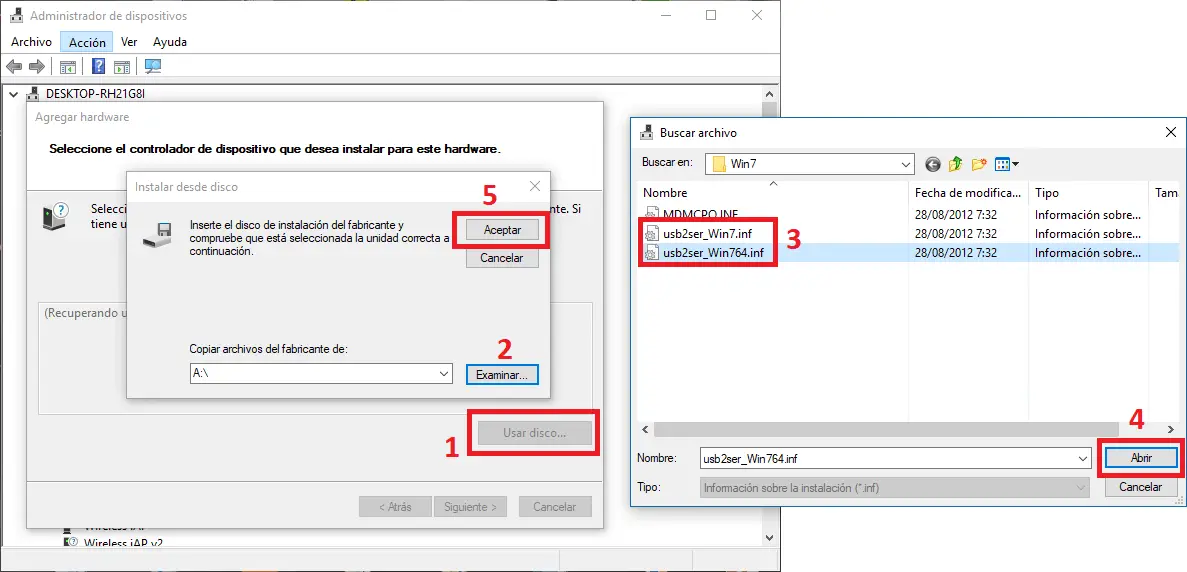
This will display a wizard in which you will have to follow the following steps: Click on "Next"> Select "Install the hardware manually select from a list (Advanced)"> Click on "Show all devices"> Click on Next > Click on Use Disk ...> Click on Browse.
This will cause a window to be displayed in which we will have to find the folder of the MT65xx USB VCOM DRIVERS drivers that you unzipped in one of the previous steps. Specifically you will have to open the folder: mt67xx> preloader driver> VCOM> Win7 . Once in this folder you will have to select the file: usb2ser_Win7.inf> usb2ser_Win764.inf depending on whether the version of your operating system is 32 or 64-bit.
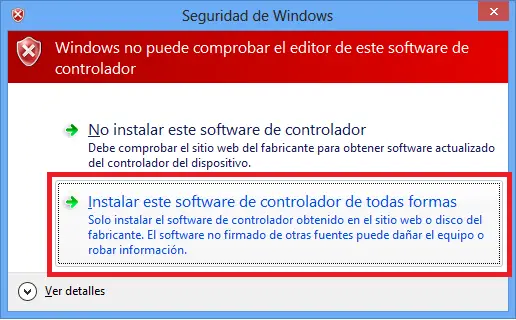
When you have selected the file you will have to follow the following steps in the installation wizard: Click on "OK"> Click on "Next"> Click on "Next"> Click on "Install this driver software anyway"> Click on " Finalize".
From that moment on, you will be able to close the Device Manager because everything will be ready to start Flashing the ROM on your Android device. The next step will be to download the Flashing program, which we can do from the following link: Download the latest version of SP Flash Tool program to flash Android ROM.
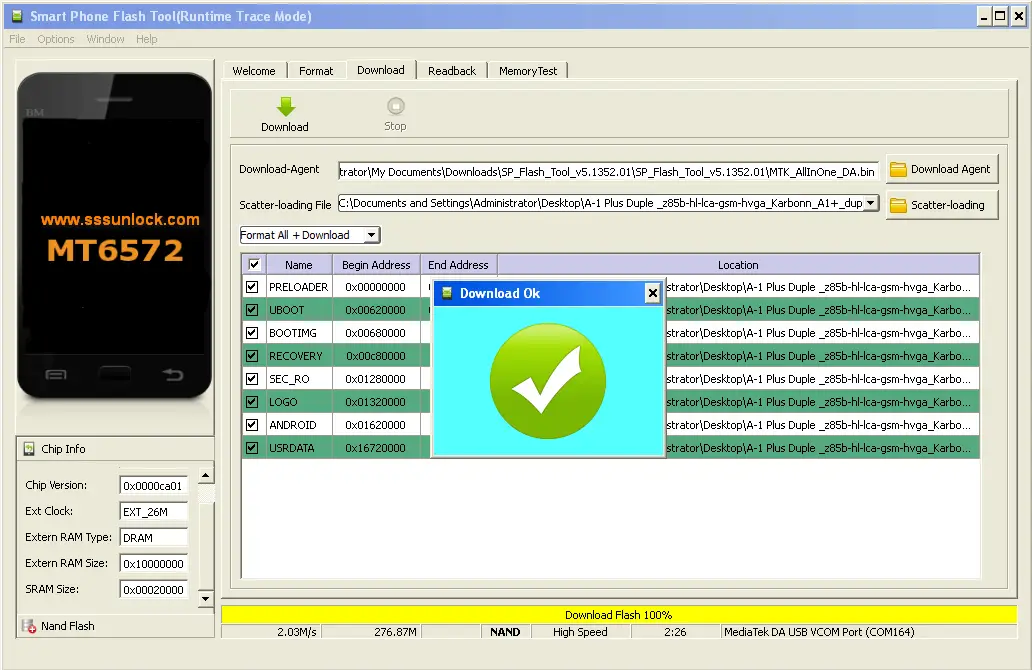
Once the file is downloaded and unzipped you will have to access the folder to locate the file: Flash_tool.exe. Once the file is executed, the program interface will open, you will have to go to the Download tab. Once here select the option in which you will have to click on the option that says: Choose , to choose the Scatter-loading File option .
This will cause a window to be displayed in which you will have to choose the file: MT6xxx_Android_scatter.txt which is found inside the ROM folder that we had downloaded in one of the first steps. This will automatically load the file into the program and the ROM is ready to be Flashed.
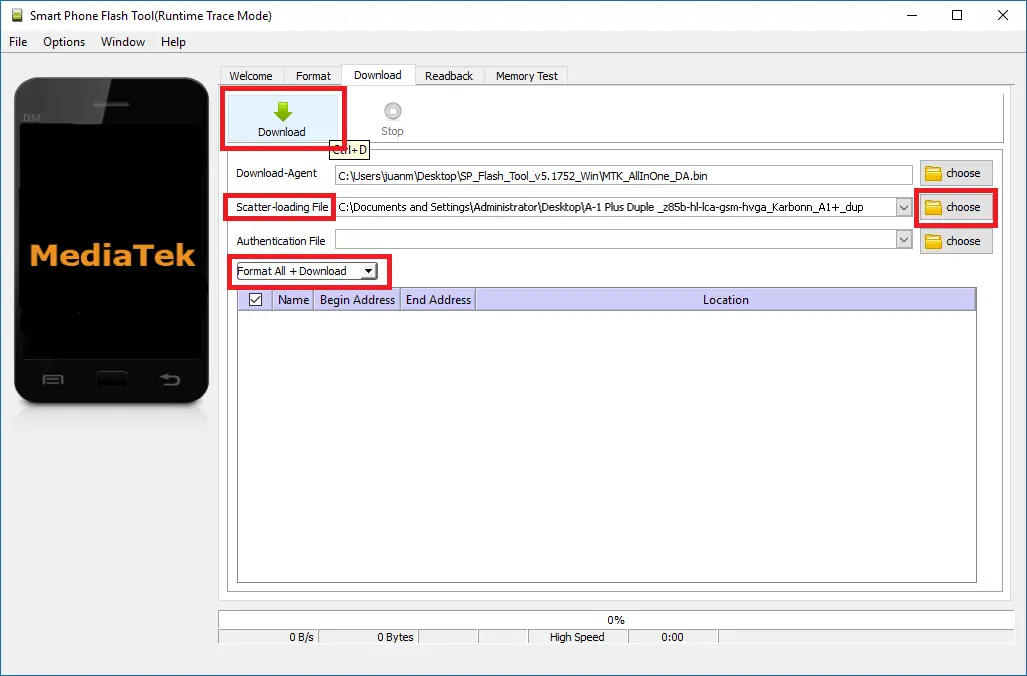
The next step will be to check the option: Format all + Download , in the drop-down menu. Remember that this will completely remove all the content from your Android device to install the new ROM. When everything is ready it will be time to click on the Download button at the top of the window.
The process will not start until we connect our Android device to our Windows 10 computer. Remember that if your phone or tables has a manually replaceable battery, it is advisable that you connect your device without a battery. Once our Android is connected to the computer through the USB cable, it will be recognized by the program and the whole process will begin.
At this point you should under no circumstances touch anything on the phone and on the computer. The process can take several minutes, so don't despair. After this time the process will end and you will be notified that everything has gone correctly. Now you only have to disconnect the Android device from your computer for line followed by connecting the battery again and check how the phone now starts correctly with the factory ROM.
