A large number of photos are uploaded to the internet through the different platforms available for it, such as social networks Facebook or Instagram. However, before uploading a photo to the Internet, we must be consistent and responsible, especially in the event that third parties or sensitive information may appear in said photos. Remember that privacy is something to keep in mind these days especially in the Online world. There are many people who do not want to leave a trace on the Internet and even less so that third parties do it for them.
You may also be interested: How to see Instagram Stories without them knowing.
This is one of the main reasons why many users when they upload their photos to the internet tend to pixelate the faces of third parties , children or license plates, among many other things. Obviously, blurring parts of a photograph can serve many other things, such as not ruining a friend's reputation by uploading a photo to Facebook in which you are 10 but he or she is very disadvantaged..
Today there are numerous applications and photo or image editors that allow you to pixelate areas of a photo . In general, these editors or applications have a tool called Blur or Blur and allow you to select a specific area of the photo, be it face, license plate, text, etc. and pixelate it so that the users who view it do not see that particular detail of the photo.
Nowadays, pixelated photography is widely used on social networks like Facebook or Instagram to safeguard children's privacy; that is, many users when they upload photos in which children appear, they blur their faces so that they are not visible to third parties. This practice is highly applauded, especially to protect the privacy of those who still cannot decide if they want to appear on the internet or not..
Having said this, we show you step by step how to blur parts of a photo using desktop programs such as GIMP or Photoshop as well as on your mobile device, either Android or iOS :
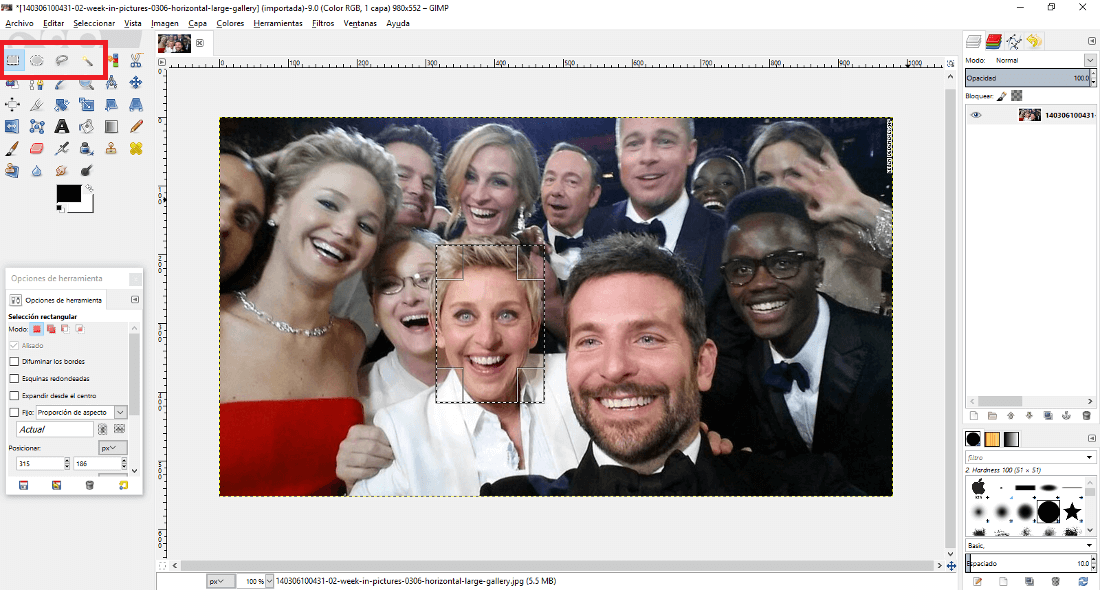
How to blur photos in GIMP. (PC)
1. Locate the photo you want to pixelate and right-click on the file. In the menu select Open with and then the GIMP program. This photo editor is completely free and you can download it from the following link.
2. Once the image is displayed in the GIMP editor, choose one of the select tools located at the top of the toolbox. You can choose between rectangular, circular, free selection or magic wand. Once you have chosen the tool, select the area of the photograph that you want to blur..
3. Once selected you will see how the area is surrounded by a dashed line. Right click on the selected area and in the context menu go to: Filters> Blur> Pixelar
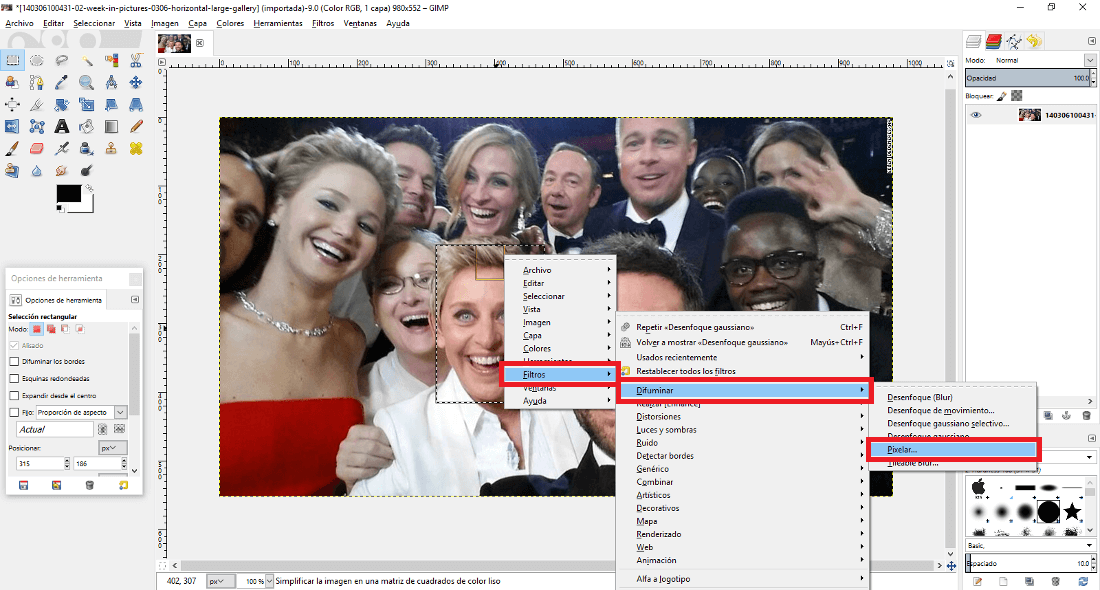
Note: If you prefer a more delicate blur instead of choosing the Pixelar option, select the Gaussian Blur option better.
4. This will bring up a window where you can check the box for "Preview! with which you will have control over the level of pixelation that you are adding in real time. Now you only have to modify the Pixel Width and Pixel Height controls. This will generate different degrees of pixelation.
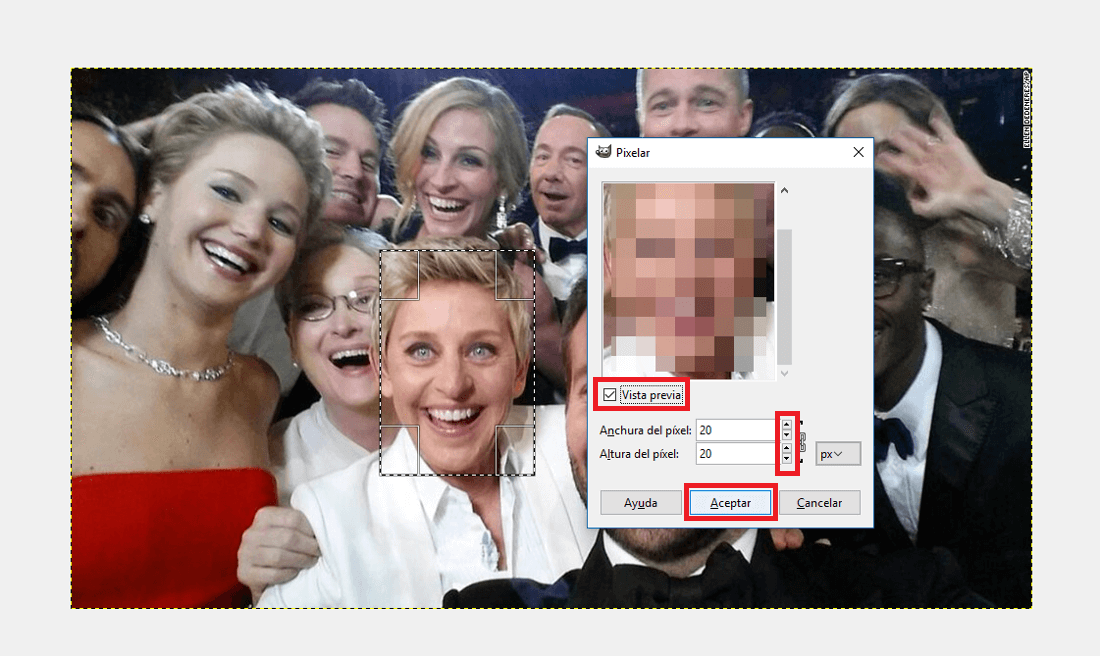
5. When everything is according to your taste, click on the OK button and that's it, the selected area will be blurred. Now you only have to save the image which you can do in File> Export As .

How to blur photos in Photoshop. (PC)
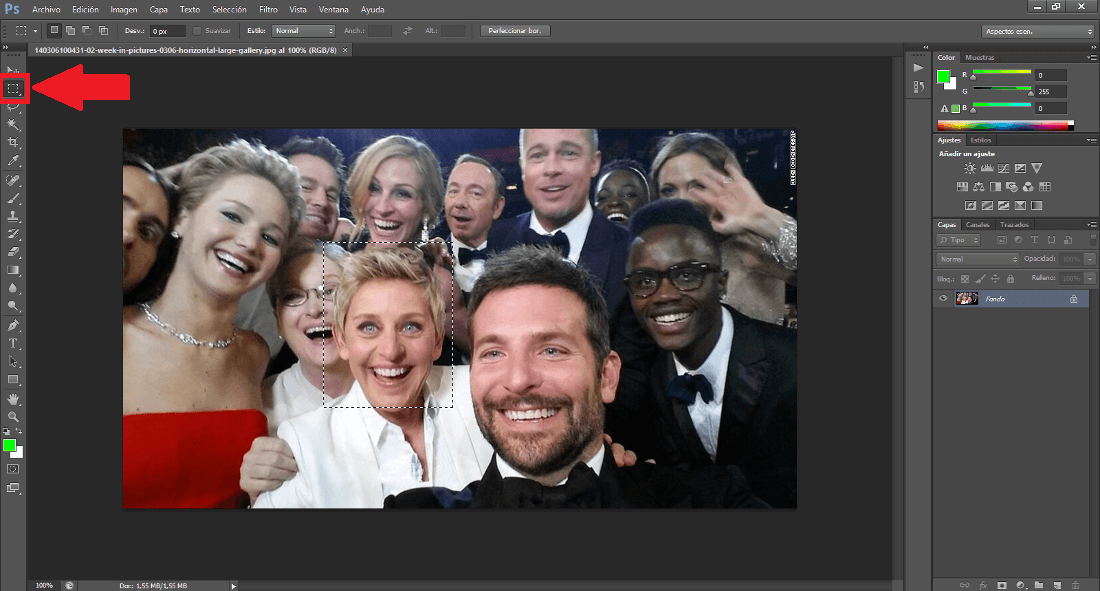
1. The first thing will be to open the photo in the Photoshop program, which however is paid. You can do this from the context menu as we showed you in the previous method. Once the photo is displayed in the editor, you must choose the selection tool which is shown at the top of the toolbox and which is represented by the icon of a square with dashed lines.
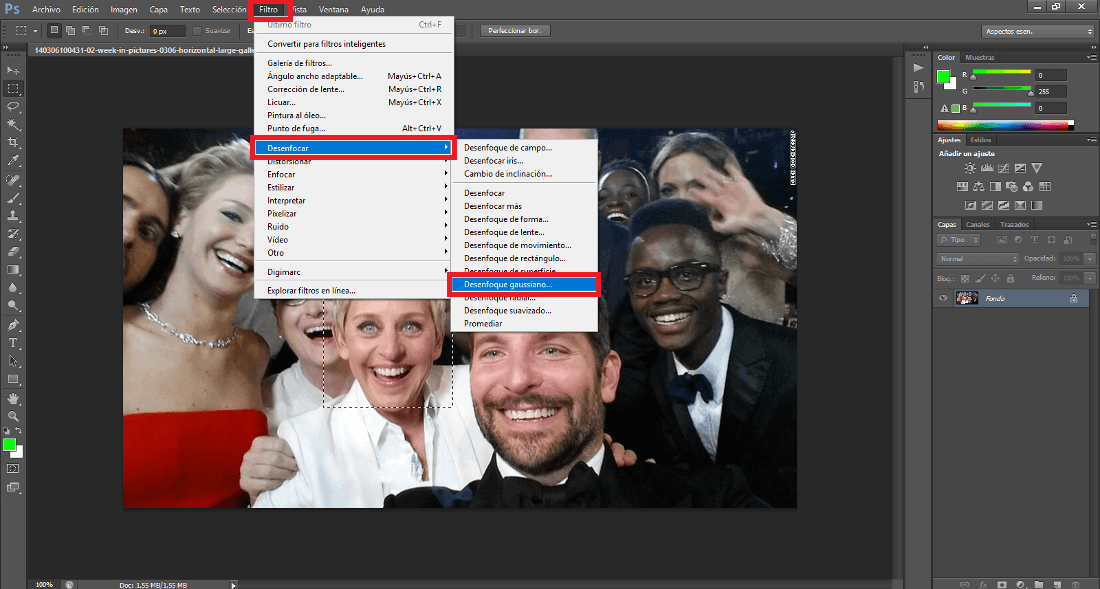
2. Now go to the image and select with the mouse cursor the area you want to blur so that it cannot be seen in detail. Once you make the selection, you should go to the options in the upper bar of Photoshop select: Filter> Blur> Gaussian Blur.
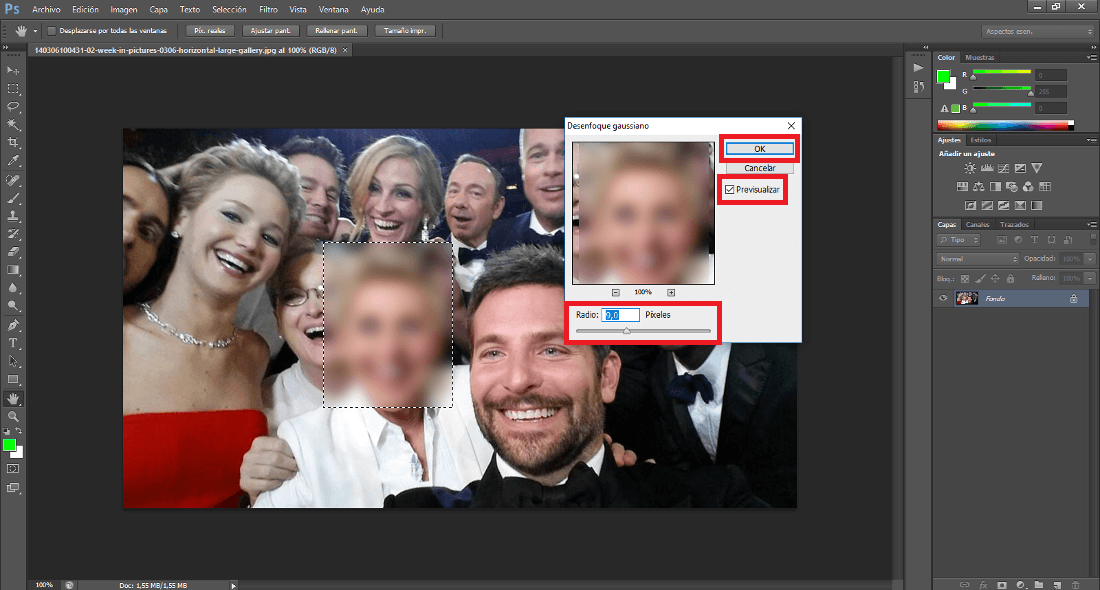
3. This will open a small window in which you will have to check the Preview box. Continuous line adjusts the level of blur in the image by moving the slider: Ratio. When it is according to your liking, click OK and list I only have to save the image on your computer going to: File> Save As.
adsense4
How to blur photos on Android or iPhone.
1. In the event that we want to blur areas of a photo from our mobile device, be it iPhone or Android, we will have to make use of a third-party application. From TechnoWikis we recommend the Blur Background Photo Editor app, which is completely free and available for both Android and iOS.
2. Once downloaded and installed, open the app to place yourself on the home screen. Here you will have to select the Album option which will give you access to all the photos and images stored in the memory of your device. Here you will have to select the photo in which you want to blur a specific area or areas.
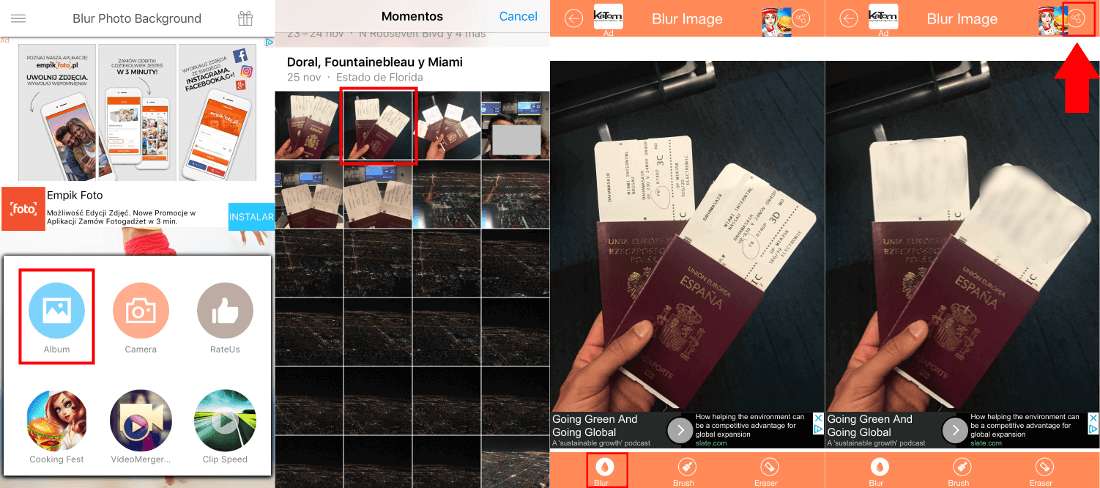
2. This will cause the selected image to be displayed within an editor in which you will have to select the Blur option located at the bottom right. When the option is selected, move your finger over the area to Blur. You will see how automatically this area is hidden under a nebula.
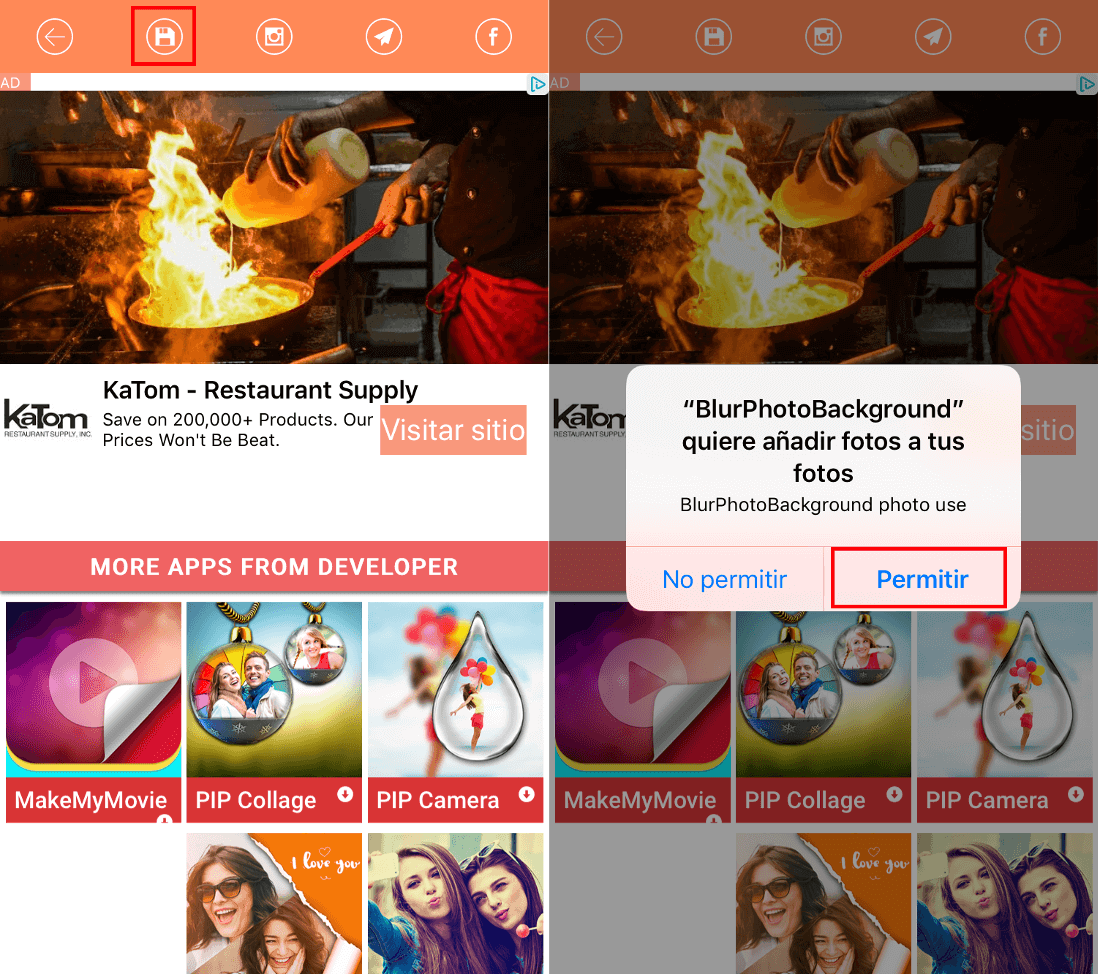
3. Once everything is according to your taste, click on the share icon shown in the upper corner of the screen. This will give you access to various options where you can directly share the already blurred photo. However, if you prefer, you can save it on your device by clicking on the floppy disk icon at the top of the screen.
As you see pixelating faces, text, passports, license plates and any other element or area of a photograph is quite simple and fast regardless of whether you use a computer or a mobile device. This means that there is no longer a case to harm the privacy of certain people who do not want to appear on the internet. However this function can be used with bulls such as preserving your own privacy or sensitive information in your photos or simply as an artistic element in your photo.