Android devices are the most widely used worldwide, which means that there are users of all kinds, from those who only use their phones for calls and messages to what they use their smartphones to play video games. Among this type of user there are many who want to use their Android mobile phones from their computer, it is what is called as vitalization of an Android device on your computer. The most used program for this is the popular Android Bluestacks emulator, however there are many who have problems when installing it.

You may also be interested in: How to install Bluestacks on a Windows PC without a graphics card.
The Bluestacks Android emulator for PC is one of the most popular and basically allows you to recreate an Android device directly on your computer. This can be very useful to use your device directly from the screen of your computer, which allows you, for example, to test mobile applications on your PC. Another of the most frequent uses is the possibility of playing video games for Smartphone on your computer..
The emulation of a mobile phone on your computer allows you to enjoy any of the Android apps on a much larger screen as well as its operation through the keyboard of your computer and the mouse of your computer. The Bluestacks program is really intuitive which makes it one of the easiest emulators to use. However, from time to time you may also experience certain errors especially during installation .
Many users of Windows 10 have complained about the problems suffered during the installation of the Bluestacks emulator, especially on computers with Windows operating system . The most frequent problem is the freezing of the Bluestacks installation, that is, it gets stuck on the installation screen and never completes..
Obviously, when the Bluestacks installation stops , we cannot install or use it. If this is the problem you are experiencing, here is how to fix the Bluestacks stuck installation on Windows :
How to fix the problem: Bluestacks installation does not progress in Windows 10/8/7.
As we have mentioned, the most common problem is when Bluestacks freezes on the installation start screen in Windows , however this problem can be due to several reasons such as not having administrator privileges or not having updated the .NET Framework.
Therefore, before performing the steps below, make sure that you have started the installation of Bluestacks with administrator rights and that you have the .NET Framework fully updated. If you have these two requirements and you are still suffering from the problem, start with the different solutions that we indicate below:
- Method 1: Uninstall Bluestacks and download the latest version
The problem may be caused by the Bluestacks installation file not being the latest version. This may be the reason why the program freezes during installation on a Windows computer. Therefore, we will have to completely uninstall the Bluestacks program, this implies deleting any temporary file or folder as well as the registry keys..

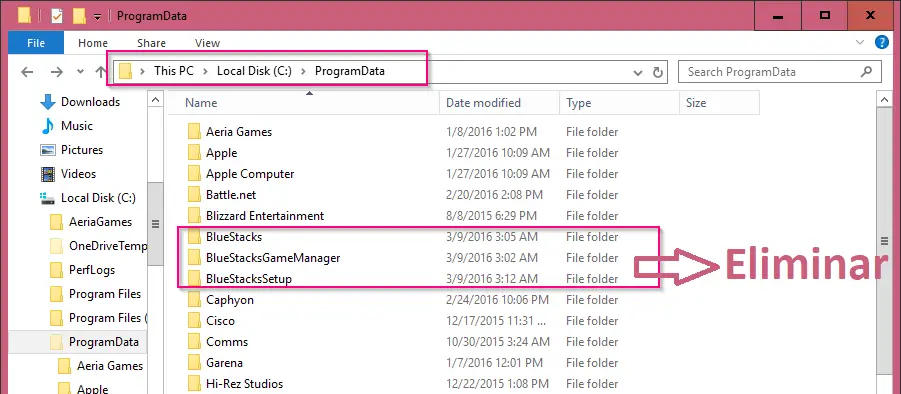
To do this, once the Bluestacks program has been uninstalled, you will have to go to the following folders and delete them:
C: \ Program Files \ BlueStacks
C: \ ProgramData \ BlueStacks
C: \ ProgramData \ BlueStacksSetup
Once deleted, open the Run tool using the keyboard shortcut: Windows key + R and when the window appears, enter the command:% temp% and click OK. This will take you to a new Windows Explorer window where you will have to search for and delete the .BST files and folders.
To eliminate the Windows Registry keys related to the BlueStacks program, we recommend using the free CCleaner program. Once everything is correctly removed, proceed to download the latest version of BlueStacks to proceed with its installation without it failing or freezing.
- Method 2: Run the Bluestacks program in compatibility mode
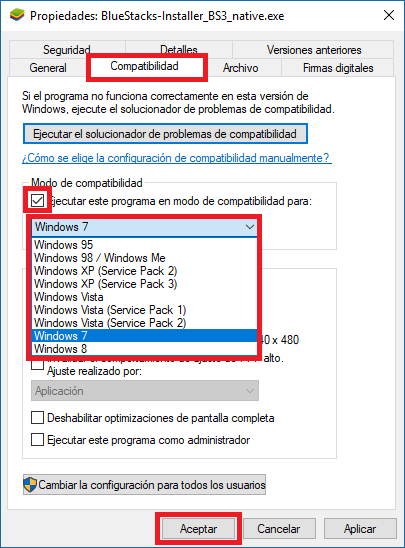
The problem may be due to an incompatibility with the version of Windows that you have. In this case you will have to activate the execution in compatibility mode in an older version of Windows. To do this, locate the Bluestacks installation file and right-click.
In the contextual menu that is displayed, you must select the Properties option, which in turn will open a small window in which you must go to the tab: Compatibility.
Now check the box for the Compatibility mode: Run this program in compatibility mode for. Once checked, you will also have to open the options menu and select a different version of Windows from the one currently installed on your computer.

Don't forget to click the OK button to save the changes. Now double click on the installable file again to proceed with the installation of Bluestacks. If it continues giving error you can repeat the operation and select the compatibility with a different version of Windows.
- Method 3: Check administrator privileges for Bluestacks
As we have previously mentioned one of the problems of the Bluestacks malfunction is the lack of administrator privileges. Therefore we must verify that we have granted these privileges. We will do this using the executable file of the Bluestacks emulator, which is located in the following path:
C: \ Program Files \ Bluestacks
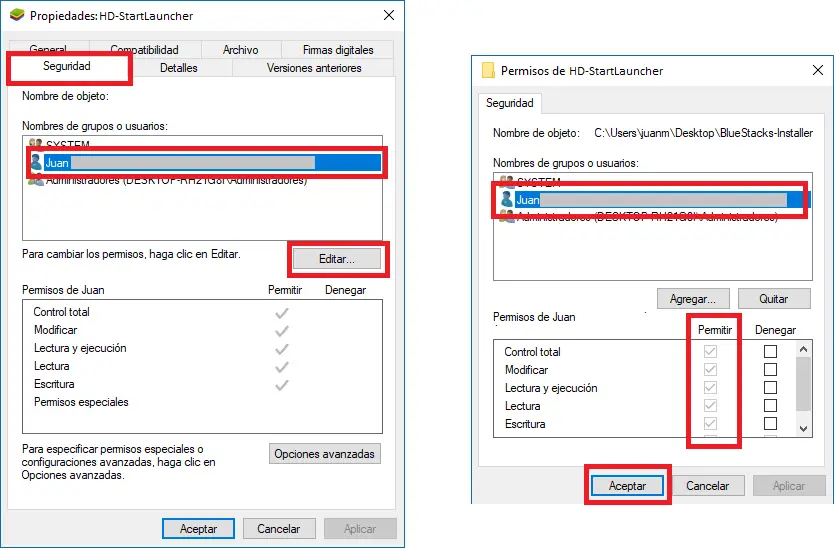
In this folder you will have to locate the HD-StartLauncher file and right click on it. When the context menu is displayed you will have to select properties so that a window automatically opens.

Here go to the Security tab to access the permissions section. Click on the Edit button to open a new window, in which you can select the name of the user who wants to have permissions to be able to run the Bluestacks emulator. Before clicking the accept button make sure that the Permission column is checked all your options.
This should allow the Bluestacks emulator program to be installed and run using your Microsoft user account seamlessly in Windows.