As many of you already know how to have a computer without an internet connection, today it is practically useless. However currently you will find an internet connection practically in any corner which can cause when we want to connect to an internet connection our Windows 10 computer shows several available networks to connect to. This can be really uncomfortable and perplexing since we might not correctly identify the network we want to connect to.
You may also be interested: How to update your Windows 10 PC for free and legal in 2017 and 2018
Most internet connection names are the predominant names of the factory or internet provider. This means that if you have a router from the same manufacturer or your internet service belongs to the same provider, the names of the internet connections may be similar. However, you should know that Windows 10 allows you to change the name of any Internet connection shown in the operating system to facilitate its identification..
Obviously any internet connection can change its name to be personalized, however we do not have access to the Router of all the internet connections that are displayed on our computer. However, in the case of having Windows 10, you can make your operating system show you a different network name than the real one in order to identify it. This can be very helpful for example at work.
In my case, the office where I work has 3 internet connections: Office 1, Office 2 and Office 3. I must connect to one of them depending on the action to be taken. However this is quite confusing and I would like to identify each of the connections by a name that identifies them much more..
As we have mentioned, Windows 10 allows you to change the name of the available internet connections in order to better identify them and then we show you step by step how to do it:
Method 1: Rename the network profile using the local security policy editor
To open the security editor we will use the Run tool, therefore use the shortcut: Windows key + R. When the small window is displayed, enter the following command and press enter: secpol.msc
This will display the interface of the Local Security Policy tool. Here you will have to go to the "Network List Manager Policies" folder that appears on the left side of the window. This will make 3 options appear on the left side of the screen, plus the name of the network that is currently Find your Windows 10 computer connected.
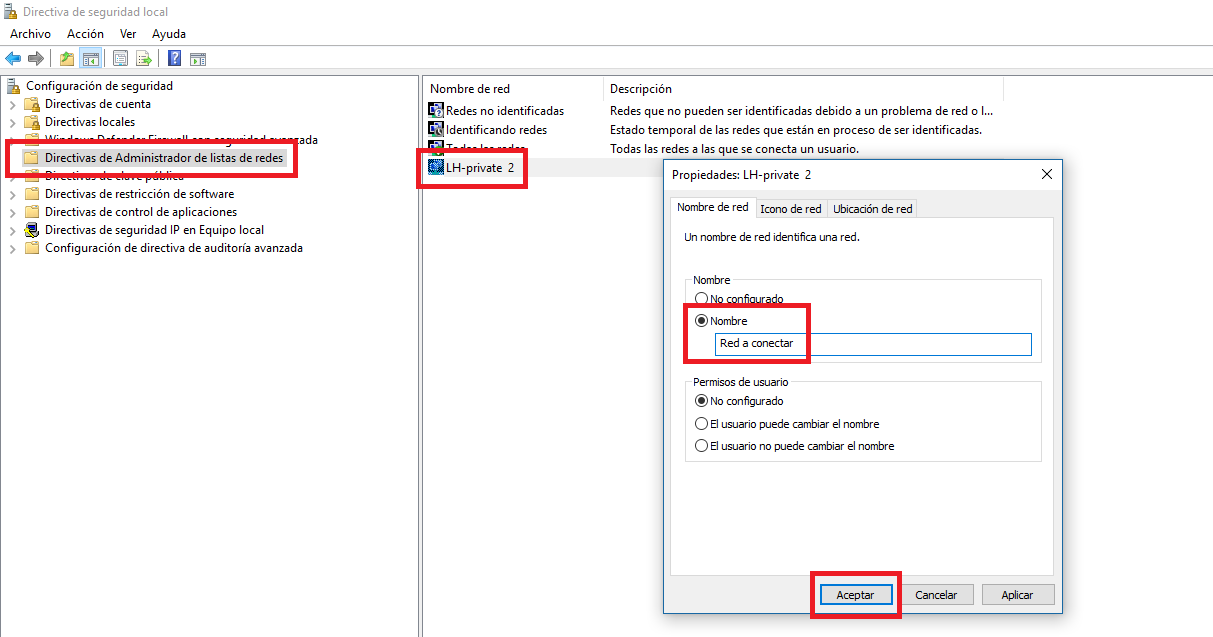
Double-click on the name of the network to which you are currently connected to open the properties window for that network. In this window you will find several fields that you can fill in with the information that you want, such as Name. Check the corresponding box and write the name that said internet connection shows..
Once this is configured, you should not forget to click on the apply and accept buttons. This will save the changes made and now when you open the network center you will see how the name of the network has changed by the one that you have decided.
Method 2: Rename the network profile using the Windows 10 registry editor
In this case, the first steps are quite similar, that is, we will have to open the Execute tool in order to execute the following command: regedit. This will bring up the interface of the Windows Registry Editor. Here we will have to go to the following route by copying and pasting it in the bar at the top:
HKEY_LOCAL_MACHINE \ SOFTWARE \ Microsoft \ Windows NT \ CurrentVersion \ NetworkList \ Profiles
This will place you in the Profile key on the left side of the screen. Just below this key you will find several sub-keys (as many as the number of networks you have connected to your computer). Here you will have to click on each of them to observe the content of each one on the right side of the window.
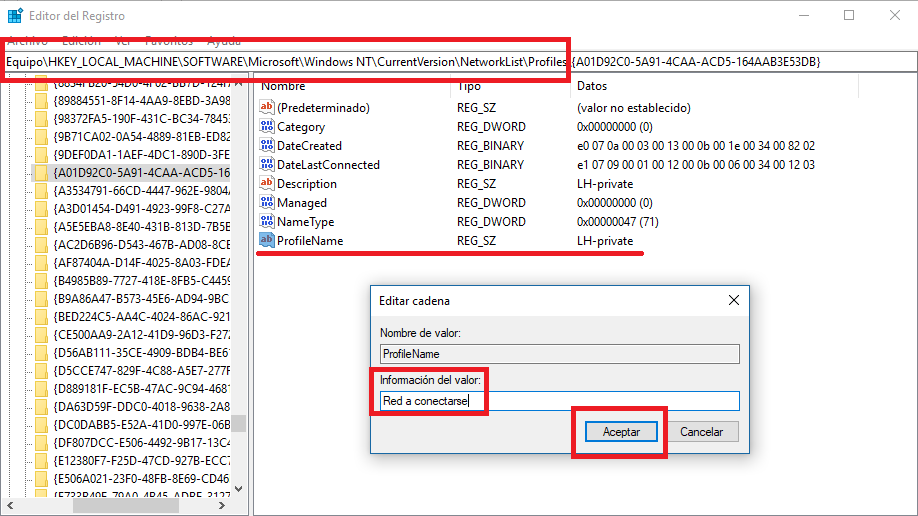
On the right side you should look for the key: ProfileName. In the data column of this key you will see the name of the network to which it corresponds. When you find the Network you want to change the name you will have to double click on ProfileName.
This will cause a window to appear in which you will have to customize the name by simply changing the Value Information field for the name you want the network to display. Once changed, click on the OK button and that's it, you can close the Windows registry editor and restart your computer. After this restart, the network to which we are connected will show the new name just configured.
It should be noted that this second method, although it is somewhat more complex, allows you to make name changes in all the networks in which you have been connected at least once and not have to be connected to it to change its name as if it happens in the first method.