Everyone knows the large amount of information that Microsoft collects from its users, especially those who use its Windows 10 operating system. In fact, when we install the operating system, it is we who must uncheck the boxes if we do not want the operating system literally spy on us and send this information to Microsoft with the excuse of knowing our habits and thus improve their products in the future.
You may also be interested: How to prevent Windows 10 from sharing our files and using our internet connection.
Today, this is not something that many users like, especially those who worry about privacy. However, Microsoft tries to convince users that this data collection allows you to recover the Cortana assistant when it stops working, as well as allowing you to resume apps, documents and other actions that you were carrying out before restarting your computer..
This collection of activities and actions is not stored exclusively on our Windows 10 computer locally, but part of this information is also sent to the cloud, specifically to Microsoft servers, so even if you reinstall your operating system from scratch, You will not be able to completely erase your Windows 10 activity history .
The activity history of Windows 10 is activated so default on your system in case you have activated both the Microsoft Edge history browser as the personal assistant Cortana. In this case you should know that you are sending information about your activity directly to Microsoft (to the cloud)..
However, you should know that Microsoft, by default, activates the collection of data, it also offers you the possibility to deactivate the Activity History in Windows 10 as well as the option to delete the collection of activities already collected. Here we show you how to do it:
How to disable Windows 10 Activity History so that Microsoft does not collect personal information.
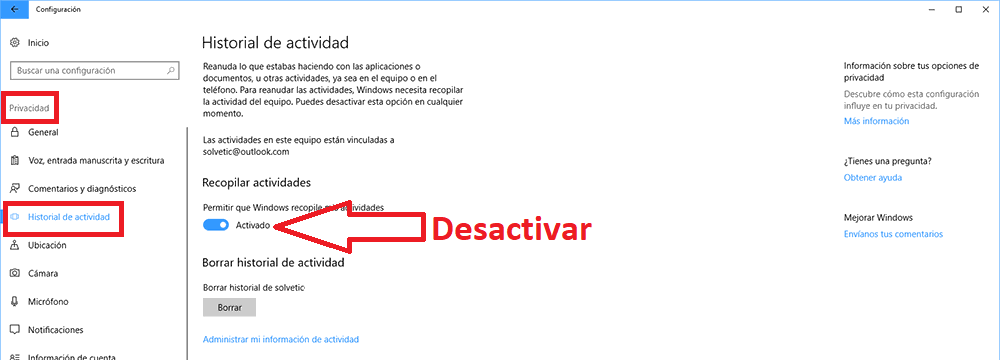
To be honest this is quite simple since it will be enough to open the Settings app for which we will use the keyboard shortcut: Windows key + I. When it opens you should go to the Privacy option which will show a window with a menu in the left side part in which you will have to select the option: Activity History
After clicking on this option, you will see how a series of settings and configurations are displayed on the right side of the screen, among which is the option: Collect Activities . Just below it you will see a switch which you must turn off so that from that moment Windows 10 stops saving your activity in the Activity History and therefore stops sending it to the cloud.
On the other hand, you can also “Almost” erase all the activity data collected and stored in your History, you can do it from this same configuration screen by just clicking on the option: Clear Activity history.
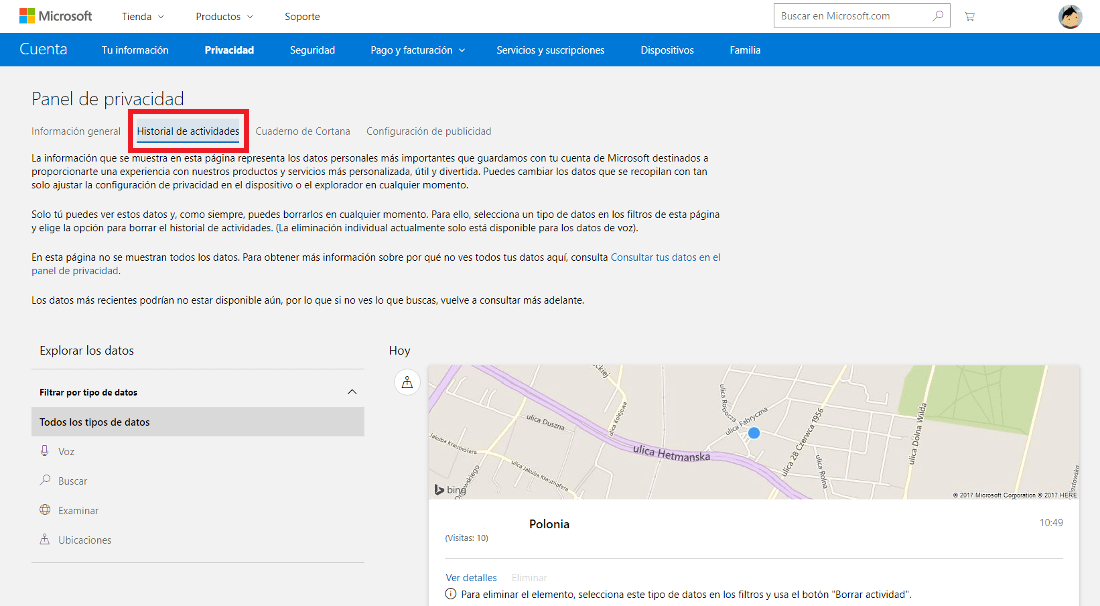
On the other hand, in the event that you want to know the Activity collected by Windows 10, which can be of great help with the purpose of parental control over our children, you will only have to click on the option: Manage my Activity Information. Alternatively you can also do it from the following link: https://account.microsoft.com/privacy/
Here you will have to log in with your Microsoft account. Once inside you will be able to view all the information collected by Windows 10 as well as the option of being able to delete from this Microsoft website , although as we have mentioned this does not assure you that all the activities that have been saved in the activity history of Windows 10 are removed entirely..
From Downloadosurce.es we advise you that if you are truly concerned about your privacy, you should completely deactivate the Windows 10 Activity History as well as other functions, such as Cortana, location, etc. On the other hand, we also recommend that you take a look at the following post: How to prevent Windows 10 from spying on you.