The Windows 10 operating system is possibly the most customizable of all those currently on the market. Among the customizations of this operating system we will find the possibility of modifying the space between icons or changing the locations of the icons / shortcuts on the Windows 10 desktop. Well, sometimes this customization can be a nuisance when moving these shortcuts to On the left side of the screen, they return to the home position instead of staying in the new one.

You may also be interested: How to open several photos or images at once in Windows 10, 8 or 7 Paint
This error usually occurs when we try to move one of the icons to the left side of the desktop; that is, when we drag an icon with the mouse from the right to the left of the desktop, when we drop said icon to the final position instead of staying in that position, the icon returns to the initial position..
This failure does not occur continuously but occurs randomly. However, even if it is a random error, this can be quite annoying since it prevents us from organizing the shortcuts on the left side of our Windows 10 computer or computer. You can also customize the space between the different shortcuts on the Windows desktop .
Having said this, we show you step by step how to solve the problem that prevents us from sorting the shortcuts on the left side of the desktop manually:
How to fix icon jumps on the desktop as well as increase or decrease the space between shortcuts.
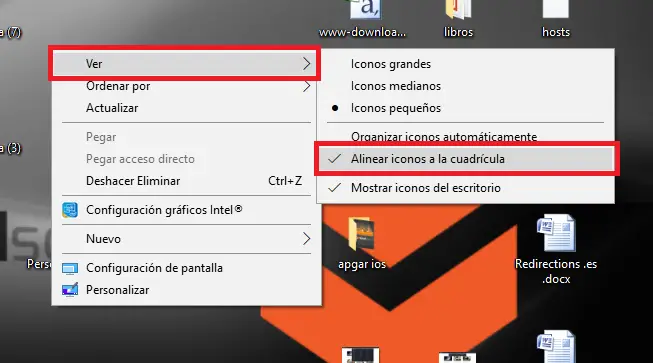
The first thing we will have to do is check that the option Align the icons to the grid , for this you will have to right-click on a free space on the desktop so that the contextual menu is displayed. Here you will have to place the cursor on the View option so that another new sub-menu is displayed in which you can already activate the Align the icons to the grid option , just by clicking on that option..

This option is the one that takes care of the problem with changing the position of the desktop icons, however this type of configuration can make the space between these icons, files or shortcuts quite large. While there is no option to change the spacing between icons in Windows 10 Settings, you can change the spacing between them using the Windows Registry.
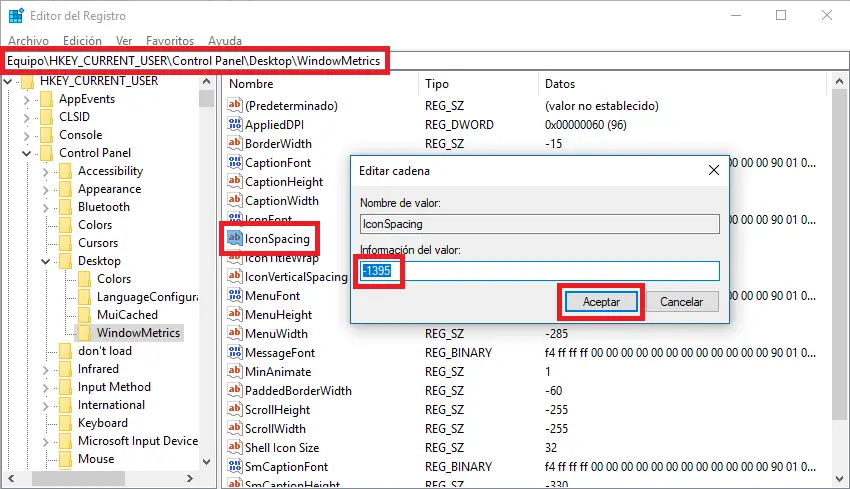
For this we will have to open the Run tool which we will do using the keyboard shortcut: Windows key + R. When the window is displayed you must enter: regedit. This will bring up the window of the Windows Registry editor in which we will have to navigate to:
HKEY_CURRENT_USER \ Control Panel \ Desktop \ WindowMetrics
Once here, the content of this key will be shown in the right part of the window in which we will have to pay attention to the IconSpacing element, which is responsible for the horizontal spacing of icons. Double-click IconSpacing to display a small window showing the value of that element, which by default will be -1395. This value can be modified, in values between -480 and -2730..

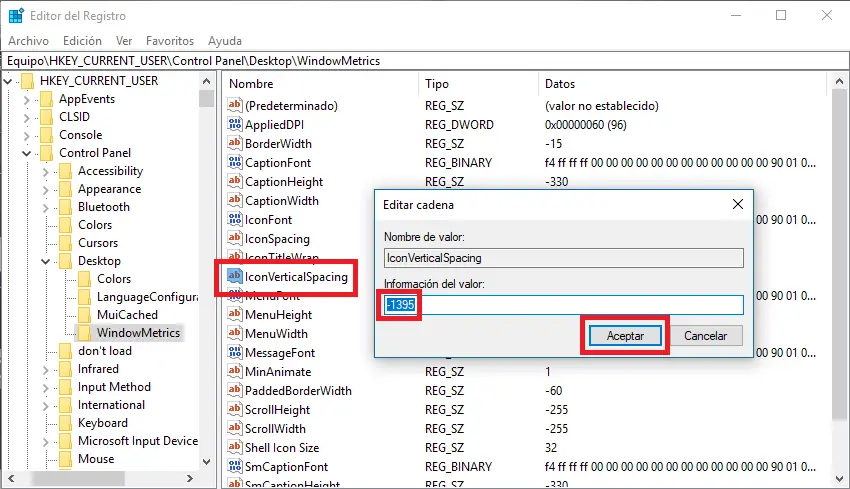
Once the desired distance has been configured and after clicking on the OK button to save the configuration. Continuous line we can configure the vertical spacing which you can do by clicking on the IconVerticalSpacing element. This, as above, a new window is displayed in which you can also configure the value between -480 and -2730. When you have accepted the new configuration, you can close the Registry Editor.

Now it will be necessary to restart our computer with Windows 10 for the changes made to take effect. Now you will see how the space between the icons on the desktop will be greater or less depending on how you have configured it.
Without a doubt Windows 10 is the operating system that allows you to configure and customize practically any aspect of the system. However many users miss a greater ease for such customization. The clear example of this is the possibility of adjusting the space between the shortcuts or desktop icons which could be done from the configuration instead of from the Windows registry editor.