Windows 10 has made different updates focused on optimizing the use of the system to the maximum, this applies both in performance and in the management of applications and services, but even with these changes it is likely that our system is slow, this undoubtedly affects daily work that we do there and more can affect us if we also see errors such as turning off only suddenly for no reason. This can cause us to lose our current job and could be conditioned in some cases by:
Windows 10 turns itself off
- Presence of virus or malware
- Too many applications open
- Excessive use of hardware resources
- System and application failures
Although we are quite annoyed by the slowness of Windows 10 when shutting down, it is even worse if we do not want to do this shutdown and we see that our PC has shut down without permission and randomly, that is, at any time. This is not pleasant after a long working day as it could cause us to lose our data. Although the causes are and always will be diverse, at getFastAnswer we bring you a series of tips to prevent Windows 10 from turning off only when it wants and without warning..
To stay up to date, remember to subscribe to our YouTube channel! SUBSCRIBE
1. Update Windows 10 drivers
One of the problems for Windows 10 to shut down randomly is having outdated drivers, the reason is that the drivers (network, audio, display, disks) allow the correct operability between them and the system, so that some of these fail or this obsolete one can affect Windows 10 taking longer to shut down, but updating them or seeing if we are with the latest versions is simple.
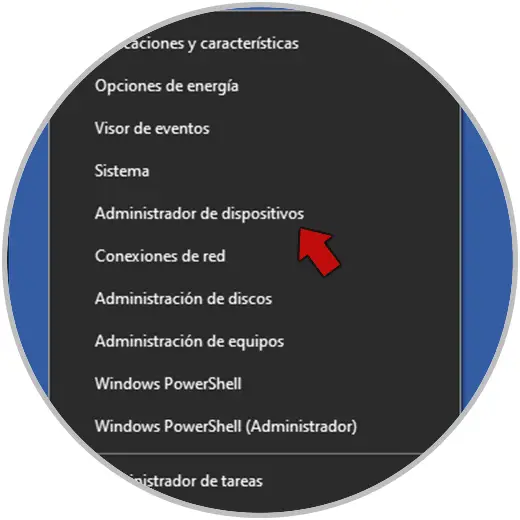
Step 1
To do this we access the Device Manager through one of the available ways:
Step 2
In the Device Manager window, we go to the different sections and there we right click on the driver and select the option "Update driver":

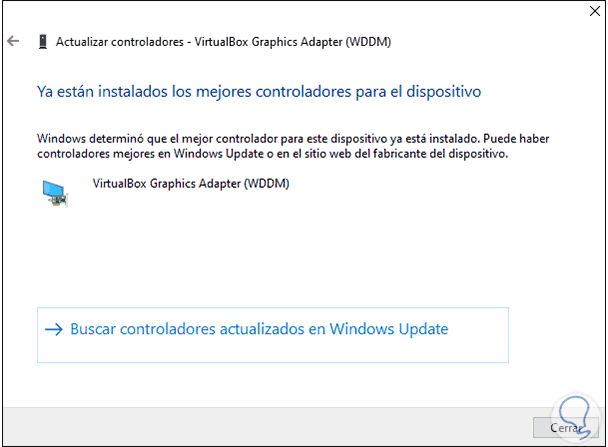
Step 3
The following window will be displayed:

Step 4
We define the type of update to use and we wait for the process to complete. We repeat this process with the other desired controllers.
2 . Turn off sleep Windows 10
By default, Windows 10 is configured to enter sleep mode after a period of inactivity and in the case of laptops also with the use of battery, this mode turns off the hard drives, but preserves the data in a space in RAM memory, so that when the information returns, it will be available but this can be a factor for Windows 10 to shut down slowly.
Step 1
To correct this Go to "Start - Settings":

Step 2
After this, we will see the following:

Step 3
There we go to "System - startup / shutdown and suspension":
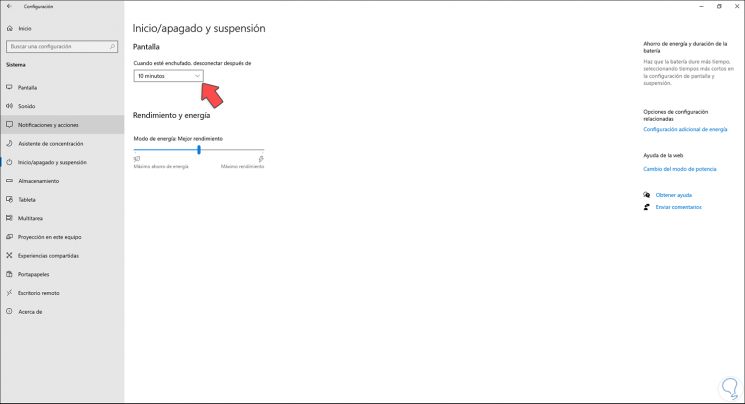
Step 4
On Screen, in the field "When plugged in, disconnect after" we set the value Never:

3. Activate Windows 10 Quick Start
The fast startup function in Windows 10 has been added as an option so that when turning on the computer all services and processes are prioritized so that we can log in soon, but the fast startup can turn into a slow shutdown due to the tasks that this entails.
Step 1
To disable it and check if this is the cause, let's go back to:
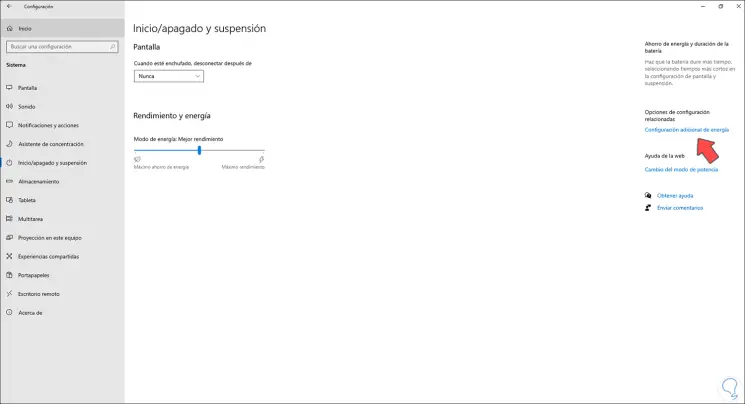
Step 2
There we click on the line "Additional energy settings", the following window will open:

Step 3
We click on the line "Choose the behavior of the start / stop buttons" and we will see the following:

Step 4
We click on "Change the configuration currently not available" and after this we deactivate the "Activate fast start" box:
We apply the changes and when we turn off Windows 10 we will see the shutdown time..

4 . Configure processor power Windows 10
The power options in Windows 10 are created to optimize the functions of disk management, battery and other elements of the system, but based on the configuration created this can have a direct impact on the shutdown of Windows 10.
Step 1
We can manage these settings to verify that this is not the cause, open the Control Panel:

Step 2
Go to "Hardware and sound":

Step 3
We click on "Power Options" and we will see the following:

Step 4
There we select the energy plan and click on "Change plan settings":

Step 5
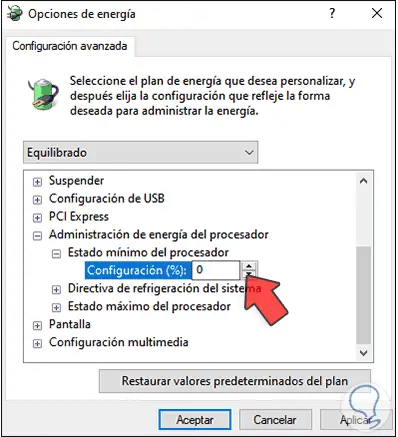
There we click on the line "Change advanced power settings" and in the pop-up window we locate the section "Processor power management":
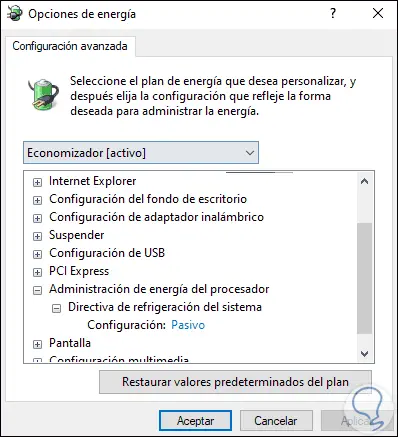
Step 6
We validate if there is the option "Minimum processor state" and if so, we must assign the value 0, on a computer where this option is, we will see the following. Apply the changes.
In case none of the aforementioned options help us, getFastAnswer recommends that you reinstall Windows 10, for this you must download the ISO image and use the Windows tool for it. With these tips it is possible to improve the shutdown of Windows 10.