With Time Machine, Apple offers an in-house backup function that you can use to back up all of your Mac's settings, files and programs. This so-called full backup creates an image of your system that you can restore to another Mac without any problems. Once activated, Time Machine automatically backs up your data at regular intervals. In the following, we'll show you what to look for when creating a backup with Time Machine:
How to enable Time Machine automatic backup
To be able to create backups with Time Machine, you first need an external storage medium . This can be an external hard drive or a macOS server in your network. If you want to use an external hard drive as a backup volume, it must be formatted with the macOS file system " Mac OS Extended (Journaled) ". In this article, we will explain to you how you can format storage media under macOS. If such a medium is available, you can start by activating Time Machine. To do this, follow our step-by-step instructions or take a look at the brief instructions .
1st step:
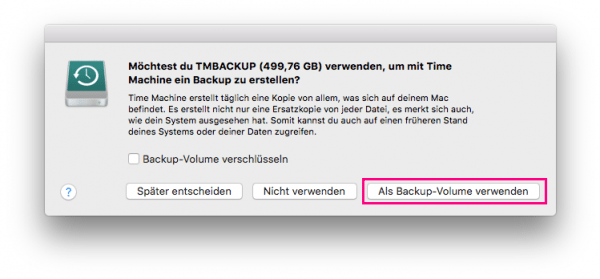 When you connect an external hard drive to your Mac, you will usually be asked directly if you want to use it as a backup volume. Click Use as Backup Disk in the lower right corner to use Time Machine to configure the hard drive. Check the box if you want to encrypt the hard disk with a password.
 2nd step:
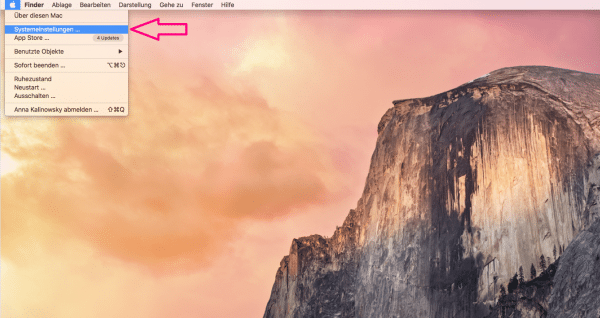 If no window opened when you connected the external hard drive, you need to go to the Time Machine settings via the system settings . Open this via the gear symbol in the dock or via the apple icon in the top left. In the following window select the Time Machine icon at the bottom .
 3rd step:
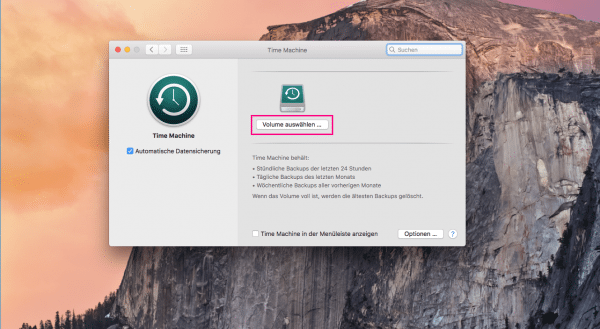 In the Time Machine settings, click on " Select volume ... " to choose a storage location for your backups.
 4th step:
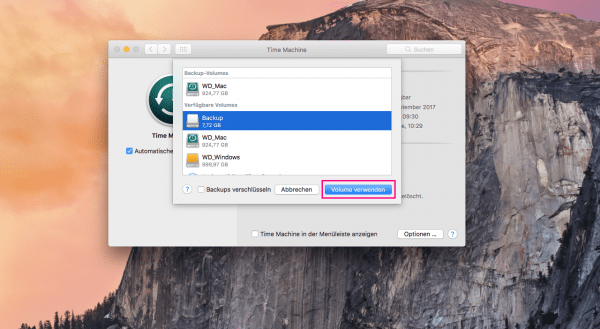 The available backup volumes are now displayed in the list . Select one of them and confirm your choice with " Use volume ". You can repeat this step to select a second storage medium for even more security. Then backups will be created alternately on these media in the future. Check the box next to " Encrypt backups " if you want to protect the backups with a password. If you left the checkmark next to " Automatic data backup " in the Time Machine settings ", backups of your Mac are now automatically created at regular intervals - every hour for stationary Macs, and whenever the power supply is connected and the backup drive is available for MacBooks. Note: The creation of the first backup can take several hours!
 5th step:
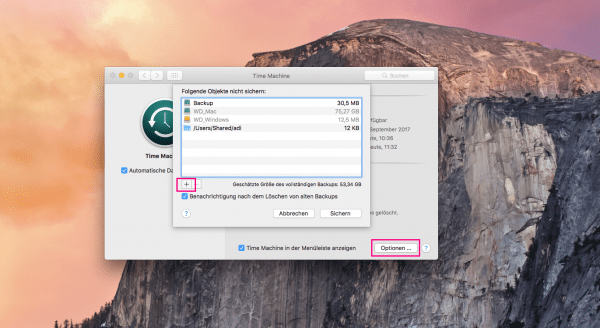 In the Time Machine settings, you can use the " Options ... " button to exclude individual objects from the backup - for example to save space on the backup volume. To do this, click on the + and select the relevant objects. Then confirm your selection with " Save ".
Warning: As soon as the external hard drive is full, Time Machine automatically overwrites older backups..
Perform a Time Machine backup manually
If you need a backup immediately, you can also start it manually and don't have to wait for Time Machine to automatically back up your data again.
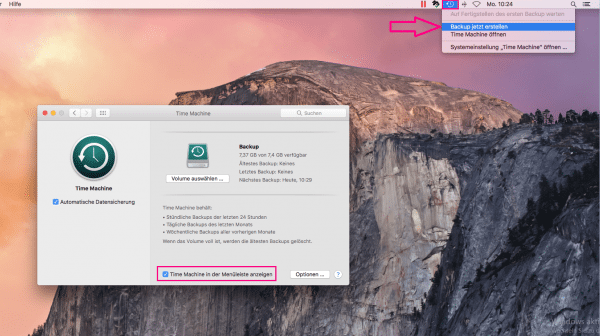
To do this, click on the Time Machine icon (small clock) in the menu bar and select " Create backup now " in the menu . If the icon does not appear in your menu bar, you have to check the " Show Time Machine in menu bar " box in the Time Machine settings ..
Quick Start Guide: Set Up Automatic Time Machine Backup
- Connect an external hard drive to your Mac and select " Use as backup disk" in the window that appears . If no such window has opened, you can access the Time Machine settings via the system settings or via the icon in the menu bar.
- Click on " Select Volume " and select an available storage medium for your backups from the list. Confirm with " Use Volume ". You can repeat this process to configure a second backup volume for added security with Time Machine.
- Check the box next to " Automatic data backup " and your data will be backed up automatically at regular intervals.
- To save space on your backup volume, you can exclude individual objects from the backup via " Options ... ".