If the Mac keeps crashing, something is wrong with the system. Mostly some software or an old driver is to blame for the unreliable behavior of the Mac. But if you see crashes and hangs even on a newly installed system or under a new user account, there is a lot to suggest that the hardware has a problem. As complex systems, Macs, like all other computers, are of course prone to such difficulties: from defective RAM modules to faulty cable connections to expensive damage to the motherboard, the possibilities for incorrect behavior are manifold. Apple's diagnostic tool helps to find out what the device is suffering from.
Apple Diagnostics
To use Apple's diagnostic tool, you need a Mac that is younger than June 2013 . With older models you have to use the Apple hardware test instead of the diagnosis - more on this later in the text. The diagnostic tool is preinstalled on every Mac.
- Turn off your Mac.
- Disconnect all cable connections from your Mac - i.e. all USB, Firewire and Thunderbolt connections as well as Ethernet. Unplug memory cards, USB sticks, external hard drives and so on.
- Position your Mac so that it is well ventilated. This shouldn't be an issue with desktop Macs, laptops should be placed on a hard surface and not in the sun. The reason for this is simple: the diagnostic tool torments the Mac in order to find errors - the device can become very hot in the process.
- Reconnect the power, mouse, and keyboard to your Mac, if necessary. With the Mac Mini and Mac Pro, of course, you also need to connect the screen.
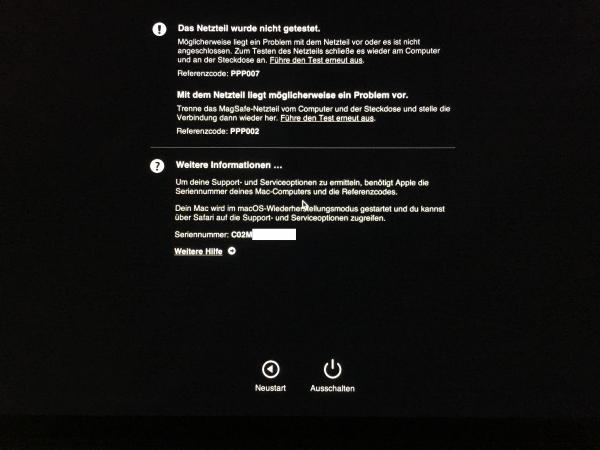
- Now switch the Mac back on and hold down the [D] key until the message “Your Mac is being checked” appears along with the progress bar.
- The hardware diagnosis is now running. After a few minutes, the tool reports which problems it found: If the list is empty or there is an obvious error (like the reference to the power supply unit that was not connected during the test in the screenshot), everything is fine, at least in terms of self-diagnosis.
- You can run the test again by clicking on the link “Run the test again” (key combination: [CMD] + [R]).
- You can now switch off the computer (key [S]) or restart it (key [R]). The next time it starts up macOS as normal. Should you need further help, you can click on the link “More Help”.
Apple hardware test
On older Macs ( before model year June 2013 ) you have to perform the so-called Apple Hardware Test instead of the diagnosis . This is the forerunner of the Apple diagnostic tool and works the same. The operation is just a little more technical:
- If your Mac came with CDs / DVDs, you will need to insert the second CD / DVD into the optical drive.
- If your Mac was shipped with Mac OS X 10.7 “Lion” or newer, the hardware test is located in the recovery partition, so you do not need to insert a CD or DVD.
- If the Mac no longer has a recovery partition, for example because a new, uninstalled hard drive is installed, you must start the Apple hardware test via the Internet. To do this, the Mac needs an Ethernet connection to the router.
- Once the basic requirements for the hardware test from steps 1 to 3 have been clarified, you can shut down your Mac.
- Then disconnect all cable connections from your Mac - i.e. all USB, Firewire and Thunderbolt connections as well as Ethernet. Remove memory cards, USB sticks, external hard drives and so on.
- Place your Mac on a stable, well-ventilated surface out of direct sunlight, as the hardware test may heat the Mac excessively.
- Connect your mouse and keyboard to your Mac and get power.
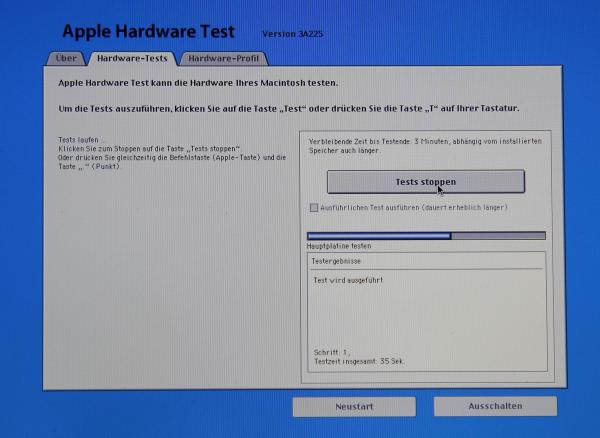
- Now turn on the Mac and hold down the [D] key until the Apple hardware test icon appears.
- If necessary, select the language. If there is no mouse on the system, you can do this with the arrow keys and the Enter key.
- Now start the test by clicking on "Test" or pressing the [T] key.
- First try it without the check mark "Perform detailed test". If this is active, the hardware test takes a long time. If the Mac does not find any faults during the first test run, you can repeat steps 3 to 10 and activate the checkbox "Perform detailed test".
- The test results are now displayed on the right in the window. If there is a problem, you can document it, for example by taking a picture of the screen with your smartphone. This will help the Apple technician better understand the error later. You can now either restart the computer or switch it off.
What you should know about the diagnostic results
Diagnosis result no evidence of intact hardware
Unfortunately, both the Apple Hardware Test and the Apple Diagnosis are not infallible tools: They fail, for example, if the error is so serious that the Mac can no longer be started. The test does not necessarily find some hardware problems either. For example, the test fails with a number of typical Mac errors, such as a loose contact on a RAM bank or the graphics card bug that occurred in many MacBook Pros from 2011. Deep-seated hardware problems can also crash the test itself. On the other hand, the test gives an indication of possible causes of errors if it finds something..
Macs are not very easy to maintain
There is also another problem: Macs are relatively maintenance-unfriendly, which means that the user can actually no longer do any work himself. If the hardware test reports a problem with a RAM module, it can no longer be replaced on many modern Macs. Instead, the entire logic board (motherboard) has to be changed, which can result in considerable costs and, in the case of older systems, actually amounts to a total economic loss.
It's the software, stupid!
However, you don't always have to assume the worst right away: Mac hardware is relatively robust and even very old Macs can often continue to function flawlessly for years. The main sources of error are therefore usually easy to identify on the Mac: Faulty RAM modules, a defective hard drive or the cable connections between the monitor and the mainboard are the most common problems that can occur. Much of it can only be fixed by a service technician. If the Mac freezes regularly, however, in the vast majority of cases the problem is caused by software - a bug that the hardware test cannot find. It is therefore advisable to first create a new user account in the event of a crash and test the system here. Then reinstalling macOS can fix many errors..