An OEM partition is used by Windows as a recovery partition that is accessed when your PC has problems booting. You can also access the same functions via a Windows 10 USB stick or CD. With every new build of Windows 10, this partition is automatically installed on your disk. But how do you get rid of them? You can find out in our tips + tricks.
preparation
The OEM partition is suitable for restoring the system or resetting Windows to factory settings. The partition can be used to restore your system in the event that you have problems booting. But why should you delete this partition? The OEM partition is redundant if you have a Windows 10 USB stick, as you can also use this to reset Windows to the factory settings in the same way. If you are one of those users who want to remove the OEM partition in order to gain around 450 MB of storage space, we will show you how this works with the in-house tool diskpart .
To first check whether you have an OEM partition, open the disk management using the key combination [Win] + [X] and " Disk Management "..
 Disk management
As can be seen on our example computer, there are several partitions on the hard disk. An EFI system partition, which is important for the actual booting of Windows, and an OS partition, on which your actual Windows is located. It is important that you remember on which data carrier your Windows and the OEM partition are located. In our case this is disk 0 or disk 0 . It is best to make a note of this for the following section. You may also find several primary partitions there that are used for backup. We are interested in the OEM partition, which is also specified as such. Unfortunately, you cannot delete this partition using Disk Management , which is why we will look at the diskpart tool in the next section .
Note: The OEM partition can also be specified as a recovery partition in Disk Management..
How do you delete an OEM partition?
Whether SSD or HDD: Windows 10 automatically installs a recovery partition or OEM partition on your hard drive with every major update in spring and autumn. So if your disk management or Windows Explorer shows an OEM partition, you can find out here how you can delete it again using diskpart . To do this, follow our step-by-step instructions or take a look at the brief instructions .
Tip: Before you delete partitions, you should always think about backing up your data in Windows 10.
1st step:
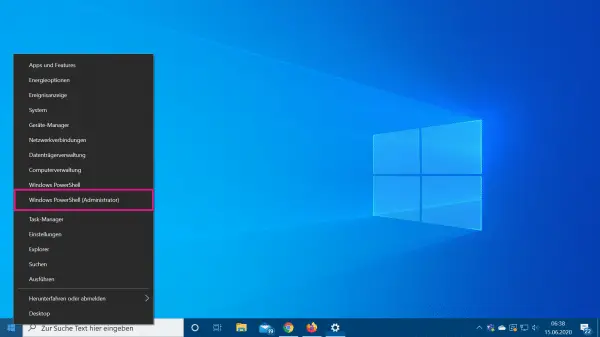 Open Windows PowerShell as an administrator. To do this, press [Win] + [X] and select Windows PowerShell (Administrator) . Enter your username and password when asked. With older Windows versions, select the command prompt (administrator) instead of PowerShell . Tip: It's even faster with [Win] + [X] followed by pressing [A] .
 2nd step:
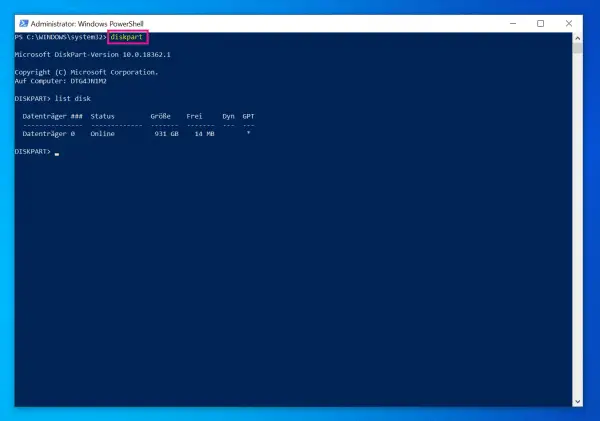 Once in PowerShell, type in " diskpart " and press [Enter] .
 3rd step:
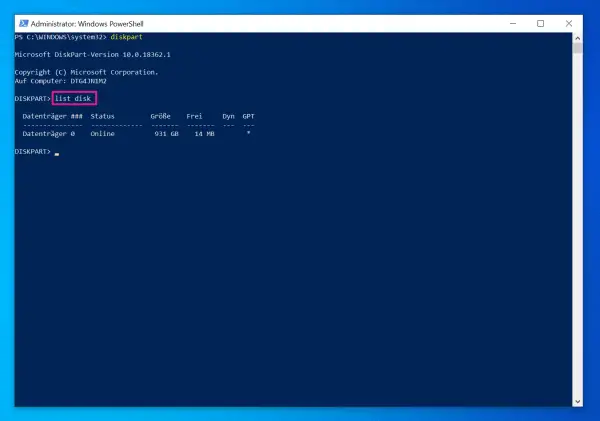 Enter " list disk " to output your different disks and press [Enter] again .
 4th step:
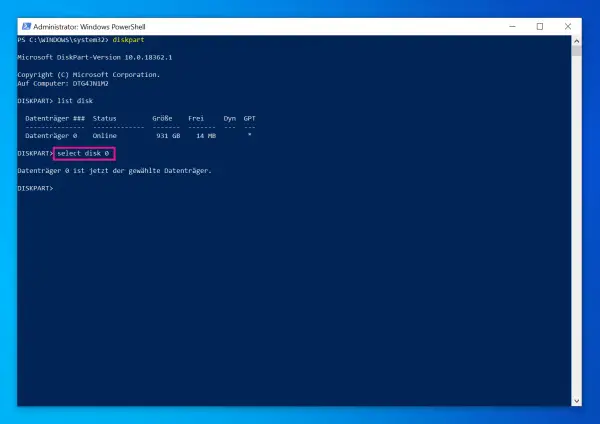 In our case, only one disk is shown. If you have connected several hard disks, identify the data carrier on which your Windows and the OEM partition are located. How do you know which disk the partitions are on, you have already made a note of it from the "Preparation" section. Now enter " select disk X ". Replace " X " with the drive letter of the hard drive on which the OEM partition is located. Confirm again with [Enter] .
 5th step:
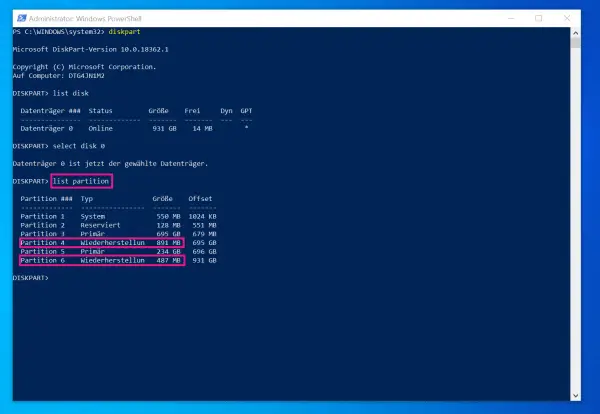 Write " list partition " and press [Enter] again . Now all partitions of the selected disk should be listed. The type in the second column tells you which partitions are recovery partitions. In our instructions, it is partition 4 and partition 6.
 6th step:
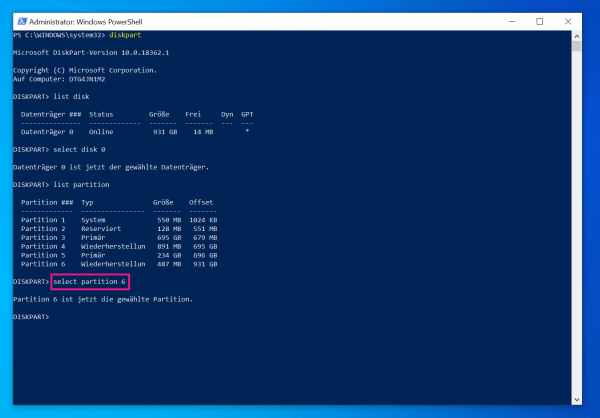 In order to select one of the partitions, we type in our example " select partition 6 " and press [Enter] . Note: Normally there should only be one recovery partition. However, when upgrading Windows 10, you may also find two OEM partitions, as in our example. You can delete both of them by repeating the process for the second partition.
 quick start Guide
- Open Windows PowerShell as administrator via [Win] + [X] .
- Enter " diskpart ".
- Type in " list disk " to display all of the disks.
- Select the Windows 10 disk via " select disk X ". X stands for the number of the correct data carrier.
- Enter " list partition ".
- Use " select partition X " to select the OEM partition . Again, X is the placeholder for the partition, the type of which is shown as " Recovery partition ".
- Finally, delete the OEM partition with " delete partition override ".