If you want to prevent third parties from viewing your e-mails, you can secure your e-mails using PGP encryption. To do this, you need two things: A free program that contains the GnuPG crypto component, i.e. it generates your key and encrypts and decrypts e-mails. And secondly, an add-on that enables the use of PGP encryption in Thunderbird.
Why encrypt at all?
Would you send your digital messages as postcards? Probably not. Non-encrypted e-mails behave similarly to postcards - third parties or any system that processes your e-mails can read their content. If you want to protect yourself against this, for example when sending sensitive data or discussing a critical topic, then the PGP encryption of e-mails is the first choice to wrap your postcard in an envelope. In order to open this envelope and read the message, your counterpart now needs a key.
The plain text of the email is encrypted in an illegible, cryptic form. This can only be made legible again with the appropriate key. Encrypting emails in our article - is it worth it? learn more about encryption. The whole thing works with PGP encryption , which we briefly explain below:
PGP stands for Pretty Good Privacy and uses a so-called public key procedure in which there is a clearly assigned pair of keys. This key pair consists of a public and a private key. Your counterpart downloads the public key from a so-called key server and can use it to send you encrypted e-mails. Only you have the secret private key and therefore you should not lose or send it under any circumstances. Messages to your e-mail address are therefore encrypted with your public key and can then only be decrypted again with your private key. This procedure is also called the asymmetric procedure because the sender and receiver use two different keys.
In an article by the c't it is simply explained how exactly e-mail encryption works with PGP.
Setup of OpenPGP from Thunderbird 78.2.0
1st step:
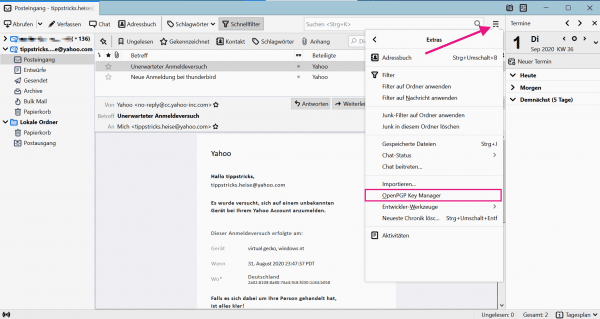 Click on the three-line menu above and select the new menu item " OpenPGP Key Manager " via " Extras " .
 2nd step:
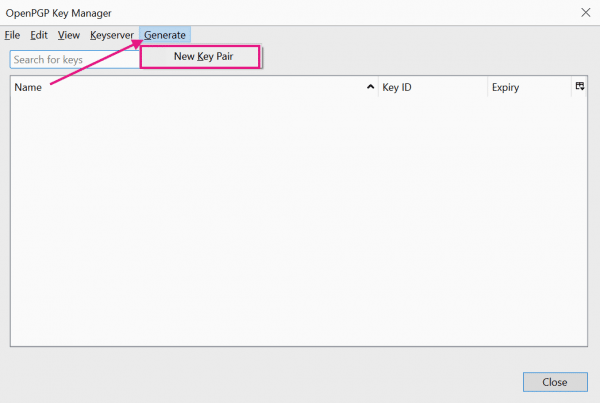 It continues via " Generate " and " New Key Pair ".
 3rd step:
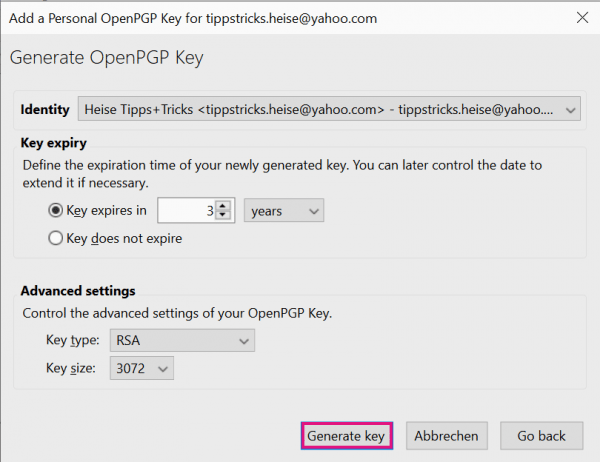 Select the identity you want to create the key for. Under " Key expiry " and " Advanced settings " you can make settings for the expiry time as well as the key type and length. Then continue with " Generate key ".
 4th step:
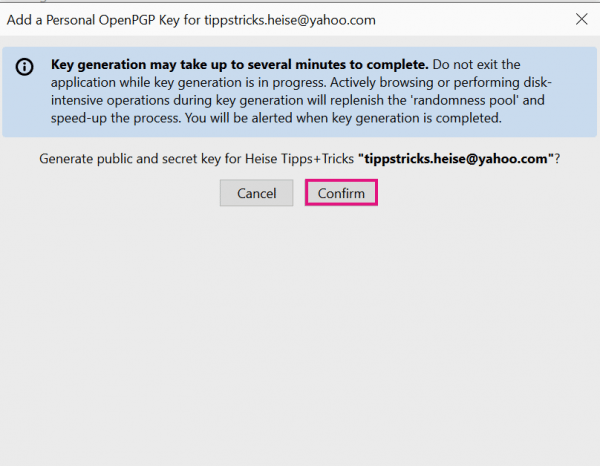 Thunderbird will now automatically generate your private and public key. Confirm the process with " Confirm ". That was about it. Upload your public key to e.g. keys.openpgp.org or send it directly to your contacts.
 5th step:
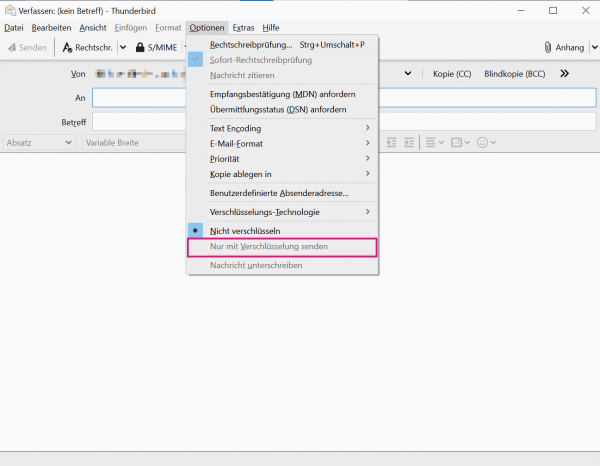 You can now activate OpenPGP by default when composing your e-mails. To do this, go to " Send with encryption only " under Options in the menu .
 Encryption in older Thunderbird versions
In order to be able to encrypt your e-mails in older Thunderbird versions, you must first install Gpg4win and then add the Enigmail add-on to Thunderbird. To do this, follow our instructions:
Installation of Gpg4win
Gpg4win is the first component in the interaction of encryption in Thunderbird. The software contains the required GnuPG (GPG) crypto components. These generate and manage keys and encrypt and decrypt emails and files.
Download Gpg4win for Windows. Then follow our step-by-step instructions:
1st step:
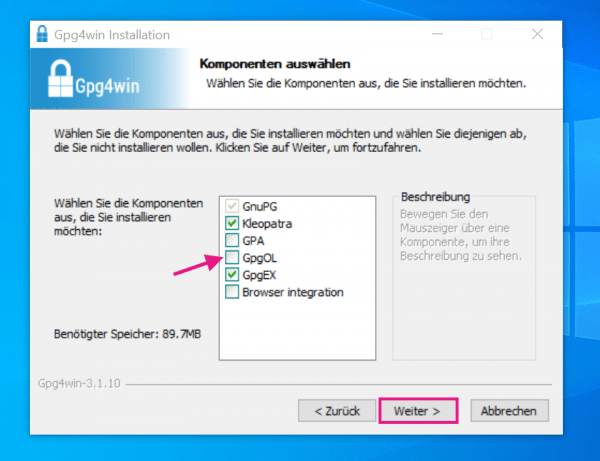 Run the downloaded .EXE file as usual. We recommend installing the file with administrator rights. Click on " Next " until you reach the above window. You can deselect GpgOL as this is an extension for Outlook. Click on " Next ".
 2nd step:
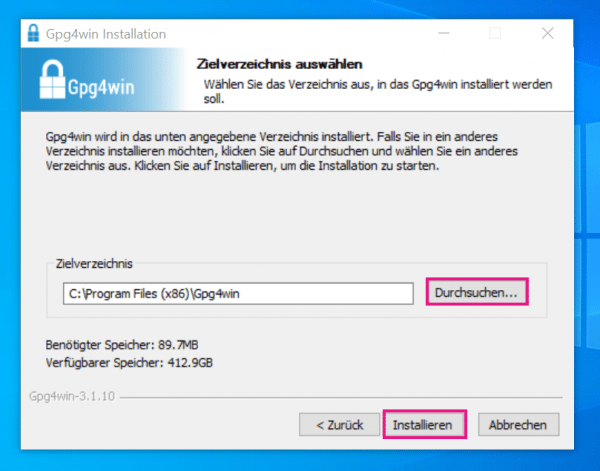 Select your target directory via " Search " and then click on " Install ". The encryption program will now be installed. This provides you with the basic tool for setting up PGP encryption in Thunderbird and you can continue with the next section.
Installation and setup of Enigmail
The second component is the "Enigmail" add-on. Enigmail acts as the middleman, so to speak, to integrate and use the crypto component GnuPG in Thunderbird. In this section we will show you how to install and set up Enigmail. OpenPGP has been an integral part of the e-mail client since Thunderbird 78.2.0 and no additional add-on is required. If you still have an older version, follow our step-by-step instructions or take a look at the brief instructions for installing Enigmail. Otherwise, follow the instructions for setting up OpenPGP from Thunderbird 78.2.0 ..
1st step:
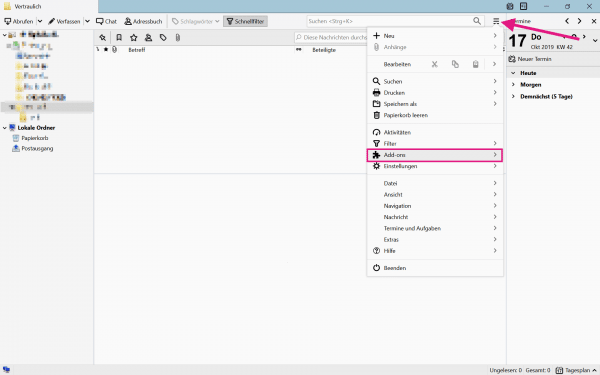 Start Thunderbird, open the three-line menu in the upper right corner and select " Add-ons "> " Add-ons ".
 2nd step:
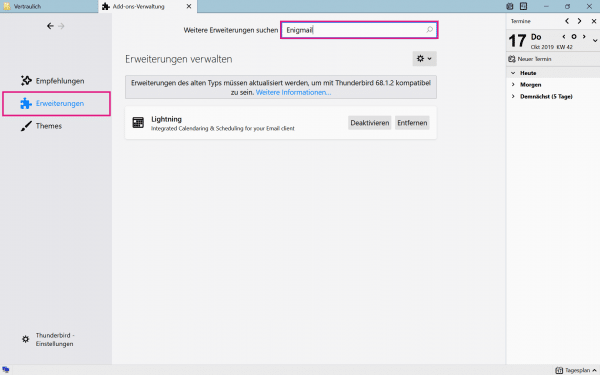 Click on " Extensions " on the left , look for " Enigmail " in the bar above and press [Enter] .
 3rd step:
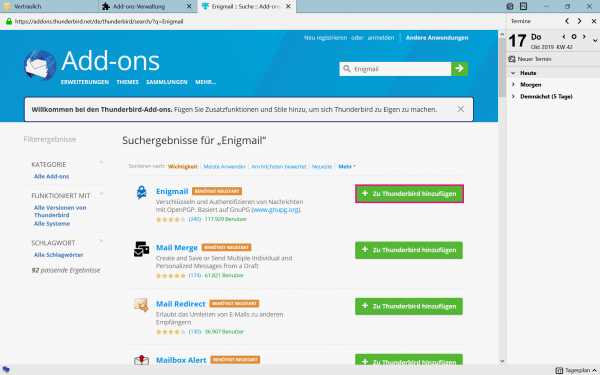 Click on " + Add to Thunderbird " to install Enigmail as an add-on. When asked, click on " Add " again. Then restart your Thunderbird again .
 4th step:
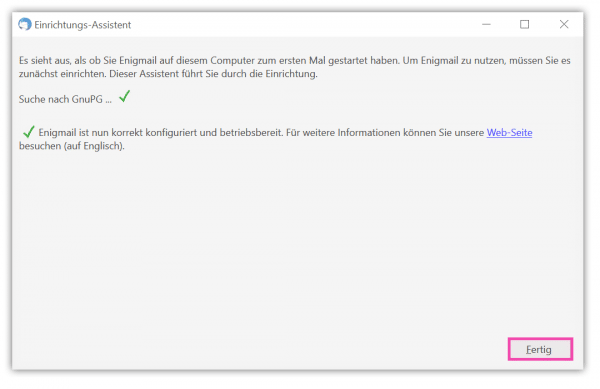 The setup wizard will now automatically search for GnuPG, which we already installed in the previous section. Then click on " Done ".
 5th step:
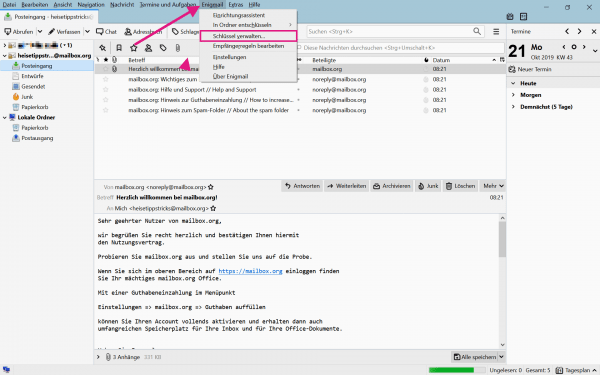 Now you need to create your own key. To do this, open the Thunderbird menu using the [Alt] key and select " Enigmail "> " Manage keys ".
 6th step:
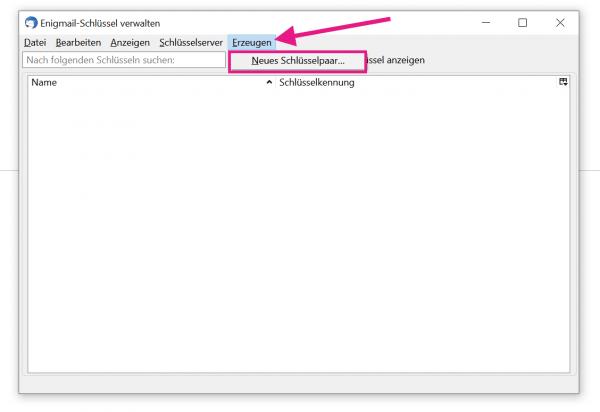 Now navigate via " Generate " to " New key pair ".
 8th step:
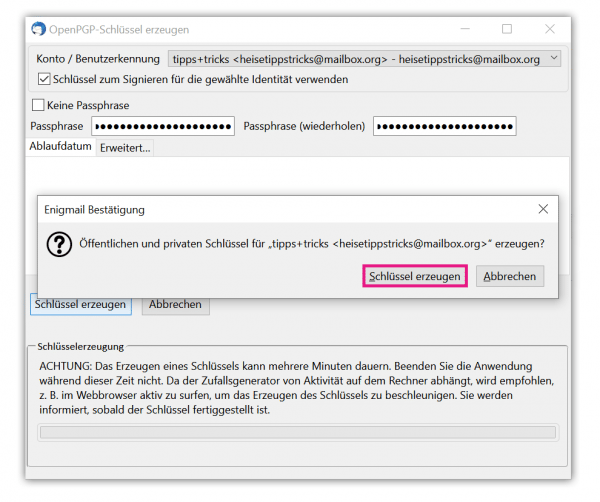 Click on " Generate Key " again.
 9th step:
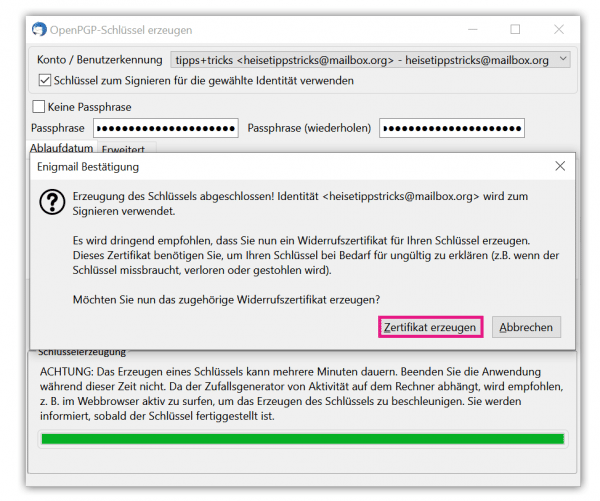 Enigmail then creates a revocation certificate . Click on " Generate certificate " and, if asked, save the revocation certificate at your desired location and confirm the creation again with your passphrase.
 10th step:
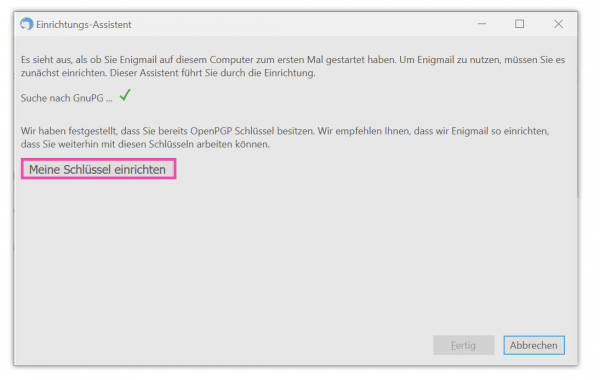 Finally, new to setting up your key pair navigate back over the Thunderbird menu to " Enigmail "> " Setup Wizard " and clicking the " Set Up ". The key is now activated and you can use it to encrypt and sign your emails. In the next instruction we will also show you how you can upload your key to a public server so that you can also receive encrypted e-mails from people who do not yet have your key.
 Upload your own key
In the following, we will briefly explain how you can upload your public key to a server. This ensures that the person you are talking to can search for your key and send you an encrypted message. Otherwise, you also have the option of simply sending your public key as an attachment to the person you are speaking to.
1st step:
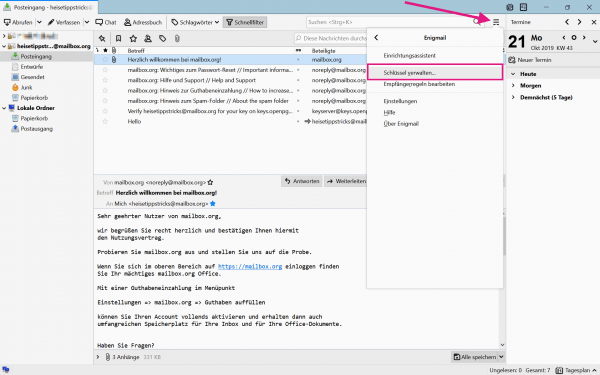 Go to " Enigmail " in the Thunderbird menu in the upper right corner and then to " Manage Keys ".
 2nd step:
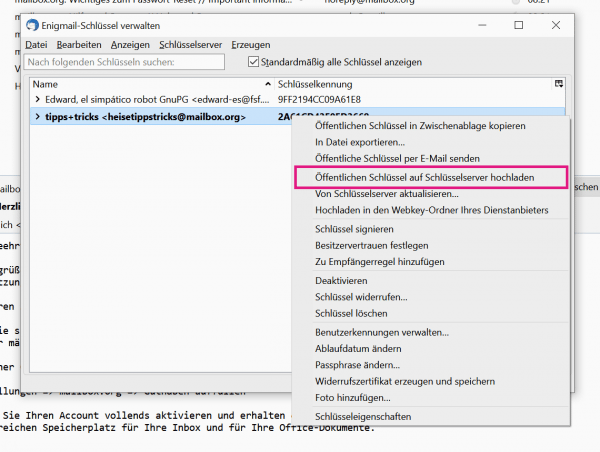 Make a right click on your account for which you have created a key. Now select " Upload public key to key server ". This allows other people to download your key to send you an encrypted email. Only you can then open the e-mail with your private key.
 quick start Guide
- Start Thunderbird, open the three-line menu in the upper right corner and select " Add-ons "> " Add-ons ".
- Click on " Extensions " and search for " Enigmail ".
- Select " + to Thunderbird Add " and s tarten Thunderbird again.
- In the setup wizard, click Done .
- Open the Thunderbird menu by pressing [Alt] and select " Enigmail "> " Manage Keys ".
- Now navigate via " Generate " to " New key pair ".
- Select the required account under " Account / User ID " and enter a passphrase. Make a note of this. Select " Key will never be invalid " and then click on " Generate key ".
- Click on " Generate Key " again.
- Go to " Generate certificate " and save the revocation certificate when asked . Confirm again with your passphrase.
- Navigate finally back over the Thunderbird menu to " Enigmail "> " Setup Wizard " and click here to " set up ".