The Raspberry Pi has been delighting a steadily growing fan base since 2012. This is of course primarily due to its wide range of possible uses. Whether as a multimedia player with Kodi, all-round emulator station for classic games or simply as a full-fledged Linux computer, the Pi cuts a fine figure. But the mini-PC only unfolds its full potential when the GPIO pins are used. The 40 plugs can be found on all current Pis including the smaller Raspberry Pi Zero. They enable the Pi to communicate with external devices or to implement various circuits. The GPIO bar is therefore also the basis for many handicraft projects that can be implemented with the Raspberry Pi.
What exactly are GPIO pins?
The abbreviation GPIO stands for " General Purpose Input / Output ". Freely translated to German, this means "Input and output for general purposes" - and that is exactly what sums up the functionality of the PINs. GPIO is a standard interface used to connect microcontrollers to other electronic devices. For example, sensors, diodes, displays and system-on-chip modules can be connected to a mini computer such as the Raspberry Pi via GPIO..
In fact, the Pi isn't the only single-board computer with a GPIO interface. Many Raspi alternatives such as the Banana Pi also offer a GPIO bar. Their assignment is in many cases identical to that of the Pis, so that corresponding projects can be transferred quite easily.
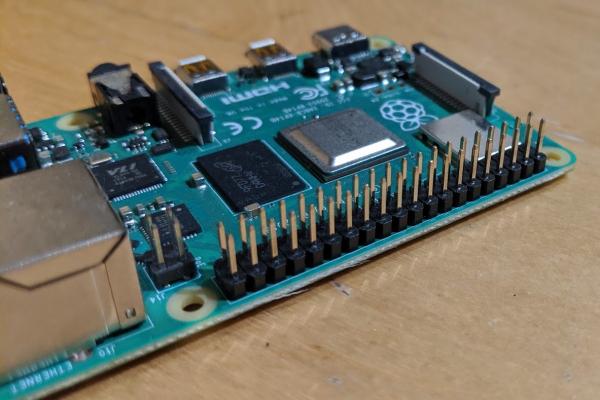 The GPIO pins (here from the current Raspberry Pi 4) fulfill a whole range of different purposes.
The task of the GPIO pins can be implemented using software programming with tools such as Python or Scratch. Examples of the use of the GPIO pins are, for example, the control of LED lights, the simple output of tones (such as a buzzer) or the power supply for external devices. Conversely, switches can also be connected to the Raspi via the GPIO pins, for example, and certain actions can be carried out via programming. A classic for this would be, for example, a power switch that starts or shuts down the mini-computer at the push of a button..
A simple but very practical application for the GPIO output would be an LED that lights up when a certain operation is performed on the Raspberry Pi. This is particularly useful in so-called "headless" operation (i.e. without a connected monitor for display output).
The assignment of the GPIO pins
Since the Raspberry Pi revision B +, the mini-computers have a total of 40 GPIO connections. Of these, however, only 26 are occupied. Some of the pins fulfill several purposes at the same time and must be defined accordingly using suitable programming..
Some of the pins also supply voltages of 5 or 3.3 volts. Together, the GPIO pins deliver up to 50 milliamps of current to external devices. This is sufficient for simple LEDs, but larger circuits require their own power supply.
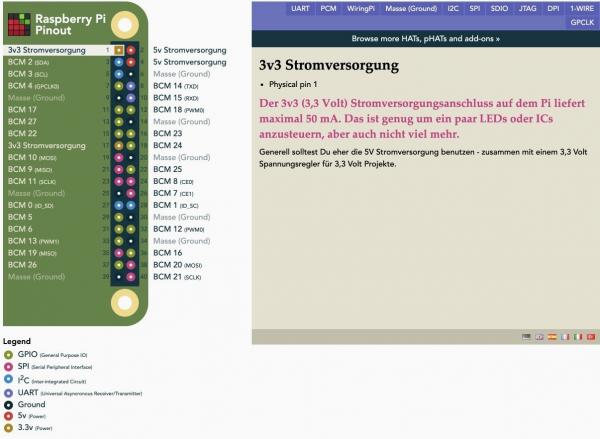 If you want to work with GPIO pins, you should know the assignment. Sites like Raspberry Pi Pinout help with this (source: pinout.xyz).
 The electrical properties of the pins also make it necessary to exercise caution when experimenting with cables and other components. The accidental plugging of cables and power sources into a Pi can short-circuit the processor and destroy it - this applies in particular to the 5-volt pins.
Unfortunately, the counting method and the assignment of the GPIO pins on the Raspberry Pi are not easy to understand, especially for beginners. It is therefore advisable to have an overview of the pin assignment at hand when carrying out your own experiments. An excellent, interactive assignment plan for the GPIO pins of the various Raspberry Pi models can be found on the Raspberry Pi Pinout website, for example .
GPIO extensions for the Raspberry Pi
The GPIO pins are of course only of interest in combination with the corresponding hardware components. First steps with the control of LEDs and Co. can be done with little financial outlay.
So-called breadboards, for example, provide a good starting point for using the versatile Raspi pins. The plug-in boards are connected to the Raspberry Pi via a jumper cable. Various circuits can then be implemented without reaching for a soldering iron.
Anyone interested in getting started with GPIO use should look around for a breadboard starter set at electrical retailers. In addition to the breadboard, such sets also contain the necessary cables and components such as LEDs, switches or resistors.
Program GPIO pins on the Raspberry Pi
In order to use components connected via the GPIO pins, programming is required. Python, the standard programming language for the Pi, is well suited for this thanks to an available library. Before you can start programming, you have to import it via the Python console. The command required is: import RPi.GPIO as GPIO
Then you can start programming the pins. A look at the official documentation of the Raspberry Pi Foundation reveals the basics of GPIO programming with Python.
The GPIO pins can be addressed even more easily using the Scratch graphic programming kit integrated in Raspbian . Here, too, the official Raspi documentation provides a good basic introduction at raspberrypi.org .
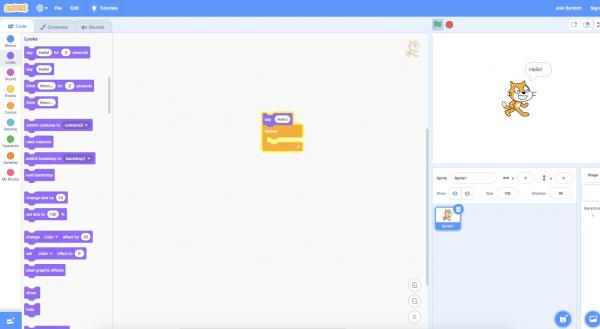 If you don't feel like using Python, you can also use the graphic programming language Scratch to control the GPIO pins.
 Good German-language instructions for programming the GPIO pins can be found, for example, in the Raspberry Pi tutorials on tutorials-raspberrypi.de .