Format with Windows Explorer Format with Disk Management Change file system in Command Prompt Convert file system via third party tool
You were trying to copy a file to an external hard drive, and there you found the error message: "The file is too large for the destination file system". What to do ? In this article, you will learn about 4 effective solutions that will help you solve this problem..
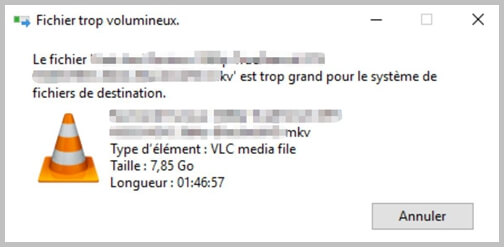
Have you ever received the "The file is too large for the destination file system" message when you were copying or moving a file to a hard drive? This problem has a direct link with the recipient's file system.
The file system is the one that controls how files are stored, identified, and organized on disk. On Windows, the most common file systems are: FAT, FAT32 and NTFS. FAT is also known as FAT16 and only supports files that are 2 GB or less each. For FAT32, the maximum file size is 4 GB maximum. And compared to these two file systems, NTFS is the one with the largest capacity for up to 16TB per file..
As just mentioned, the "The file is too large for the destination file system" problem could be caused by the individual item size limit set by the file system on your destination disk. In most cases, the file system used is FAT or FAT32. So what you could do is convert your file system to NTFS. Here are 4 ways to do it. But above all, it is imperative that you back up the data on your storage device. Otherwise, you will need to perform data recovery to find all the missing items.
Format with Windows Explorer
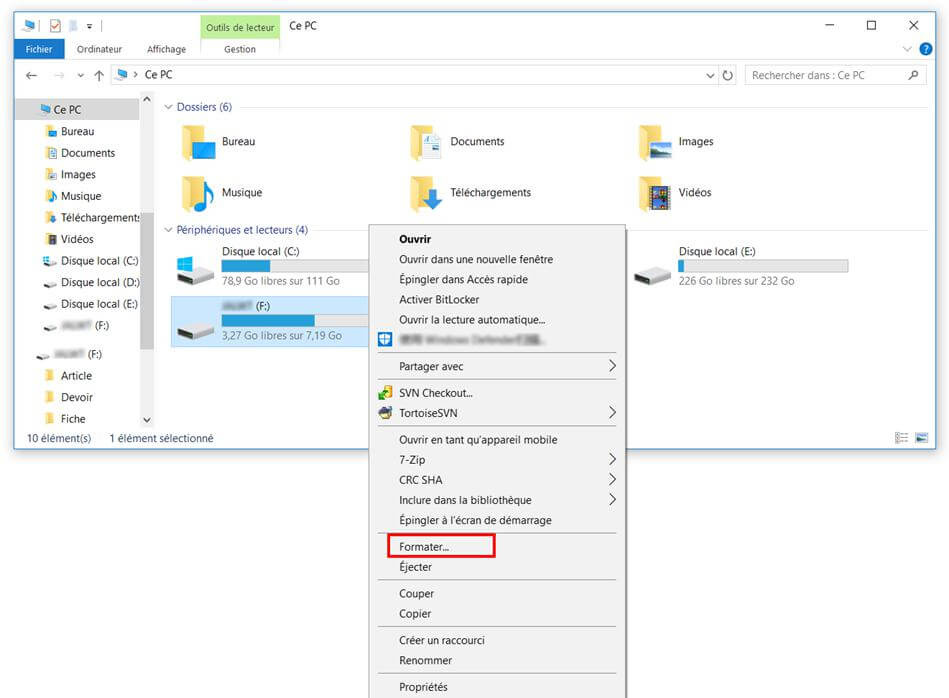
- To get started, click on the "Start" menu, then on "My PC".
- Next, locate your destination drive in Windows Explorer.
- Right-click on it and select the “Format…” option.
- A dialog box will appear on the screen. In the "File System" section, select "NTFS".
- Finally click on the "Start" button.
Format with Disk Management
- Simultaneously press the "Start" + "R" keys to open the "Run" window.
- Then type in "diskmgmt.msc" and click on the "OK" button or press the "Enter" key.
- When you are in the Disk Management window, locate your destination drive.
- Right-click on it, then select the “Format…” option.
- A dialog box will appear on the screen. In the "File System" section, select "NTFS".
- Finish by clicking on the “OK” button.
Change file system in Command Prompt
- To get started, open the "Run" window by following step 1 of the previous method.
- Type "cmd" there, then click the "OK" button or press the "Enter" key.
- When you are in the Command Prompt window, enter the command below: [drive letter to convert]: / fs: [new filesystem]
- For example, if you want to convert the file system of drive F to NTFS, then please type: convert F: / fs: ntfs
- Then, press the "Enter" key.
- Then please wait while the process is completed.
Convert file system via third party tool
Apart from the built-in methods provided by Windows, you can also use a third-party tool to help you with this. There are a large number of file system conversion tools in the global market today. A program that is unreliable could cause damage to your disk and to your data. It is therefore important that you choose a reliable, experienced and known tool to support you in this task..