Are you new to the macOS operating system? Or are you having trouble finding data on your Mac? Even though macOS is very nice, it can sometimes be a bit complicated to find a particular file or folder. Just like Windows and Linux, Mac also has many methods to find and find files as well as their location in local system storage..
In this article, we will show you how to find the bookstore / library folder on a Mac and how to recover a document from your Mac's system.
Part 1: How to find hidden files and folders on Mac hard drive?
So how do you find the library / library folder lost on a Mac? You can search your Mac's internal hard drive or an external hard drive. The search methods to find lost files on Mac are the same for the majority of Apple computer models. There may, however, be some differences between the interfaces of different macOS systems. Learn about the most common techniques you can use to find any file on your Mac..
Use "Recent Items" to find Documents on a Mac
If you want to find files or folders that were opened not long ago on your Mac, then please follow the directions below. macOS should have saved documents, applications, and even system processes, which were recently opened. Quickly learn how to find lost files on your Mac with these few steps.
1. Click on the Apple logo, which is located in the upper left corner of the screen, then select the “Recent Items” option..
2. You will be presented with a list of recently opened items, such as folders, applications, and documents. Just click on the icon of the app or file you want to open.
3. You can also go to menu “File”> “Open Recent” to see recently opened files. You have the option to clear the history of recently used files or you can click on any of them to access them again.
Check the "Downloads" folder to find files
It is quite common to hear about Mac users who have seen documents, which they had just downloaded from the Internet, disappear from their Macs. If you've also noticed that something has disappeared from your Downloads folder, then follow the directions below.
1. To get started, go to your Mac's desktop. Click on the "Go" section of the menu bar. Then, select the "Downloads" folder on your Mac.
2. Alternatively, you can go to the “Library” and then click on the “Downloads” section from the left side panel.
3. Once your Mac's “Downloads” folder opens, you'll be able to see all the items you want. There is a search bar at the top of the window, which can help you quickly locate a particular file. Click the bar, then type the name of the file you are looking for in the "Downloads" folder.
Check the Recycle Bin to find deleted files
When you delete something on a Mac, it doesn't immediately disappear from storage. In reality, it is moved to the Recycle Bin, from where it can still be restored. So, before taking any drastic action, check your Mac's Recycle Bin to see if your lost files or documents are there.
Also read:
- Items in the recycle bin keep reappearing after i delete them, what should i do?
- Recycle Bin Recovery on Mac: How to Recover Trash on Mac
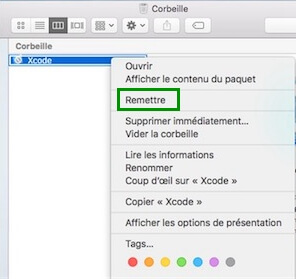
1. Start by opening the Trash folder on your Mac. You can access it by clicking on the Trash can icon in the Dock.
2. When the Trash folder opens, you will see all the deleted files there, which are temporarily stored there.
3. If you want to recover a file, please select it and then right click on it. Click the "Put Back" option to restore the file to its original location.
Use Spotlight Search to Find Files and Folders
Spotlight is probably one of the most resourceful features on macOS. As Spotlight has made a name for itself in all macOS versions, you will have no problem finding a file on your Mac with its help. You can access this function from the desktop. It will allow you to find files, documents, items on the Internet, etc. If you don't know how to find documents on your Mac, then simply follow the steps below.
1. To access Spotlight, go to your Mac desktop and click on the magnifying glass icon, located in the upper right corner of the screen. Type in the name of the file or folder you want to find.
2. The system will immediately begin searching for the items that best match the keyword you typed. Once you see the results displayed on the screen, just hover your mouse over a file's icon to preview it. In general term, your Mac will allow you to preview photos, videos, audio files, documents, etc.
3. To access a file, click on its icon and it will open immediately. You can click on the “Show All” option to see all the results in the Finder.
4. By opening the results in Finder, it will be easier for you to find the items you are looking for.
Use Terminal to find files and folders on a Mac
Terminal is one of the most useful utility tools on Mac, it will allow you to give direct control to your system. Many users are unable to find hidden files and folders on their Mac. What to do in this case ? You can use Terminal to view hidden files and folders, and then access them from Finder.
Get more tips on using Terminal on your Mac.
If the item you are looking for is in your Mac's storage, then you can easily find it with the methods mentioned above. These methods work even if the data sought has been hidden or deleted. You can do all of this with your fingers up your nose. However, if your data is inaccessible and does not seem to be on your Mac anymore, then please follow the directions in the next section. They will help you find lost files from your Mac.
Part 2: How to Recover Lost Files from Mac?
It can happen to any user to lose important data from their Mac. Even though there are many culprits, it is still possible to find the lost documents. Here are the methods that will help you.
Why are your files missing?
Before we talk about ways to find documents on your Mac, it's important to know what happened. Here are the main causes of data loss on Mac.
- There are times when users accidentally delete items on their Mac.
- Changing the location of some files may make them inaccessible. A virus or malware must have attacked your storage, making your files inaccessible.
- It is possible that your data has been overwritten.
- Your data may have been mishandled by a third-party application.
- The storage drive or partition must have been corrupted or formatted.
- There must have been software issues or a corrupted update on your Mac.
FonePaw Data Recovery: Best Partition Data Recovery Program for Mac
No matter what may have caused your data to be lost or inaccessible, you can easily find it back with FonePaw Data Recovery program. It is a reliable high-tech tool that supports all versions of Mac and Windows. This app has been designed by FonePaw and has achieved positive results in different kinds of situations. It is very easy to use. Moreover, no technical experience is required for recovering lost data on Mac.
Free TrialFree Trial
If you accidentally deleted a partition on your Mac or lost it for some other reason, then you should use FonePaw Data Recovery. Follow the steps below to restore data from your Mac partition.
Step 1: Select a disk
To get started, launch the FonePaw Data Recovery app on your Mac. The app will automatically identify the built-in partitions on your Mac and sort them into a list. All you need to do is select a partition of your choice and then start the data recovery process.
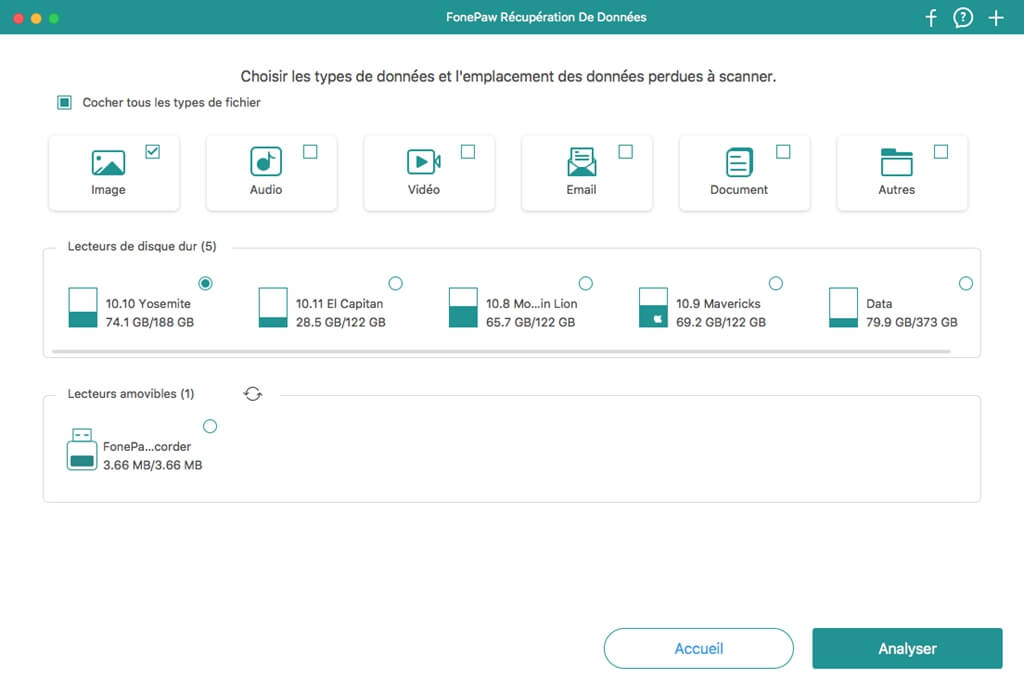
Step 2: Analyze the location
FonePaw will detect the lost items from the selected partition in no time. If the partition is lost, then the “Quick Scan” mode will not be enough to provide you with the expected results. In this case, you will need to use the "Deep Scan" mode to perform a full and deep scan of the selected storage.

This process may take some time, we recommend that you wait until the scan is complete before checking the results. Do not restart your Mac or close the FonePaw app during the deep scan process.
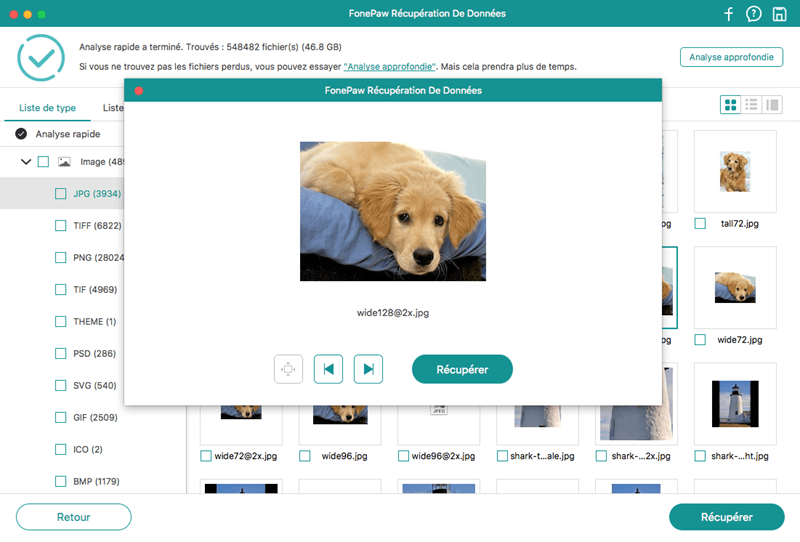
Step 3: Preview and Recover
And There you go ! It is done ! The process is completed, the application will display all the recoverable data on the screen, categorizing it under different categories. You can see a list of categories in the left panel and preview the chosen data on the right.
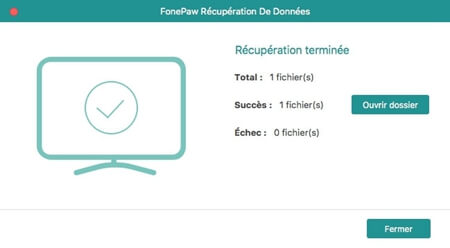
Finally, select all the files you want to restore and click the “Recover” button to save them to a safe place.
Free TrialFree Trial
And that's all ! After reading this article, we are sure that you have finally been able to find the lost files from your Mac. We have listed the various methods of finding lost documents on Mac, recovering hidden files, and restoring deleted data. If you are unable to find files deleted from your Mac in Trash, then you should turn to FonePaw Data Recovery. As the name suggests, it is a professional and user-friendly data recovery app that will help you restore all kinds of missing items from your Mac. It will even help you find the missing bookstore / library folder from your Mac. There is a free trial version of this tool!So what are you waiting for? Download it on your Mac and enjoy the great features of the FonePaw software.