Running Linux and Windows on the same machine is pretty easy - you just choose which system to start when you boot. All the necessary steps can be found here simply explained.
How does dual boot work?
When you turn on the computer, Windows usually just starts. The process can, however, be canceled by pressing [Shift] + [F8] at some point (from Windows 8; with older versions only [F8]). A menu appears with boot options, for example for the safe operating mode. If you later install a Linux, such a boot manager will also be installed - and it always appears after switching on.
And at this point choose the operating system you want . Alternatively, the standard system starts after a few seconds, usually your Windows. It does not matter on which data carrier you install Linux. If there is enough space, it can also be the same disk on which Windows is running..
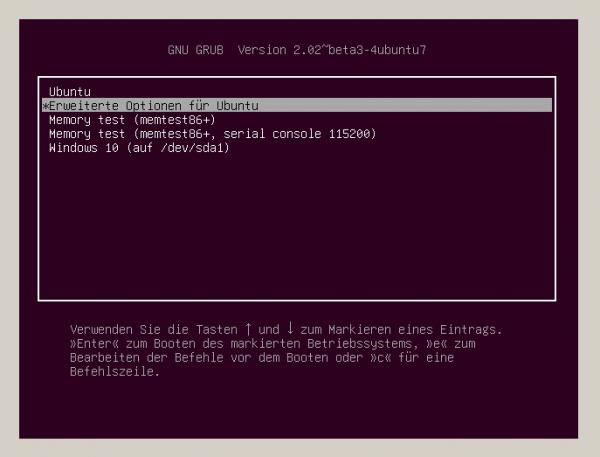 The end result: the boot manager Grub asks which system should start.
 Create boot medium
First of all, you need a boot medium, usually a USB stick . However, it is not enough to simply copy a downloaded Linux onto the stick; the ISO file must be unzipped with a special program . If you want to install a typical Linux, for example Ubuntu, the easiest way to do this is with Unetbootin, which can also download the ISO file at the same time.
- Unetbootin consists of only one window. First you determine the Linux to be installed . Either select one of the systems offered from the " Distribution " area above ( caution : not always up to date!) Or enter an ISO file that you downloaded yourself under " Image ".
- Now select the USB stick you want at the bottom of the window . But be careful : the drives are only listed here with drive letters, the wrong one can easily be selected. And that would erase all of the data on the disk. Then confirm with [ OK ] and wait for the writing process. If Linux is to be installed on the same computer, the stick can remain plugged in. Otherwise, you shouldn't just take it off, but " eject " it using the USB icon in the system tray .
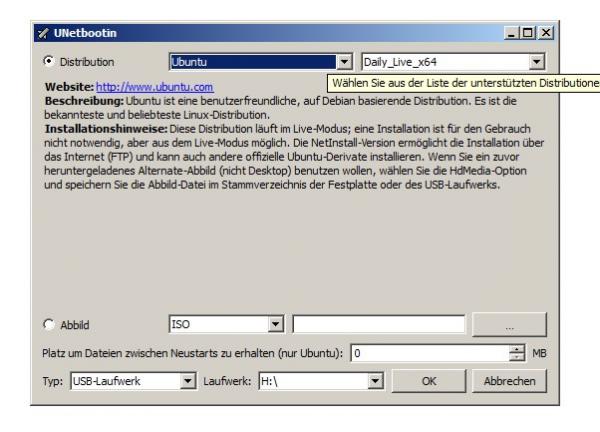 Boot media are particularly easy to create with Unetbootin.
 Configure the boot order
Not all computers start an inserted boot medium immediately; most of the time, the hard disk or SSD is still used for booting. In all likelihood, you will therefore have to change the boot sequence in the BIOS / UEFI (the computer's firmware) . By the way, you only need to do this once: If a bootable USB stick is not inserted, the computer will start from the disk without asking..
- Restart the computer . In order to get into the BIOS on older computers and into the UEFI on newer computers, you have to click on a button immediately after the computer restarts - unfortunately it is not always the same. When the computer turns on, a short splash screen usually appears with a logo of the mainboard or computer manufacturer. The key you want is usually there too. In most cases it should work with [ DEL ], sometimes with [ F2 ] or [ F12 ] or [ ESC ].
- In the BIOS you now have to navigate with the keyboard , in the UEFI there is also mouse support. Since BIOS / UEFI don't always look the same, you'll have to do a bit of searching. Somewhere there is an entry for " Boot Options ", " Start Options " or something like that. Below that you will always find the boot order . Place the inserted USB stick all the way up .
- Exit BIOS / UEFI and save the settings. The computer then restarts automatically and you land on the welcome screen of, for example, Ubuntu. It continues with the installation.
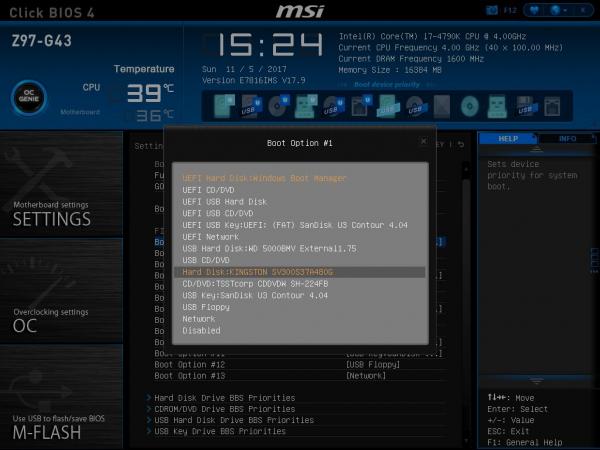 Unfortunately, there is no avoiding an intervention in the BIOS / UEFI, the USB data carrier must boot before the internal hard drive.
 Install Linux
The installation is pretty simple, basically you have to enter things like username, password, regional settings and so on. However, there are also a few important options that cannot be taken for granted, such as where Linux should be installed, here using Ubuntu as an example.
Note: Before installing Linux alongside Windows, you should always back up your data. Read here how to create a backup with Windows 10.
- In the first screen select the desired language and the option " Install Ubuntu ".
- In the next step, you will be asked if you want to update Ubuntu during the installation and if third-party software can be installed. You should activate both options . The third-party software is a non-open source tool such as an MP3 codec or graphics card driver, which is essential for smooth operation.
- In the following dialog the installer informs you that a Windows has been found and should offer the options " Install Ubuntu next to Windows (10) " by default . Accept them so as not to change the Windows system.
- Now comes the question of where to install Ubuntu . If only one hard drive is installed, you can probably just accept the suggested settings. The installer then creates another partition for Ubuntu. You can change their size with the mouse. However, if you want Ubuntu to be installed on a second hard drive, click the Advanced Partitioning Tools button . For the example it is a new, empty, unformatted hard drive.
- By default you will now see one hard drive called "sda" and a second called "sdb". "sda" is the first hard disk with Windows, "sdb" the empty second one. Call up the properties of the disk with a double click and have a partition created . The defaults can stay that way, you just have to set the " integration point " to " / ". The slash stands for the lowest directory. In the Windows world this would simply mean that Windows should be installed under "C: \" as normal. And if necessary, you should limit the size of the partition . There is little point in installing the operating system on a 3 terabyte partition. Now confirm the partitioning and continue the installation using the " Install now " button .
- In the following two installation steps you only confirm the localization settings, i.e. keyboard layout, time zone, language and so on.
- Last but not least, you assign a username and password . And you can choose whether your personal files should be encrypted . This is practical with laptops. Because even if nobody could log on to the computer without a password, you could still expand the memory and read the files on it as normal. Confirm the dialog, remove the USB stick when prompted and then restart the computer .
- So you have now landed in the boot manager mentioned at the beginning . There is probably an entry for " Windows XXX ", two " Memory Test XXX " (tests for the RAM) as well as " Ubuntu " and " Advanced options for Ubuntu ". Ubuntu starts automatically after about ten seconds, Windows must be selected manually. (The order can of course be changed.)
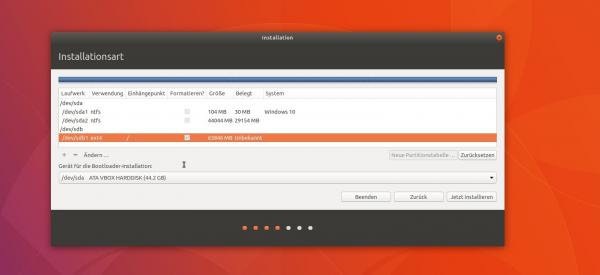 Partitioning is the only stumbling block to installing Linux - but the default suggestions are usually very good.
In this tipps + tricks article, we explain how to install Ubuntu without dual booting.