Arch Linux is a Linux system for more experienced users and offers a fast, minimalistic base system that can be expanded as required. The problem for many beginners: The installation of Arch Linux does not run graphically and there is initially no included desktop environment. Everything has to be installed by hand and then the system has to be adapted to your own preferences. Below, we'll show you how to replace your PC's current operating system with Arch Linux. These instructions are aimed particularly at beginners. We explain step-by-step what preparations you have to make, how you install the actual Arch and how you integrate a desktop environment.
Preparation: create a backup and a USB stick
Step 1: First
create a backup of your PC. Here you can read how to create a backup for Windows and how to do a backup in Linux. When you install Arch on your hard drive, the current operating system and all files will be erased. If you just want to try Arch, you can install it via a virtual machine. We already have instructions for using Ubuntu in VirtualBox.
Step 2:
You also need to install a bootable USB stick. First download the official Arch Linux image from archlinux.de. The current version of our instructions is 2020.01.01. Compare the hash values of the downloaded file using a tool or using Windows PowerShell via Get-FileHash. More at microsoft.com . Then create a Linux boot stick according to our instructions. You can also use alternative software like Rufus or balenaEtcher for this.
Note: Arch Linux only supports 64-bit (x86_64) computers..
Step 3:
Restart your computer and select the USB stick as the boot device in the BIOS. As soon as your PC starts, you open the BIOS via a specific key. This depends on your manufacturer. Often these are the keys [Esc], [F2], [F8], [F10], [F12] or [Del]. You can find out which key to use to start the BIOS here. In the BIOS, navigate to the boot menu and use the arrow keys to select the USB stick as the boot drive. Save the change and then boot from the USB stick.
Create and mount partitions
You must first properly partition a drive in order to install the Arch Linux base system. In the following we explain step-by-step how to create partitions and then correctly mount them:
1st step:
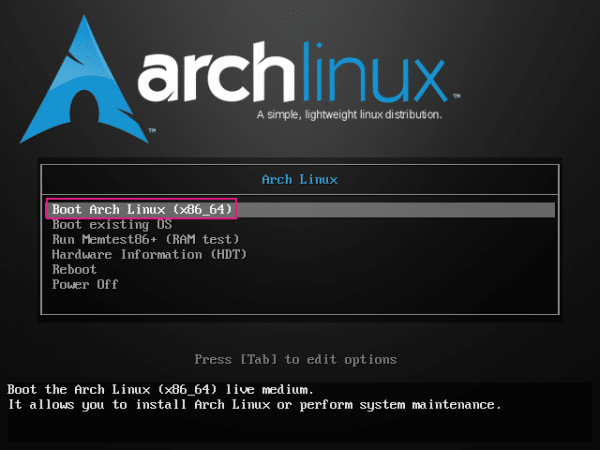 Select “ Boot Arch-Linux x86_64 ”.
 2nd step:
 First load the German keyboard layout via " loadkeys de " so that there are no errors when entering it later. Enter " loadkeys de-latin1 " so that umlauts are also output correctly, if required .
 3rd step:
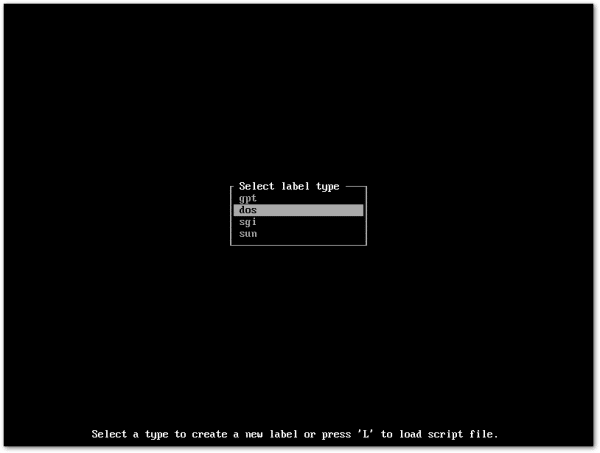 You now need to create partitions. The partitioning program cfdisk can be used for this. Start the tool using the command of the same name. You now need to set your partition style. We choose dos what stands for MBR partition style. Be sure to read the instructions from archlinux.de to ensure that you choose the correct partition style. You can read more about GPT vs. MBR here in our tips + tricks article. Important: Since we only have the hard disk / dev / sda in our example , it is automatically used by cfdisk chosen. If you have several, you can use lsblk, for example, to view your hard disks and find the right one. Then start cfdisk via cfdisk / dev / sdx .
 4th step:
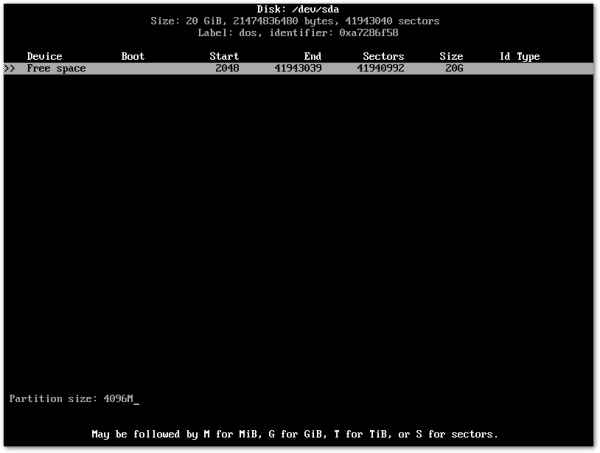 If the hard disk is written to, you can delete it with [Delete] . Our hard drive is already empty and we now need to create partitions. Just navigate with the arrow keys. Create a "swap" partition. Go to [New] and press [Enter] Select [primary] and press [Enter] again Enter a number in MB, e.g. 2048M for 2 GB. The rule of thumb for the swap partition is twice as large as your RAM. For example, we choose 4096 MB for 2 GB RAM. Select [Type] and change this to " 82 " for a Linux swap partition. Finally select [Write] and confirm this by entering " yes " and [Enter] .
 5th step:
 Now create the main partition for Arch. This is where the base system and all other files are saved. Proceed as follows: Make sure the " Free Space " partition is selected. Go to [New] and press [Enter] . Select [primary] and press [Enter] again . Make sure the partition size you entered is correct. We choose 16G, which is the rest of our 20 GB test hard drive. Select [Bootable] and press [Enter] . Finally select [Write] and confirm by entering " yes " and [Enter] .
 6th step:
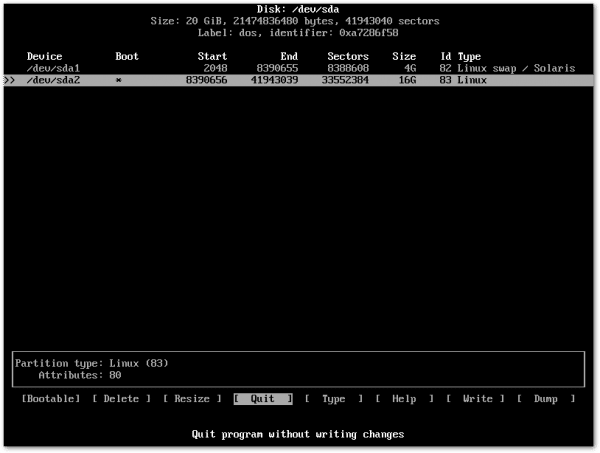 The partition table should now look like ours in the screenshot. Now click on [Quit] to return to the input line. Make a note of the name of your partitions. We chose sda1 for the swap and sda2 for the main partition .
 7th step:
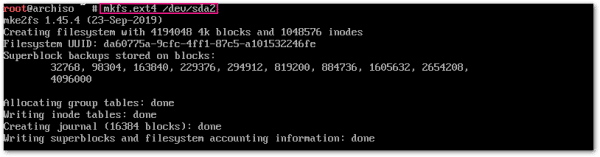 It is now necessary to create the file system and integrate the partitions. First we format the primary partition with mkfs.ext4 / dev / sda2 .
 8th step:
 Now create the file system of the type "swap" via mkswap / dev / sda1 . Here again the note that sda1 or sda2 can vary depending on your settings.
 9th step:
 Now you can mount the main partition and activate swap. This works with the following commands: mount / dev / sda2 / mnt and swapon / dev / sda1 .
 Installation of the basic system and further setup
1st step:
 You now need to establish a network connection in order for the base system installation to work. This is downloaded from the Internet. Since we are connected via ethernet, we have a network connection. You can test this, for example, via ping -c3 heise.de . If you receive packets, there is also a connection.
 2nd step:
 After the previous steps, the Arch base system can finally be installed. To do this, enter pacstrap / mnt base base-devel linux linux-firmware nano . The installation may take some time depending on the network speed.
 3rd step:
 After installing the required software, you have to generate an "fstab" with UUIDs. This is a file that defines which drives are mounted where in the directory tree. To do this, enter the following command: genfstab -Up / mnt> / mnt / etc / fstab .
 4th step:
 For further settings change to the operating system environment of "/ mnt /". To do this, enter arch-chroot / mnt . At this point we recommend setting a root password via passwd . To do this, just follow the instructions.
 5th step:
 Now it comes to the system configuration. If you want to specify a computer name, this works via echo hostname> / etc / hostname . We assume a German installation by Arch. Therefore you have to change the language settings accordingly via echo LANG = de_DE.UTF-8> /etc/locale.conf .
 6th step:
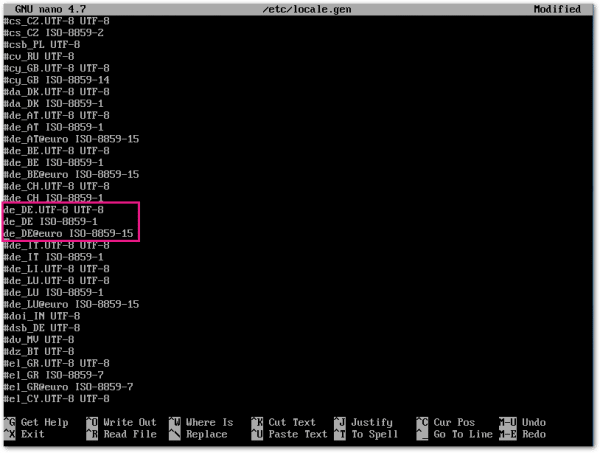 You also have to configure "/etc/locale.gen" using the nano editor. To do this, enter nano /etc/locale.gen . Activate # de_DE.UTF-8 UTF-8 #de_DE ISO-8859-1 # de_DE @ euro ISO-8859-15 by removing the hash # in front of all three options. Save with [Ctrl] + [O] and close nano with [Ctrl] + [X] . Then generate the language settings via locale-gen .
 7th step:
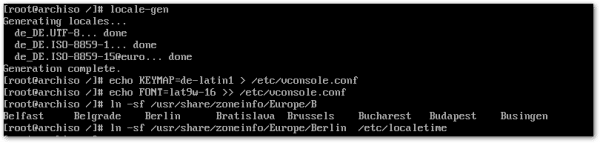 It is also important to define the keyboard layout and font. This works with the commands echo KEYMAP = de-latin1> /etc/vconsole.conf and echo FONT = lat9w-16 >> /etc/vconsole.conf . You can also create a symbolic link for the time zone via ln -sf / usr / share / zoneinfo / Europe / Berlin / etc / localtime .
 8th step:
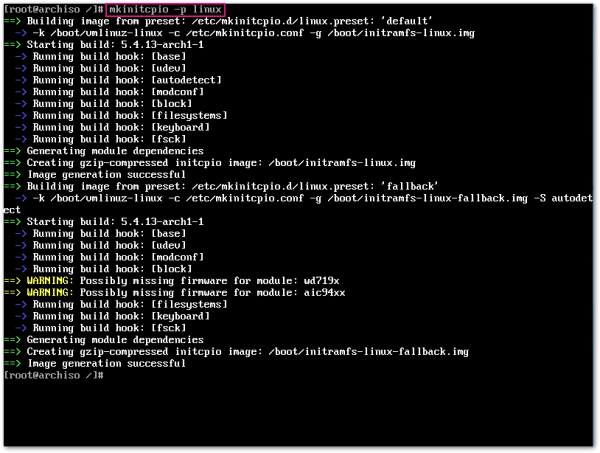 Create an initramfs via mkinitcpio -p linux . The initramfs is an archive that contains files required for the system start. Without this Arch Linux would not boot.
 9th step:
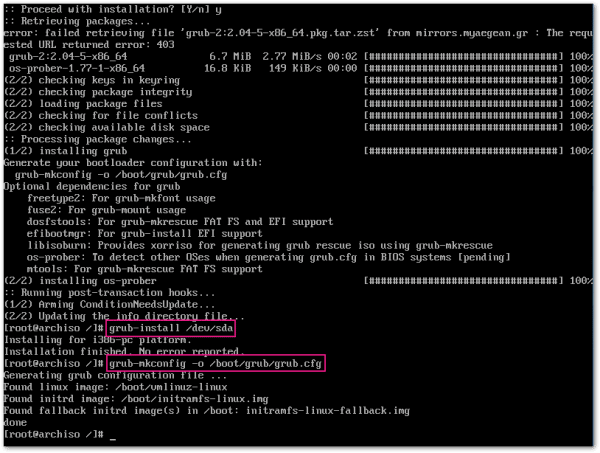 In order for Arch to boot successfully, you need a boot loader. We choose the Grub bootloader. Install this via pacman -S grub os-prober . When booting via BIOS, then enter grub-install / dev / sda . So that the grub file is configured correctly, grub-mkconfig -o /boot/grub/grub.cfg follows . In theory, Arch Linux is now installed. Via exit > umount / dev / sda2 > reboot you would have a working Arch base system. However, without a graphical user interface. You will learn how to install and integrate a desktop in the next instruction.
 Optional: Install desktop environment and window manager
1st step:
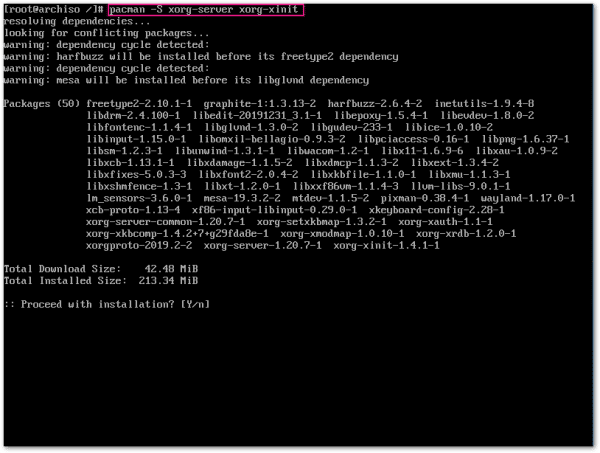 First install the window manager X or X11 so that the basic framework for the basic functions of a GUI is given. To do this, enter pacman -S xorg-server xorg-xinit . You can also install the appropriate driver for your graphics card. A detailed list can be found at archlinux.de. We install the general driver vesa via pacman -S xf86-video-vesa .
 2nd step:
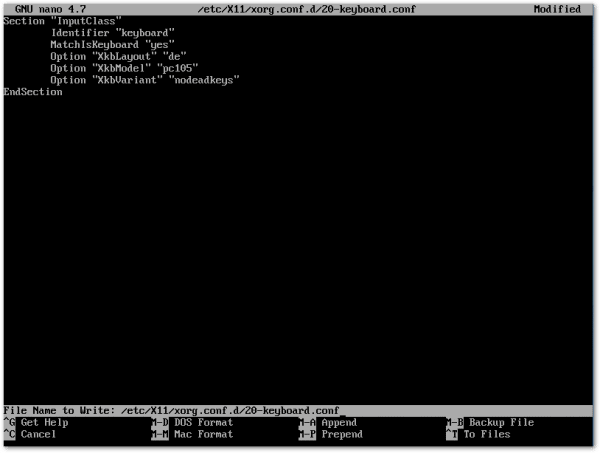 With a German OS it makes sense to configure the keyboard layout in German. Create a file with nano /etc/X11/xorg.conf.d/20-keyboard.conf and write the following into it: Section "InputClass" Identifier "keyboard" MatchIsKeyboard "yes" Option "XkbLayout" "de" Option "XkbModel "" pc105 " Option" XkbVariant "" nodeadkeys " EndSection Save with [Ctrl] + [O] and close nano with [Ctrl] + [X] .
 3rd step:
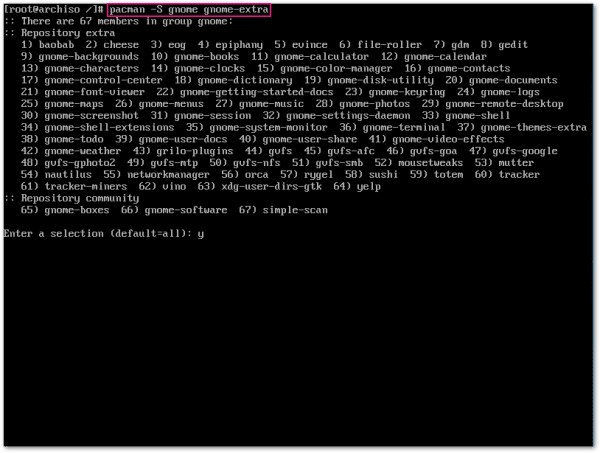 Select your favorite desktop environment for Linux and install it. In our example we choose the Gnome Desktop. This is installed via pacman -S gnome gnome-extra . You can of course also install lighter-weight environments such as LXDE or Xfce.
 4th step:
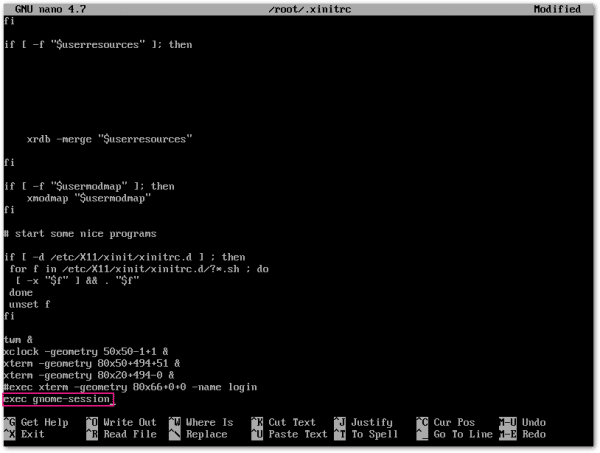 So that the X server knows that Gnome is to be used, you have to activate the line "exec gnome-session" in .xinitrc. To do this , enter nano ~ / .xinitrc and delete the # symbol in front of the line. If necessary, comment out " exec xterm ... " with #. If you don't have a .xinitrc, create one beforehand with cp / etc / X11 / xinit / xinitrc ~ / .xinitrc . Save with [Ctrl] + [O] and close the editor with [Ctrl] + [X] .
 5th step:
 So that Gnome is started automatically via a service from systemmd, enter the following command: systemctl enable gdm . Then log out as the root user with exit .
 6th step:
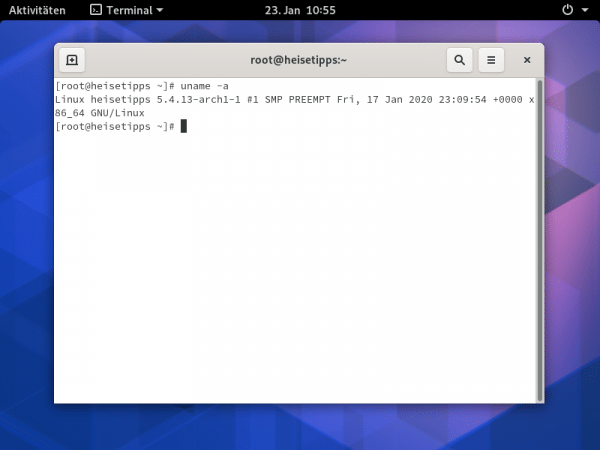 When restarting, select " Boot existing OS " and then " Arch Linux ". Then log in with your user data. You now have a working Arch Linux with Gnome desktop. Now install software, create users and adapt the system.
 Tip: If you have problems installing Arch Linux, we recommend asking in the official archlinux.de forum . There you will find a lot of instructions and explanations in case of problems..