Appealing forms can also be created using tables in Excel in which you can combine buttons, check boxes, list boxes and scroll bars. Other people can then fill out the form and e-mail it back to you as a file, for example using a macro. In the following you will find out how to insert and create elements and which elements are available for tables.
Note : Before you can access any of the controls in Excel, you must turn on Developer Tools in Excel.
Add and format form controls
Follow our step-by-step instructions or take a look at the brief instructions ..
1st step:
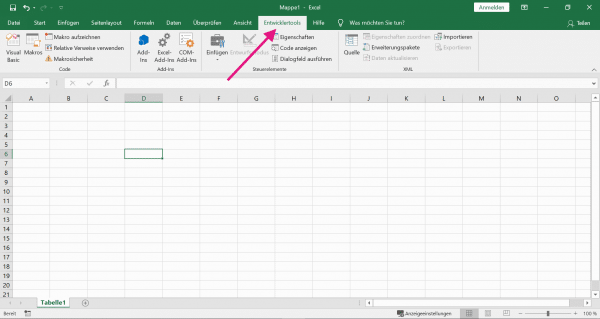
 If you have activated the developer tools , first select the tab of the same name in Excel.
 2nd step:
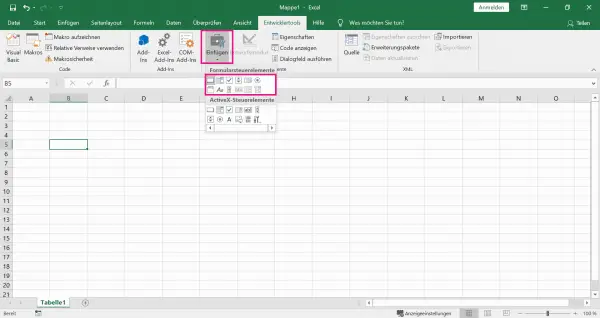
 Under developer tools go to " Insert " and select the desired element under " Form Controls ". Click on the worksheet where you want to insert the control. We select the " Button " element as an example .
 3rd step:
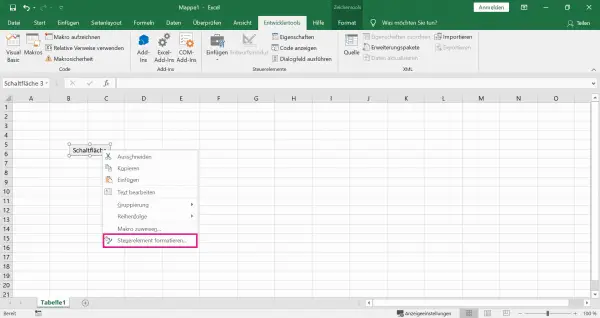
 To change the properties of the control, hold down [Ctrl] and click the control. Here you select " Format Control ".
 4th step:
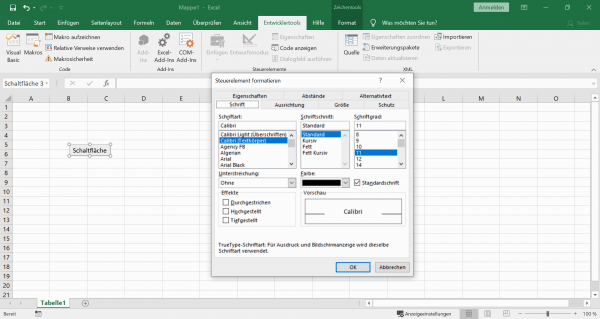
 In addition, the font, alignment, size and other formatting of the element can be adjusted. Repeat the process to add more elements to the form and adjust them as required.
 Overview of all form controls and their functions
So that you can understand the corresponding functions of the control elements in Excel, we have listed the individual elements and their functions for you in a table:
| Control | function |
| button | Define a macro that is to be executed when the button is pressed. As an example, you can set up automatic forwarding of the completed form to your e-mail address for the "Send" button. |
| Check box | By default, the check box can be activated or deactivated. You can also integrate more than just one check box into the Excel table in order to query a selection menu or statuses in the form. |
| List box | A list box displays a list with at least one text element. A selection menu with different options can also be implemented. Excel also offers the option of creating a single-choice and multiple-choice menu. |
| Combo box | You can combine a text field with a list field using a combo box. For example, you can create a drop-down list box under a text field. |
| Scroll bar | Scroll over a range of values using arrows to adjust a percentage, for example. |
| Rotating field | A value can be increased or decreased using arrows. The steps can be determined beforehand. |
| Radio button | Choose one of the options given. |
| Group field | Groups related controls in a rectangle. Optionally, you can also name the unit. |
| description | Simple designation, e.g. to explain the purpose of a cell to the user. |
| Control | function |
| button | Legen Sie ein Marko fest, das beim Betätigen der Schaltfläche ausgeführt werden soll. Exemplarisch können Sie für die Schaltfläche "Senden" eine automatische Weiterleitung des ausgefüllten Formulars an Ihre E-Mail-Adresse einrichten. |
| Kontrollkästchen | Standardmäßig kann das Kontrollkästchen aktiviert bzw. deaktiviert werden. Sie können auch mehr als nur ein Kontrollkästchen in die Excel-Tabelle integrieren, um ein Auswahlmenü oder Zustände im Formular abzufragen. |
| Listenfeld | Ein Listenfeld zeigt eine Liste mit mindestens einem Textelement an. Darüber kann ein Auswahlmenü mit unterschiedlichen Möglichkeiten realisiert werden. Excel bietet zudem die Option, ein Einfachauswahl- und Mehrfachauswahlmenü zu erstellen. |
| Kombinationsfeld | Über ein Kombinationsfeld können Sie ein Textfeld mit einem Listenfeld kombinieren. So können Sie z.B. ein Dropdown-Listenfeld unter einem Textfeld erstellen. |
| Scrollleiste | Über einen Bereich von Werten mithilfe von Pfeilen scrollen, um bspw. einen prozentualen Anteil anzupassen. |
| Drehfeld | Über Pfeile lässt sich ein Wert vergrößern oder verkleinern. Die Schritte können dabei vorher festgelegt werden. |
| Optionsfeld | Wählen Sie zwischen gegebenen Optionen eine aus. |
| Gruppenfeld | Gruppiert verwandte Steuerelemente in einem Rechteck. Optional können Sie die Einheit auch noch bezeichnen. |
| Bezeichnung | Simple Bezeichnung, um bspw. den Zweck einer Zelle für den Benutzer zu erklären. |
You can use these elements to create a beautiful form in Excel. In combination with macros, a form becomes a powerful tool for surveys or similar files. Read here how to create macros in Word. The macros can also be transferred to the application in Excel.
quick start Guide
- Go to " Insert " via Developer Tools .
- Under Form Controls, select the element you want.
- To adjust this, hold down [Ctrl] and click on the control.
- You can now adjust the font and other formatting as you wish.
- Repeat the process with additional items until the form is ready.