File losses are the exception today, but as annoying as ever. We'll show you how to back up important photos, your work, configurations and so on under Linux - in the style of Apple's Time Machine.
What should be secured?
First of all, you need to identify the folders and files that you want to be backed up in the first place. Which files you put where is of course up to you. By default, however, there are two main locations that you should back up: Your personal files are in your home folder, i.e. under "/ home / USERNAME /" - including your desktop, downloads, pictures and so on. Many configurations are located in the "/ etc" folder, which is also worth backing up accordingly.
You can also save a list of all installed programs. If your current system should actually fail, you can not only restore your data on a new system, but also all previously installed programs.
And there are things that you should explicitly not back up: Temporary files, possibly the Downloads folder, the recycle bin, working copies and integrated network folders.
In addition, backups should run automatically, outdated backups should be automatically deleted and it should be possible to restore individual file versions. All of this works wonderfully with the "Back In Time" tool, which is intended for Gnome and KDE, so it fits wonderfully into Ubuntu, for example. Of course, it also works fine with Xfce and other desktops. The whole thing then resembles Apple's Time Machine..
Create the conditions
You need two things: "Back In Time" and a place to store the backups. The installation of Back In Time is super easy and works according to the standard pattern in the terminal with " sudo apt-get install backintime-qt4 ".
You can use an existing second hard drive, mount a USB data carrier or use a network share as the storage location. Network shares are now a separate topic again, but in a nutshell: In a typical network with Samba shares, for example on a NAS, you can integrate folders via the "/ etc / fstab" file.
Assuming you want to include the "Backup_HDD" folder shared on the NAS on your local Ubuntu in your user folder as the "Backup_HDD" folder,then proceed as follows:
- Install support for the cifs filesystem: " sudo apt-get install cifs-utils ".
- In " / etc / fstab " add a - customized! - Line like: " //192.168.178.100/Backup_HDD / home / USERNAME / Backup_HDD cifs defaults, uid = 1000, username = MY USERNAME, password = MY PASSWORD ".
- Mount the share with " sudo mount -a ".
The NAS folder is now available to you under "/ home / USERNAME / Backup_HDD" like a normal local folder in which to store the backups. The fstab line is basically very simple: First comes the shared folder, then the mount point, then the file system (cifs), then the cifs standard options (defaults), the authorized user (user ID 1000 is the current standard users) as well as the login data for the NAS.
If you want to create a list of the installed apps, you can do that with "dpkg --get-selections | awk '{print $ 1}'> ~ / mypackagelist". (Installing the programs on the list then works later with "xargs -a" mypackage list "sudo apt-get install".)
Create backups with Back In Time
You can find the installed Back In Time via the start menu - in two versions: standard and as a root version. If you want to back up system files, for example the "/ etc" folder, start the root version.
Back In Time starts directly with the configuration. Create backup jobs using a total of six tabs, here as one step each:
1st step:
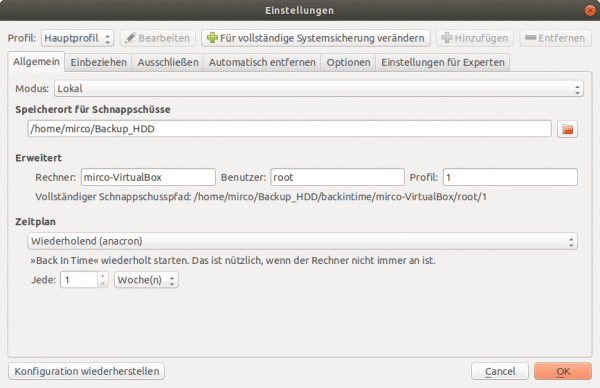 Under " General " you first define the storage location , for example the network share you just created or another folder. You also set the " Schedule ": Perhaps the best option is " Repetitive (anacron) ". As with the other options, you can have daily, weekly or monthly backups made here. The special thing about it: Normally the " cron "Such tasks - but only when the computer is running. Anacron stands for" anachronistic cron "and basically only means that the tasks are carried out if the computer was switched off at the time of the planned execution.
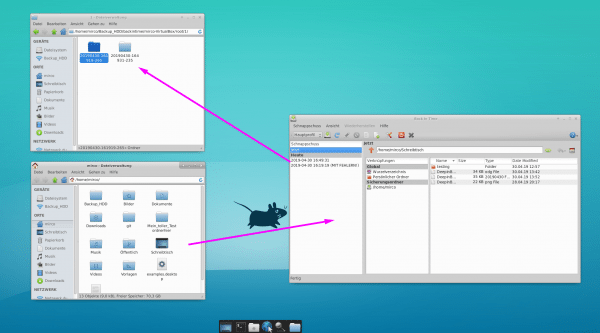
On the left of the window you can see the snapshots you have made. If you select one of them, you will see the saved folder structure including all files on the right in the window. Individual files, folders or entire backups can now be restored with a right-click.
Of course, you can do even more with Back In Time, for example create an additional profile for a complete system backup - the configuration even offers an automatic mechanism for this: Simply create a new profile and click the "Change for complete system backup" button. Then set the schedule and the full backup is ready..
Under the surface, Back In Time happily uses standard tools such as cron, anacron and above all rsync for the actual copying processes. And in the "Settings for experts" you can also set further rsync options manually. With this wonderful backup tool you get a beginner-friendly, simple graphical user interface, but also access to the full power (and reliability) of rsync.