If you want to protect your private data on your Mac, you can hide your private files or folders so that if someone else is using your MacBook, they won't see the hidden files / folders. Or, you can encrypt files / folders on your MacBook so that people who don't know your password cannot open those files / folders..
In this article, we are going to introduce you to 8 ways to hide or encrypt files on MacBook Pro or MacBook Air. Use any of these methods to secure your private files.
1. Activate FileVault
FileVault is the method Apple uses to encrypt your Mac's startup drive. When FileVault is turned on, you must enter your passcode to sign in to your account each time your MacBook starts up or wakes from sleep mode. This will ensure that no one will be able to access the data on your MacBook without your passcode..
Complete the following steps to enable FileVault:
- Go to “System Preferences ...” → “Security & Privacy” → “FileVault”.
- Click on the padlock icon.
- Click on "Activate FileVault ...".
- Once FileVault is enabled, it will start encrypting all of your data on your startup disk in the background.
FileVault is a very primitive method of encrypting your files on your MacBook because your files are no longer protected when your MacBook is unlocked. Read the rest of this article to protect your files with higher security methods.
2. Hidden Library folder
By default, the "Library" folder on your MacBook is hidden. So if you have private files or folders, and you don't want them to be easily found by other people, you can just move those files / folders to the hidden Library folder..
You can access the hidden ~ Library folder from Finder in 2 ways.
1. Click on “Go” in the menu bar. Next, press the "Option" key on the keyboard to display the "Library" folder in the Go menu.
2. Or click “Go” → “Go to Folder”, then type “~ Library” and press “Enter” key. The library folder will be opened.
Move the files you want to hide into the Library folder. This way, other people won't be able to see your files unless they open the Library folder.
What will happen if they open the Library folder? You might not be happy with this method. If so, don't worry. There are much more secure ways to protect your data on your MacBook.
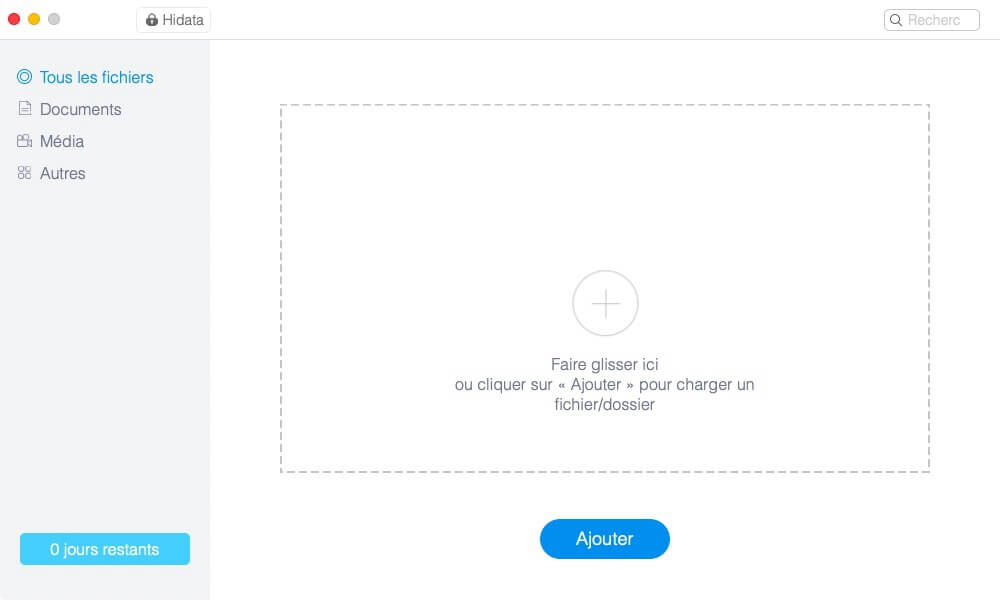
3. Hide and encrypt files with a dedicated application
FonePaw Hidata is an application that not only makes your files / folders invisible on your MacBook, but also encrypts them with a password.
Free try
Just drag the files or folders you want to hide into the app, and those files / folders immediately disappear from their original location, as if they never existed on your MacBook.
While other people cannot see the hidden files, Hidata allows you to easily view your hidden files. To do this, you just need to enter the password you have configured and the hidden files are displayed in the app.
If you no longer need to hide some files, you can reveal the hidden files with just one click with Hidata.
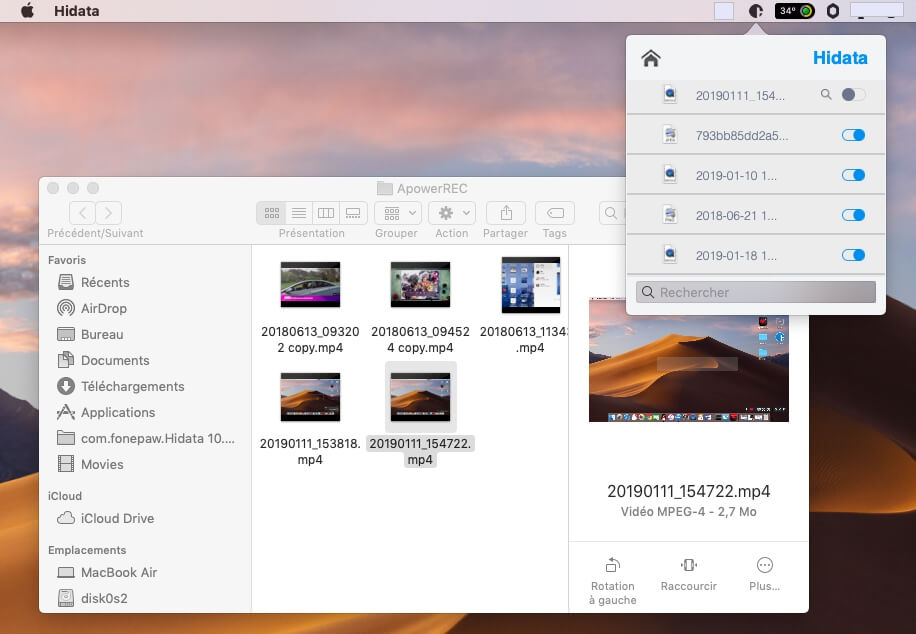
The app can be used to hide and encrypt photos, documents, videos and more. You can download it for free now. (Tutorial: How to hide files / folders with Hidata on Mac)
4. Move private files to another user account
With two user accounts on your MacBook, you can move your secret files to one user account and sign in to another user account when your MacBook is in use by other people. However, it can be quite annoying having to switch from one account to another ...
Follow these steps to move files from one user account to another:
- Log in to the user account containing the private files or folders.
- Open "Finder" → "Go" → "Go to Folder," then type "/ Users /" and click "Go."
- Find the folder named "Shared" and move your private data into the folder.
- Then log into the other user account and go to the shared folder.
- Cut the files and paste them in another folder in the account.
5. Name a file starting with a period
macOS treats files whose names begin with a period as hidden files. So you can make files invisible on your MacBook using this method.
In this example, I have renamed a photo named "123.png" to ".123.png". A pop-up window will appear, indicating that macOS will treat items with names that begin with a period as invisible files. Click on “OK”. The file has greyed out, indicating that it is now an invisible file. Press "Command" + "Shift" + ". (Period) ”and the file will disappear and be completely hidden.
Press "Command" + "Shift" + "again. (Dot) ”, and the file will appear again.
6. Create hidden folder on MacBook
With Terminal's "mkdir" command, you can create a new hidden folder, then drag all your private files into that folder.
- Launch the Terminal. Type "mkdir .hiddenfolder".
- A folder named “.hiddenfolder” will be created in your home directory.
- Navigate to the folder by clicking “Finder” → “Go” → “Home”.
- Press "Command" + "Shift" + ". (Period) ”to make the hidden folder invisible.
Tip: You can name the hidden folder however you like, but always add a period at the start of the folder name.
7. Hide secret files with a terminal command (chflags hidden)
One of the most commonly used command lines for hiding data on a MacBook is this. Follow the next steps to run the command in Terminal.
- Launch the Terminal. Type "chflags hidden" and add a space.
- Drag the file or folder you want to hide into the Terminal. Press "Enter".
The files will become invisible on your MacBook. You can show hidden files with the "chflags nohidden" command.
8. Set the visibility attribute of a folder / file to Invisible
If you have installed Xcode or Apple Developer Tools on your MacBook, then you can set a folder as invisible using the following command line.
- Launch the Terminal. Enter the command line "setfile -a V" and add a space.
- Drag your secret file or folder into the terminal window. Then press “Enter”.
The file / folder will become invisible in your MacBook system. To undo the change, use the following command: "setfile -av" (Note: Replace the uppercase V with a lowercase v).
Among all these methods, Hidata is the most efficient and straightforward way to keep your data invisible and encrypted on your MacBook. If you have important documents, photos or videos that you absolutely don't want to show to other people on your Mac, then I recommend using Hidata.