The line spacing can be changed in OpenOffice with a few clicks. There are several ways to access the paragraph settings. We'll show you these and explain how to set up quick access and how to set the line spacing in the paragraph settings. To do this, follow our instructions:
Preparation: add line spacing to the toolbar (quick access)
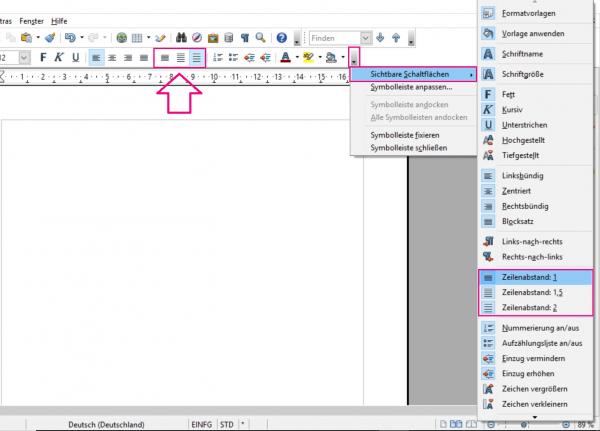
You can include the line spacing " 1 ", " 1.5 " and " 2 " in the toolbar for quick access . To do this, click on "▼"> " Visible buttons " and click the line spacing that should be displayed in the bar. All activated buttons have a blue background:
You can now click the required line spacing in the toolbar at the top. Either you set the line spacing you want before you start writing, or you mark individual sections of text and change the line spacing for these places only. To set personalized line spacing , follow the instructions below:
Change line spacing via paragraph settings
If the predefined line spacing is not sufficient for you, you can also set it manually using the paragraph settings. If you want to set the line spacing for the entire document, you should make the change before you start writing. However, you can also mark different sections of the document here and subsequently define the line spacing only for the marked text.
To do this, follow our step-by-step instructions or take a look at the brief instructions ..
1st step:
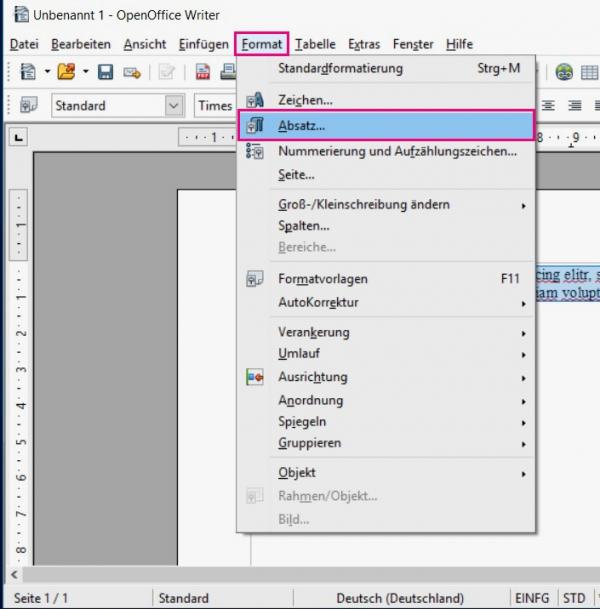 If you want to change the line spacing of a text that has already been written, select it. Regardless of whether you have selected text or want to specify the line spacing from the start: Now open the format settings by clicking on " Format "> " Paragraph " in the tab at the top . Alternatively, you can click the marked text with the right mouse button . Then in the menu select " Paragraph ... " or set the " spacing " a simple, 1, 5-line or two-line Distance a.
 2nd cut:
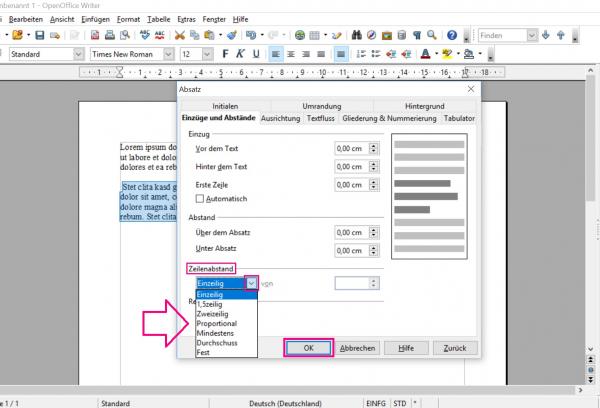 If you clicked on the " Paragraph ... " menu item , this window opens. Here you can now choose the line spacing by clicking on the down arrow next to " Single line ". We explain the different types of line spacing in more detail below in the article. Finally click on " OK " and the line spacing will be adjusted for the entire document or for the selected text.
In addition to the well-known " single-line ", " 1.5-line " and " two-line " line spacing, there are also these additional line spacings:
Proportional:
You can enter a line spacing of 50 to 200 percent (proportional to the font size). That is, if you enter 155, the line spacing will be 1.55 times larger than the font.
At least:
This setting extends the distance in centimeters above the line.
Leading:
Exactly like "At least", only the space below the text line is added here.
Fixed:
Here the distance becomes above and below of the text line in centimeters.
In this picture you can see as an example a change in the line spacing in " Lead " with " 1.50 cm "..
Brief instructions: Change line spacing via paragraph settings
- If you want to change the line spacing of a text that has already been written, select it. To set the line spacing from the start, just start with step 2.
- At the top of the tab, click on " Format "> " Paragraph ...". Alternatively, you can right- click on the text and make the change under " Paragraph ..." or " Line spacing ".
- Now select the type of line spacing in the " Indents and Spacing " tab and, if necessary, determine the size .