If you're using macOS - that is, you have a MacBook, Mac Mini, or iMac - you've probably never thought about reinstalling. Why also? The system runs and runs and ... doesn't it seem somehow lame and sluggish to you? And do some programs or apps keep crashing without you knowing why? Does it start super slow and take forever for the simplest tasks? Well, then we have to confront you with the truth: Macs also litter with time. Of course, if you have a good idea, you can remove the decelerating garbage yourself. But it is much easier to simply reinstall the Mac. It's relatively easy - if you know how to do it.
preparation
1. Create a backup
Tip: It can be worthwhile to clear out your Mac before backing up. For example, remove old programs or files that you are sure you no longer need. This frees up storage space and often improves performance.
Before doing anything that has to do with "reinstallation" make sure that you have backed up all of your data. If you haven't already, now is the time. You can find detailed and illustrated instructions for creating a backup with Time Machine here..
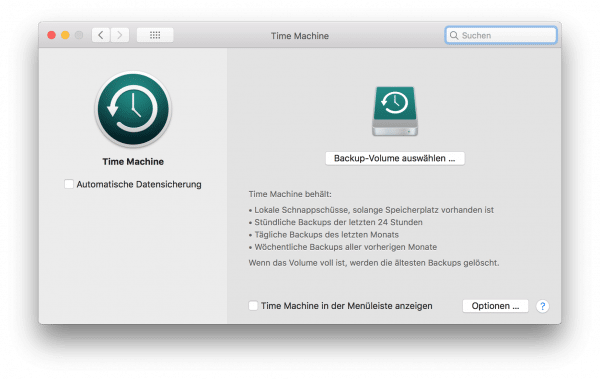
- The best way to do this is to connect an empty USB hard drive to your Mac.
- Then start the “ System Settings ” tool under “ Programs ”. Here you will find the setting " Time Machine ".
- Click on " Select backup volume " and enter the USB hard drive . The Time Machine backup then starts, which can take a few hours depending on the amount of your data.
Note: You should always run Time Machine : The tool regularly backs up all changed data. In case your Mac breaks or is stolen, you always have a backup close at hand. Then, eject the external hard drive and disconnect it from your Mac for safety.
 First, you should create a Time Machine backup.
 Alternatively or additionally, you can also make a manual backup : Simply copy the contents of your user folder (under / Users /) to an external hard drive, a large USB stick, a NAS or the cloud. However, the Time Machine variant is simpler and safer. Then, eject the external hard drive and disconnect it from your Mac for safety..
2. See if you have everything
Next, make sure you have all of the software you will need on a regular basis. Basically, these are installation media and serial numbers , for example for programs such as Microsoft Office or Photoshop. Otherwise you will not be able to reinstall these programs. You can, of course, easily download what you have downloaded from the iTunes or App Store. Only when you are sure that you have all the data, programs, and serial numbers to hand can you begin the actual Mac reinstallation.
3. Important: Deactivate "Find my Mac"
Finally, you have to deactivate "Find My Mac":
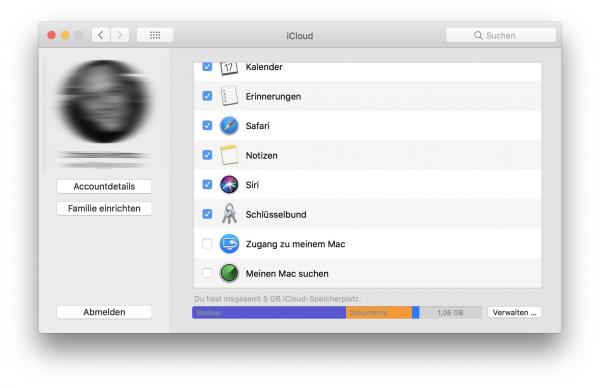
- To do this, go back to the system settings and select " iCloud ".
- On the right is a list of iCloud services, at the bottom is " Find my Mac ". There must be no tick here, if there is, you have to remove it.
- To be on the safe side, you should also log out of iCloud afterwards by clicking on “ Log out ”.
- The iCloud asks you if you want to keep local copies, but it doesn't matter because you are reinstalling the computer anyway. So choose “ keep a copy ” - it will be faster.
 Turn off "Find Mac" and log out of iCloud.
 Reinstallation
1. Shut down your Mac and start it in recovery mode
When you are absolutely sure that everything is backed up on external data storage, you can start with the actual macOS reinstallation:
To do this , restart the Mac once and hold down the key combination (cmd) + (R) during the restart . On older Macs there is a gong that requires you to press the combination at the latest, on newer Macs you should switch the Mac off, then switch it on and then directly hold down (cmd) + (R). This starts the Mac in what is known as macOS recovery , the recovery system for macOS. The start usually takes a little longer than the normal system start.
2. Erase Mac system hard drive
Since the recovery system is on a second partition - this is something like an additional hard drive on your system drive - you can now delete the Mac system from here.
- To do this, the home screen of the recovery to " Disk Utility " and click " Continue ".
- Select your system hard drive here (usually “ Macintosh HD ” if you haven't changed this) and click on “ Erase ”. You can keep the name and format. Attention: There are no more warning messages!
- Click Erase again to remove everything from your Mac hard drive.
- You can then exit Disk Utility by clicking the red dot .
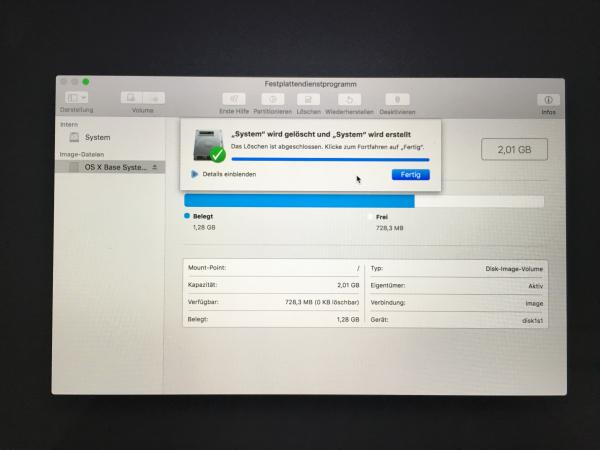 In the system recovery you must first delete the system hard drive.
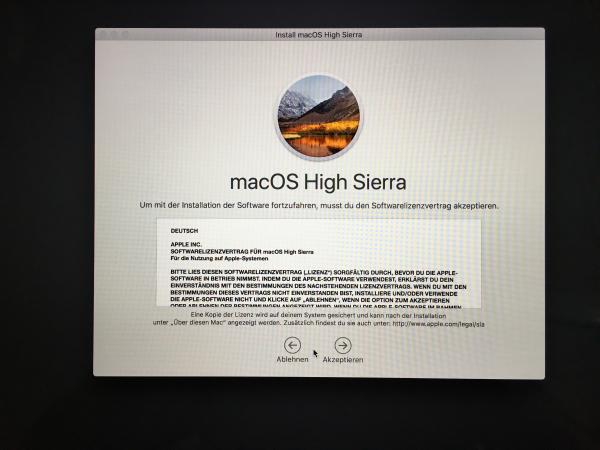
 3. Reinstall macOS
- You are now back in the main Recovery window. Select “ Reinstall m acOS ” and click “ Continue ”.
- Now the actual reinstallation starts. Click on " Continue " again, accept the software license by clicking on " Accept " and then confirm again with " Accept ".
- The installer then shows the system drive. Click on it and select " Install ". The reinstallation will now be carried out.
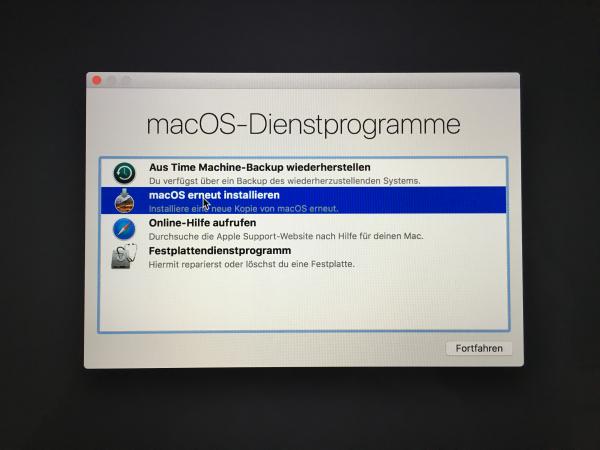 In the system recovery you must first delete the system hard drive.
 4. Set up macOS
The installation can now take a while. Have a coffee or watch an episode of your favorite series on Netflix. Make sure that your Macbook is connected to the power adapter and power during installation so that there are no problems on the way. Then it is time to wait. The Mac may restart several times.
The macOS setup dialog then starts , in which you first select your country (Germany), confirm the keyboard layout (German) and then enter the WiFi password .
 The installation routine is actually self-explanatory.
 5. Restore the backup
A dialog now follows asking you whether you want to read back a backup. If you have made a Time Machine backup, select “ From a Mac, Time Machine backup or startup disk ”. Then click on “ Continue ”. Otherwise, select “Do not transfer any information now ”.
Once you have selected the transfer, you can now plug the backup hard drive into your Mac and select it . Then the reading back of the files and all apps begins, so that the Mac is then as it was before - albeit with a completely fresh basic system. The restore process can take a long time.
6. Sign in to iCloud and finish the installation
Finally, macOS asks you for your iCloud credentials:
- Enter your Apple ID and password .
- Then you have to approve the terms and conditions again by clicking twice on " Accept ".
- Finally, create a user account with a password . If necessary, select " Save files from" Documents "and" Desktop "to iCloud Drive " and click " Continue ".
- You should disable FileVault first, you can set it up later or it will take too long. The rest is done automatically: Your Mac is now reinstalled and ready for use, any damage to the base system has been eliminated.