Make what is displayed on your iOS device project on a bigger screen? What could be more awesome?
A few years ago, the Apple company developed a superb function which allows you to mirror the screen of an iPhone / iPad / iPod touch on a larger screen (computer, television, etc.). Have you used this function before?
It is really very practical, especially if you are at home, relaxed on your sofa, and you want to broadcast on TV or on the PC what you are watching on your small phone or tablet. It's also great when you go to work, already weighed down with lots of files and you have a presentation to give. Yes, you no longer need to bring your PC which is very heavy, take care of your shoulders, because just the mobile device is enough if you have already prepared your presentation for it..
Other than re-casting your mobile device's screen to a bigger screen, what can you do? Video capture with sound! Isn't that great?
However, it is possible that the design of this tool is still a bit hazy in your eyes. But don't worry about anything! This article will tell you more about the subject, and will surely answer the questions you are asking yourself.
To get a clearer idea of this functionality, let's take a look at a few points together:
Part 1: What is AirPlay / iPhone Screen Mirroring?
AirPlay is a feature that was created by the Apple company for its iOS devices. It allows you to share various content (videos, music, images, etc.) or display the entire screen of an iPhone / iPad / iPod touch to a TV, a Hi-Fi system or even on a PC ..
This function works thanks to the Wi-Fi network, of course the connected devices must support it to ensure fluidity of use. Transmitting Apple devices must have iTunes version 10 or higher, and iOS 4.3 or higher.
Recently, in its new iOS 11 update, Apple changed the name of this feature to “Screen Mirroring”. Even though the name has changed, it still works the same way..
Part 2: How to Use AirPlay / Mirroring iPhone Screen on Mac
Using AirPlay / Screen Mirroring with Mac is very easy, just follow the steps below to know how to do it.
Step 1: Make sure your devices are on the same Wi-Fi network
Please make sure that your Mac and the iOS device whose screen you want to display are both on the same Wi-Fi network.
Note: Preferably use a private network to avoid saturation of the connection when mirroring the screen.
Step 2: Activate AirPlay / Screen Mirroring on your Mac
To activate this function on your Mac, go to "System Preferences". Click on the “Monitors” tab, then choose “AirPlay”. Then check the box "Show mirroring options in menu bar if applicable".
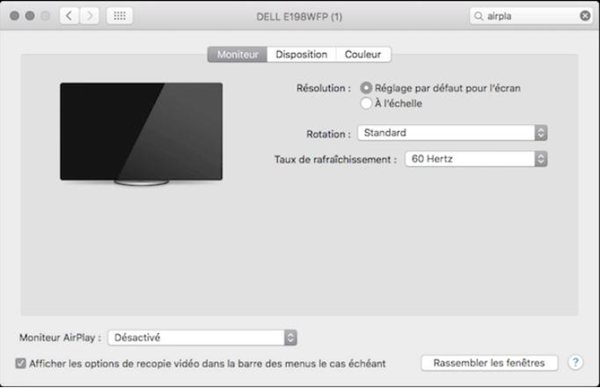
The feature is now available in the menu bar which allows you to mirror the entire screen of your iOS device, you can also use it as a completely separate screen in a second office.
Step 3: Launch AirPlay / Screen Mirroring
Now that the function has been properly configured on your Mac, you can display your iOS device screen there.
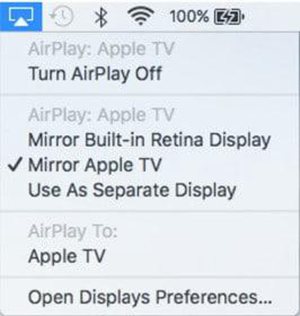
To do this, swipe up from the bottom of the screen to bring up the Control Center.
From there, please activate the AirPlay / Screen mirroring function, by pressing the inscription designating the function.
After a short while your iOS device will be able to detect your Mac, then please press it to connect and your iPhone / iPad / iPod touch screen to appear on the Mac. Its good !
Part 3: How to use AirPlay / Mirroring iPhone screen with Windows
As both iOS and Windows system are different, it is necessary to go through software to be able to connect the two devices.
FonePaw ScreenMo (opens new window) is just the program you need to be able to mirror your iOS device screen to a PC, plus you can also capture audio video with it.
Get FonePaw ScreenMo by clicking the link below to be able to download and install it on your computer.
To know how to cast your iOS device screen to computer with FonePaw ScreenMo software, please follow the steps below.
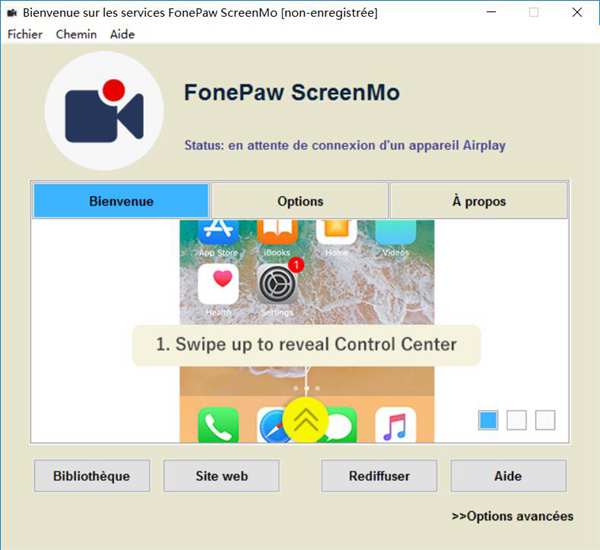
Step 1: Start FonePaw ScreenMo
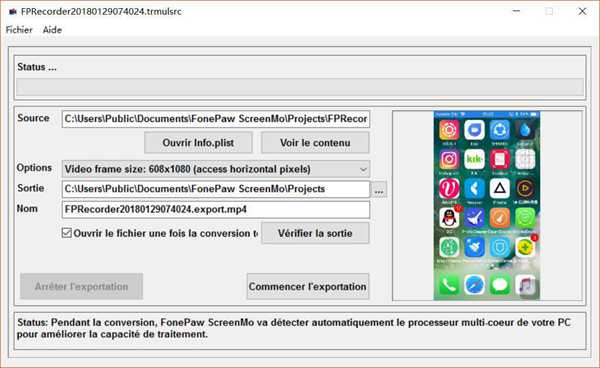
Launch the FonePaw ScreenMo software on your computer by clicking on the icon representing it on the desktop.
A window like the one shown below will appear on the screen.
Step 2: Connect to the same Wi-Fi network
Please make sure that your computer and the iOS device whose screen you want to display are both on the same Wi-Fi network.
Note: Preferably use a private network to avoid saturation of the connection when mirroring the screen.
Step 3: Show your device screen on the computer
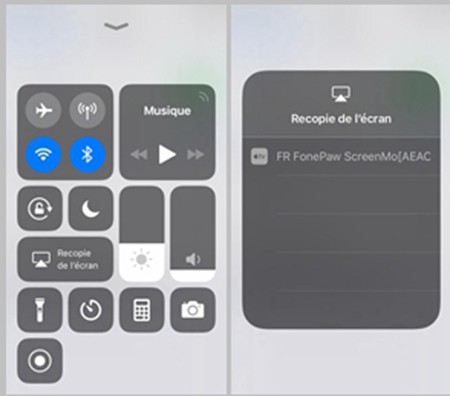
On your iOS device, swipe up from the bottom of the screen to bring up the Control Center.
From there, please activate the AirPlay / Screen mirroring function, by pressing the inscription designating the function.
After a short while your iOS device will be able to detect “FonePaw ScreenMo [your computer name]”, please press it to connect to the software.
Note: You can change the name of the software that is detected by other devices by going to “Options” then “AirPlay Name”. You can also add a password, if you want to limit the connection of devices on FonePaw ScreenMo. Other display configuration details can be found under "Options", and you can change them to suit your preferences.
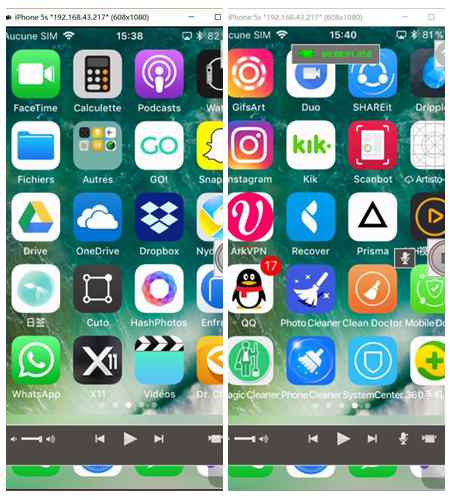
As soon as the iOS device is successfully connected to your PC, your iPhone / iPad / iPod touch screen will be displayed automatically on your computer. You can now scroll through the actions you want to see.
Step 4: Take a video recording of your iOS device screen
Now that your device is connected to the computer and your screen is displayed on that of your PC, you can start recording by clicking on the red button on the right side of the window.
To end the recording simply click again on the red button you just pressed.
Note: If you want to take a video recording with sound, please make sure the microphone has been turned on. On the other hand, if you want to take a silent screenshot, make sure the microphone is turned off.
Determine the latest configurations, save your video capture and it's good!
And There you go ! If you enjoyed this article, please share it with others! And if you have any questions, write to yourself!