Today, mobile devices have become almost as ingenious as computers. No longer being satisfied with the simple functions of calls and messaging, phones and tablets can now help us carry out other activities such as surfing the net, organizing our schedule, taking notes, preparing presentations, taking notes. taking photos and videos, listening to music, drawing, measuring the number of steps you take daily and even counting the number of hours you sleep each night. For this reason, fewer and fewer people are using computers these days..
When is it if we have to give a presentation or want to share on a bigger screen that is displayed on our iPhone / iPad / iPod touch? Or if we need to capture video with audio from our iOS device?
Find out the answer to these questions in this article!
FonePaw ScreenMo (opens new window) is the tool you need to be able to mirror the screen of your iOS device on a PC, in addition you can make a recording at the same time.
This way, you can give a presentation without much hassle, just by bringing your iPhone / iPad / iPod touch and even having the option to record the entire meeting.
Supported operating systems:
- Windows 10 / 8.1 / 8/7 / Vista / XP (32 bit or 64 bit)
Supported iOS devices:
- iPhone X | iPhone 8/8 Plus | iPhone 7 / 7Plus | iPhone SE | iPhone 6S / 6S Plus | iPhone 6/6 Plus | iPhone 5S / 5C / 5 | iPhone 4S | iPhone 4 / 3GS
- iPad Pro | iPad Air 2/1 | iPad mini Retina / 4/3/2/1 | iPad 3/2
- iPod touch 4 | iPod touch 5 | iPod touch 6
Project your iOS screen display to a PC now! Do not wait any longer ! You can experience FonePaw ScreenMo by downloading the free trial version!
After downloading and installing this software, what should I do?
Follow this tutorial to learn how to mirror your iPhone / iPad screen to PC, and even make a video recording with great sound..
Part 1: How to mirror your iPhone / iPad screen
Step 1: Start FonePaw ScreenMo
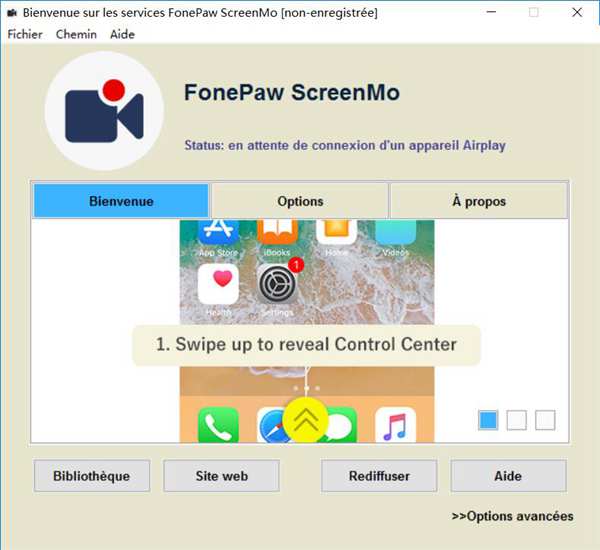
Launch the FonePaw ScreenMo software on your computer by clicking on the icon representing it on the desktop.
A window like the one shown below will appear on the screen..
Note: Simple steps are displayed in the center of the window, you can also follow them to know how to do it. In this tutorial, we provide you with some additional details that are not mentioned there.

Step 2: Connect to the same Wi-Fi network
Please make sure that your computer and the iOS device whose screen you want to display are both on the same Wi-Fi network.
Note: Preferably use a private network to avoid saturation of the connection when mirroring the screen.
Step 3: Show your device screen on the computer
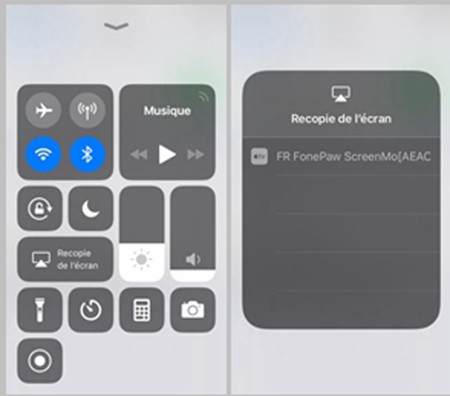
On your iOS device, swipe up from the bottom of the screen to bring up the Control Center.
From there, please activate the AirPlay / Screen mirroring function (from iOS 11 update), by pressing the inscription designating the function.
After a short while your iOS device will be able to detect “FonePaw ScreenMo [your computer name]”, please press it to connect to the software.
Note: You can change the name of the software that is detected by other devices by going to “Options” then “AirPlay Name”. You can also add a password, if you want to limit the connection of devices on FonePaw ScreenMo. Other display configuration details can be found under "Options", and you can change them to suit your preferences.

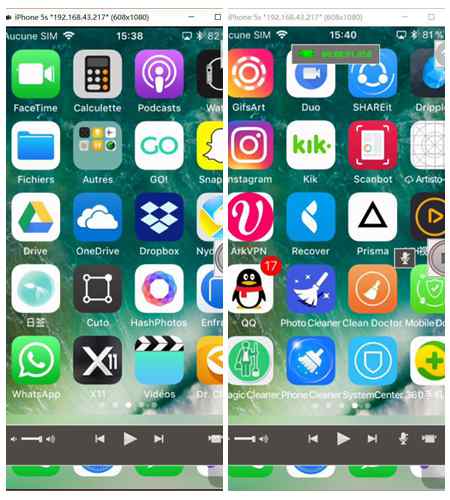
As soon as the iOS device is successfully connected to your PC, your iPhone / iPad / iPod touch screen will be displayed automatically on your computer. You can now scroll through the actions you want to see.
Part 2: How to take a video capture of your iPhone / iPad / iPod touch screen
Now that your device is connected to the computer and your screen is displayed on that of your PC, you can start recording by clicking on the red button on the right side of the window.
To end the recording simply click again on the red button you just pressed.
Note: If you want to take a video recording with sound, please make sure the microphone has been turned on. On the other hand, if you want to take a silent screenshot, make sure the microphone is turned off.

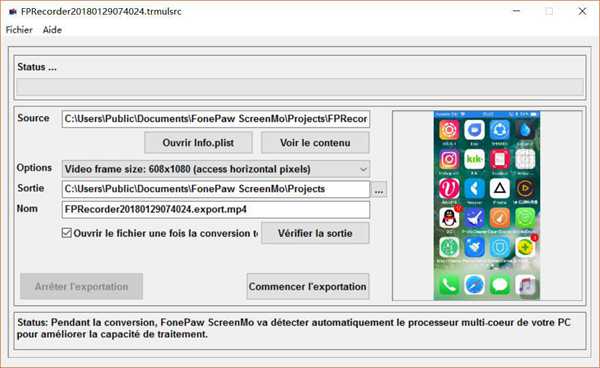
When the screenshot of your iOS device is complete, a window like this will appear. Please configure recording name and output location. Click “Start Export” to finish.

And There you go ! These were very simple steps to be able to mirror your iOS device screen to PC, right? Video capture is also very easy to use, and allows you to make quality recordings during your presentations, or even for other purposes.
Did you know ? You can also perform these operations simultaneously with several devices at the same time! To learn how, please see this tutorial: How to Record the Screen of Multiple iOS Devices Simultaneously (opens new window) .
Did you like the use of this software? So what are you waiting for? Share this article! Many will surely appreciate it!